Category Archives: Original Xhorse Series

Mise à jour de la dernière version du logiciel VVDI PROG version V4.7.6

Mise à jour de la dernière version du logiciel VVDI PROG version V4.7.6

v4.7.6 (2018-10-31)
* This version DON’t need update firmware
* Fix V850 SERIES D70F3558 CHIP READ ERROR bugs
+ Add VVDI PROG USER MUNUAL 4.7.6 version in Doc folder
+ MB90F352E, MB90F352ES, MB90F352TE, MB90F352TES, MB90F352A, MB90F352AS, MB90F352TA, MB90F352TAS, MB90F357E,
MB90F357ES, MB90F357TE, MB90F357TES, MB90F352, MB90F352B, MB90F352S, MB90F352BS options in <2-MCU>-><FUJITSU-MB9XF>
+ Add CX70(2017) option in <5-DASHBOARD>-><CHANGAN>
+ Add FORTUNER(2018) option in <5-DASHBOARD>-><TOYOTA>
+ Add BAOJUN510-TIRE PRESSURE MODULE option in<8-OTHER>-><SAICMOTOR

Mise à jour de la dernière version du logiciel VVDI PROG version V4.7.4

Mise à jour de la dernière version du logiciel VVDI PROG version V4.7.4

v4.7.4 (2018-08-27)

* This version DON’t need update firmware
* Fix some bugs
+ Add VVDI PROG USER MUNUAL 4.7.4 version in Doc folder
+ Add MX25L512E, MX25L1005, MX25L1025, MX25L1006, MX25L1026, MX25L2005, MX25L2006, MX25L2025, MX25L2026, MX25L4005, MX25L4006, MX25L4025,
MX25L4026, MX25L4033, MX25L4035, MX25L8005, MX25L8006, MX25L8025, MX25L8032, MX25L8035, MX25L8036, MX25L8073, MX25L1602, MX25L1605, MX25L1606,
MX25L1608, MX25L1633, MX25L1635, MX25L1636, MX25L1655, MX25L1673, MX25L3205, MX25L3206, MX25L3208, MX25L3225, MX25L3235, MX25L3236, MX25L3239,
MX25L3255, MX25L3273, MX25L6405, MX25L6406, MX25L6408, MX25L6435, MX25L6436, MX25L6445, MX25L6446, MX25L6455, MX25L6465, MX25L6473, MX25L12805,
MX25L12833, MX25L12835, MX25L12836, MX25L12845, MX25L12865, MX25L12873 options in <1-EEPROM&FLASH>->
+ Add MX25L1025(CLIP), MX25L512E(CLIP), MX25L1005(CLIP), MX25L1006(CLIP), MX25L1026(CLIP), MX25L2005(CLIP), MX25L2006(CLIP), MX25L2025(CLIP), MX25L2026(CLIP), MX25L4005(CLIP),
MX25L4006(CLIP), MX25L4025(CLIP), MX25L4026(CLIP), MX25L4033(CLIP), MX25L4035(CLIP), MX25L8005(CLIP), MX25L8006(CLIP), MX25L8008(CLIP), MX25L8025(CLIP), MX25L8032(CLIP),
MX25L8035(CLIP), MX25L8036(CLIP), MX25L8073(CLIP), MX25L1602(CLIP), MX25L1605(CLIP), MX25L1606(CLIP), MX25L1608(CLIP), MX25L1633(CLIP), MX25L1635(CLIP), MX25L1636(CLIP),
MX25L1655(CLIP), MX25L1673(CLIP), MX25L3205(CLIP), MX25L3206(CLIP), MX25L3208(CLIP), MX25L3225(CLIP), MX25L3236(CLIP), MX25L3239(CLIP), MX25L3255(CLIP), MX25L3273(CLIP),
MX25L6405(CLIP), MX25L6406(CLIP), MX25L6408(CLIP), MX25L6435(CLIP), MX25L6436(CLIP), MX25L6445(CLIP), MX25L6446(CLIP), MX25L6455(CLIP), MX25L6465(CLIP), MX25L6473(CLIP),
MX25L12805(CLIP), MX25L12833(CLIP), MX25L12835(CLIP), MX25L12836(CLIP), MX25L12845(CLIP), MX25L12865(CLIP),
MX25L12873(CLIP) options in <1-EEPROM&FLASH>-><mxic(clip)>(Need EEPROM CLIP ADAPTER)
+ Add W25P10, W25P20, W25P16, W25P32, W25P40, W25P64, W25P80, W25Q10, W25Q16, W25Q20, W25Q32, W25Q40, W25Q64, W25Q80, W25X10, W25X16, W25X20,
W25X32, W25X40, W25X64, W25X80, W25P128, W25Q128, W25X128 options in <1-EEPROM&FLASH>->
+ Add W25P10(CLIP), W25P16(CLIP), W25P20(CLIP), W25P32(CLIP), W25P40(CLIP), W25P64(CLIP), W25P80(CLIP), W25Q10(CLIP), W25Q16(CLIP), W25Q20(CLIP),W25Q32(CLIP),
W25Q40(CLIP), W25Q64(CLIP), W25Q80(CLIP), W25X10(CLIP), W25X16(CLIP), W25X20(CLIP), W25X32(CLIP), W25X40(CLIP), W25X64(CLIP), W25X80(CLIP), W25P128(CLIP),
W25Q128(CLIP), W25X128(CLIP) options in <1-EEPROM&FLASH>-><winbond(clip)> (Need EEPROM CLIP ADAPTER)
+ Add XC886CM-8FFI-5V, XC886-6FFI-5V, XC886-8FFI-5V, XC886C-6FFI-3.3V, XC886C-6FFI-5V, XC886C-8FFI-5V, XC886CM-6FFI-5V, XC886LM-6FFI-3.3V, XC886LM-6FFI-5V, XC888-6FFI-5V,
XC888-8FFI-5V, XC888C-8FFI-5V, XC888CLM-8FFI-5V, XC888CM-8FFI-5V, XC888LM-8FFI-5V, XC888CM-8FFI-3.3V, XC888LM-8FFI-3.3V, XC878CM-16FFI-5V, XC878M-13FFI-3.3V, XC878M-13FFI-5V,
XC878M-16FFI-3.3V, XC878M-16FFI-5V, XC878-13FFI-3.3V, XC878-13FFI-5V, XC878-16FFI-5V, XC878CM-13FFI-5V, XC878CM-16FFI-3.3V, XC858CA-16FFI-5V, XC858CA-13FFI-5V options in
<2-MCU>->
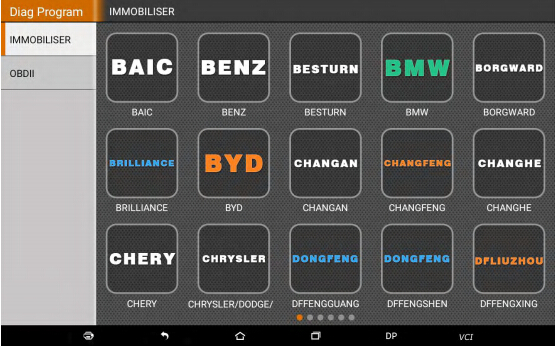
+ Add ALSVIN(2012) option in <4-IMMOBILIZER>->
+ Add AUNEAU-DELPHI-48 option in <4-IMMOBILIZER>->
+ Add VERNA(2017) option in <5-DASHBOARD>->
+ Add K5(2015) option in <5-DASHBOARD>->
+ Add S50(2018) option in <5-DASHBOARD>->
+ Add SANTAFE option in <7-AIRBAG>->
+ Add AVANTE(2017) option in <7-AIRBAG>->
+ Add VV7-AIR-CONTROLLER option in <8-OTHER>->
+ Add MUSTANG-LEFT-DOOR-WINDER option in <8-OTHER>->
+ Add ROEWE-PDC option in <8-OTHER>->
+ Add TIGUAN-HEADLIGHT-CONTROLLER option in <8-OTHER>->

VVDI Prog V4.7.4 Software Download Link

VVDI PROG V4.7.3 Avis de mise à jour

VVDI PROG V4.7.3 Avis de mise à jour

V4.7.3              (2018-07-27)

* This version DON’t need update
  firmware
* Fix some bugs
+ Add VVDI PROG USER MUNUAL 4.7.3
  version in Doc folder
+ Add CAT1021,
  CAT1022,
  CAT1023,
  CAT1024,
  CAT1025 options in
  <1-EEPROM&FLASH>->
+ Add CAT1021(CLIP),
  CAT1022(CLIP),
  CAT1023(CLIP),
  CAT1024(CLIP),
  CAT1025(CLIP) options in
  <1-EEPROM&FLASH>-><catalyst(clip)>
+ Add M25P10,
  M25P16,
  M25P20,
  M25P32,
  M25P40,
  M25P64,
  M25P128,
  M25P80 options in
  <1-EEPROM&FLASH>->
+ Add MC9S12ZVH64,
  MC9S12ZVH128,
  MC9S12ZVHL32,
  MC9S12ZVHL64,
  MC9S12ZVL8,
  MC9S12ZVL16,
  MC9S12ZVL32,
  MC9S12ZVL64,
  MC9S12ZVL96,
  MC9S12ZVL128,
  MC9S12ZVLA64,
  MC9S12ZVLA96,
  MC9S12ZVL128,
  MC9S12ZVLS16,
  MC9S12ZVLS32,
  MC9S12ZVM16,
  MC9S12ZVM32,
  MC9S12ZVMA16,
  MC9S12ZVMA32,
  MC9S12ZVMAL16,
  MC9S12ZVMAL32,
  MC9S12ZVMB48,
  MC9S12ZVMB64,
  MC9S12ZVMBA48,
  MC9S12ZVMBA64,
  MC9S12ZVMC64,
  MC9S12ZVMC128,
  MC9S12ZVMC256,
  MC9S12ZVML31,
  MC9S12ZVML32,
  MC9S12ZVML64,
  MC9S12ZVML128,
  MC9S12ZVFP64,
  MC9S12ZVC64,
  MC9S12ZVC96,
  MC9S12ZVC128,
  MC9S12ZVC192,
  MC9S12ZVCA64,
  MC9S12ZVCA96 options in
  <2-MCU>->
+ Add EC820-BCM option in
  <4-IMMOBILIZER>->
+ Add FENGJUN-6 option in
  <5-DASHBOARD>->
+ Add VW21(R7F7010713) option in
  <7-AIRBAG>->
+ Add W204-FRONT-SAM-MODULE option in
  <8-OTHER>->
+ Add W221-AIR-CONTROLLER option in
  <8-OTHER>->
+ Add W221-SEAT-COMPUTER option in
  <8-OTHER>->
+ Add W221-FRONT-SAM-COMPUTER option in
  <8-OTHER>->
+ Add AIRBAG-F-CHASSIS option in
  <8-OTHER>->
+ Add GATEWAY(XC2060M-104) option in
  <8-OTHER>->

Comment faire un diagnostic en utilisant OBDSTAR X300 DP Plus

Comment faire un diagnostic en utilisant OBDSTAR X300 DP Plus

3 HOW TO DIAGNOSE
3.1 CONNECT VCI CONNECTOR

Procedure to connect VCI connector:

1.Locate vehicle’s DLC socket. The DLC (Data Link Connector or Diagnostic Link

Connector) is the standardized 16-pin connector where diagnostic code readers interface with the vehicle’s on-board computer. The DLC is usually located 12 inches from the center of the instrument panel (dash), under or around the driver’s side for most vehicles. If Data Link Connector is not located under dashboard, a label should be there telling location. For some Asian and European vehicles, the DLC is located behind the ashtray and the ashtray must be removed to access the connector. If theDLC cannot be found, refer to the vehicle’s service manual for the location.

1

2.Plug the diagnostic connector into the vehicle’s DLC socket (It is suggested to use the OBD 2 extension cable to connect VCI connector and DLC socket.). For non-16PIN DLC socket, please select the corresponding non-16 pin connector adapter, then plug the non-16pin end of the adapter into the DLC socket, and then connect the standard 16pinend VCI connector.

3.2 DIAGNOSIS FLOWCHAT

For new users, please follow the 3.1 to get familiar with and start using this device. connect the diagnostic connector –>user registration–>user login–>download or upgrade software–>select function or vehicle type–>proceed diagnosis

3.3 USER REGISTRATION &DIAGNOSTIC SOFTWARE DOWNLOADING

3 .3.1 User registration
Click to enter diagnostic software, select “the user information” in “Settings”

menu, then enter user registration window. As shown in following photo:

2

Fill in the information in each field (Items with * must be filled). After inputting, tap “OK” If you have registered to be a member, click “the user information” to enter user login page, as following picture shown:

3

3.3.2 Download diagnosis software

Tap “One Key Upgrade” to enter one key upgrade page, as following picture shown:

4

Tap “One Key Upgrade” to start downloading, enter main interface after finishing downloading. (Notes: Ensure internet connection is normal when updating. Besides, because of many software, it may take several minutes, please wait patiently) If need to cancel a software, just tap corresponding Check Box as following picture shown:

5

3.3.3 Diagnostic software main interface introduction

6

7
Function menu included as follows:
Diag Program: operate as a diagnostic tool.

Maintenance Database: Provides abundant automotive technology, handbook and repair case for your reference.

Video Center: to guide users by video.

One Key Upgrade: To download diagnostic software or upgrade diagnostic software to the latest version.

Settings: It includes VCI information, language, unit, data records, user information, help, about.

Remote assistance: Realize remote hosting operation.

Report Center: Record maintenance data and diagnostic report.

Inspection Camera: To do a complete detection via flexible tube with HD camera into the vehicles.

3.4 START DIAGNOSING
Tap on the main menu screen, and then choose “Diag Program” to enter the function selection and vehicle selection page. As following photo shown:

8

Hereinafter, take OBDII for example, to introduce how to start diagnosing.

Tap “OBDII”, and tap “OBDII” icon. As following photo shown:

9
To select software version, as following photo shown:

10
To enter diagnostic function menu, as following photo shown:

11
To select AUTO SCAN, as following photo shown:

12

3.4.1 Read vehicle information

Tap “Read vehicle information”, as following photo shown:

13

3.4.2 Read trouble code

Tap “Read trouble code”, as following photo shown:

14
3.4.3 Clear trouble code

15

3.4.4 Read data stream

16

17

VVDI2 et VVDI Key Tool copie transpondeur VW 48 96bit

If you have VV-04 activation (Clone 48 96bit) for VVDI2, you can combine VVDI2 with vvdi key tool and use Copy 48 on Keytool

1) Register Keytool apps on your smartphone:

and connect Keytool via Bluetooth

2) Connect VVDI2 to your PC and go to Transponder Programmer

3) Go to SYSTEMS POINTS

combine-vvdi2-and-vvdi-key-tool-1

4) Connect Keytool to your PC with a USB cable,VVDI2 still connected with a USB cable

combine-vvdi2-and-vvdi-key-tool-2

5) Select BIND VVDI2 and Keytool and press BIND VVDI will display information to connect Keytool to a PC

combine-vvdi2-and-vvdi-key-tool-3

6) Then read the information

combine-vvdi2-and-vvdi-key-tool-4

7) you will be redirected to the login page, enter the same login information you entered when logging in to Keytool on android

combine-vvdi2-and-vvdi-key-tool-5

combine-vvdi2-and-vvdi-key-tool-6

combine-vvdi2-and-vvdi-key-tool-7

8) After logging in you will see the state of VVDI2 and Keytool

9) if you want to transfer points from Keytool to VVDI2 , press OK

10 ) Moved points

combine-vvdi2-and-vvdi-key-tool-8

combine-vvdi2-and-vvdi-key-tool-9

11) VVDI Key Tool for 4896bit count will display the status of points from both devices

combine-vvdi2-and-vvdi-key-tool-10

V5.0.1 Condor MINI Update Information

V5.0.1 Condor MINI Update Information
Modify
Mahindra(India)/XYLO&SCORP10
Honda Cycles(India)/activa 3G
Hero(India)/Splendor Minda, TVS(India)/Tata(India)/Ace,Suzuki(India)/Access(New)
HondaCycles(India)/Spark Minda,SuzukiCysles(India)/Access(New),Hero(India)/Splendor Minda
Honda(India)/BRIO,Tata(India)/Vista,TVS(India)/WEGO,Mahindra(India)/Duro,Yamaha (India)/FZ
Add Key:HU162
Fix some bug

Free Download V5.0.1 Condor XC-MINI Update Software

https://mega.nz/#!QTx3yYKb!OW3Mc4sBaMqUSCUfWtPM4__Od-OPkemRe2j4EfPHRLo
ikeycutter-xc-mini-condor

VVDI2 dernière mise à jour du logiciel V5.3.0

VVDI2 dernière mise à jour du logiciel V5.3.0

************************************************* *********************
*** 2018-03-22
*** Require firmware V5.2.5
************************************************* *********************
===== VAG V5.3.0 =====
1. Improvement for prepare MQB dealer key
2. Improvement for MQB keyless GO key learning
3. Improvement for BCM2 dump tool
4. Support write immodata for Audi RB8 type
5. Bgufix for customer request in diagnostic unit
6. Bugfix for MED17/EDC17 online decode PIN/CS
7. Bugfix
===== BMW V5.3.0 =====
1. Improvement for FEM/BDC key learn
1. Bugfix
===== Porsche V5.3.0 =====
1. Support porsche 911,997, boxster 987 keylearn: Menu->Key Learn->Transponder Key – 911,987, Boxster 987, Cayman
2. Bugfix
===== PSA V5.3.0 =====
1. Bugfix
===== Transponder Programmer V5.3.0 =====
1. Immobilizer data tool: bugfix for Asia->Suzuki->SX4->2006 93C56
2. Immobilizer data tool: bugfix for America->Jeep->Laredo->2008 uPD70F
3. Immobilizer data tool: bugfix for Euro->Fiat->Grand Punto->93C86
4. Bugfix
===== Copy 48 (96 bits) V5.3.0 =====
1. Bugfix
===== J2534 V5.3.0 =====
1. Bugfix
===== Online Upate Tool V5.3.0 =====
1. Bugfix
===== Quick Start V5.3.0 =====
1. Bugfix
https://mega.nz/#!zp5xzZaQ!jlaj4a3qKpc5PKTY5eJ1_3r4v8RhgHhvKO5qsIImVR4

VVDI2 Commander Key Programmer for VW/Audi/BMW/Porsche V1.2.3

v2.2.3(2016-11-16)

===== Support software version ====
VAG V1.2.3
BMW V1.2.3
Porsche V1.2.3
PSA V2.0.5
Passthru J2534 V1.2.3
Online Update Tool V1.2.2
Quick Start V1.2.3
You can find the detail update information from Readme in newest software, Mainly include:
1. Fix bug for lost all key via OBDII: support keyless Go cars
2. Prepare remote: Add support for Chevrolet Epica
3. Update remote database
Update Steps:
1. Close other VVDI2 software, Connect VVDI2 to PC with USB cable
2. Choose VVDI2 firmware version
3. Press button “Update Online” to start
—————————ATTENTION!!!—————————
If failed, close antivirus and firewall software, try again
DON’t shutdown your PC or disconnect USB cable while updating!!!

Original Xhorse V2.1.2 VVDI MB BGA Tool

===== BENZ V2.1.2 =====
1. Attention: All user update device to firmware v2.1.2, software v2.1.2
2. User manual v1.6 released, overview v1.6 released
3. Support Repair KM: Menu->Special Function->KM Repair, support w204, w207, w212, w211, w166, w246, w231, w205
4. Support read/write gateway: Menu->Special Function->Read/Write CGW(ZGW)
5. Support Read/Activate blank BGA key(0CF4): Read Write Key->Read blank BGA(0CF4) EIS data
6. Support read current HASH in key(Repair key): Read Write Key->Key current HASH (Repair key)
7. Support unlock key track: EIS Tools->IR->Enable Key
8. Support another type (Continental)ISM read/write/erase
9. Bugfix