Étapes pour réinitialiser les paramètres de l’outil de diagnostic Vident iSmart800 Pro
Le scanner de diagnostic automatique iSmart800 Pro est un nouveau scanner de diagnostic automobile Vident pour les véhicules de tourisme 12V. Avec une interface Android conviviale et une navigation facile, un disque dur à semi-conducteurs de 72 Go, un processeur Cortex-A17 1,3 GHz, une communication facile avec les voitures, un écran tactile LCD 7″ 1024 × 600 HD IPS, iSmart800 Pro prend en charge tous les systèmes de diagnostic ECU pour plus de 100 Marques de voiture, ainsi qu’avec plus de 40 fonctions de service courantes. La tablette sans alimentation peut vérifier la voiture.
Habituellement, certains de nos clients suppriment accidentellement un logiciel ou une autre application, ils souhaitent donc réinitialiser la machine et l’utiliser à nouveau.
Ici, nous partageons les étapes de cette opération
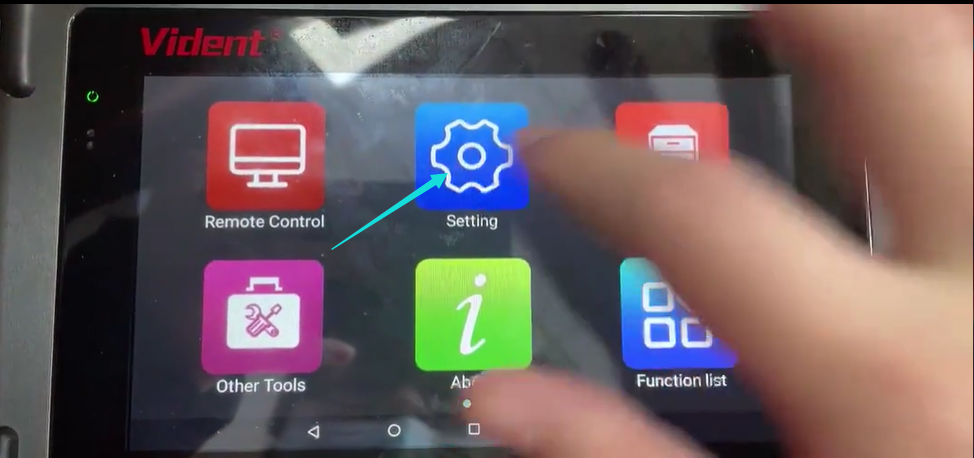
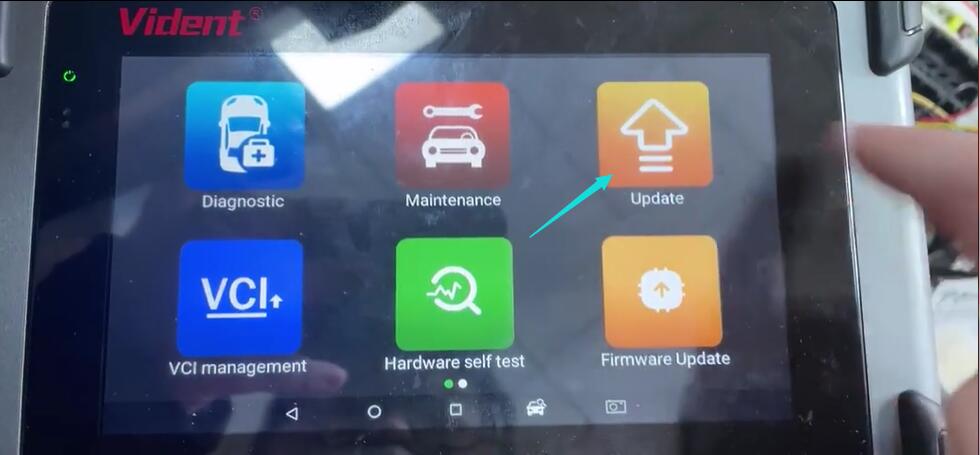
1.Sélectionnez d’abord les paramètres sur l’écran principal
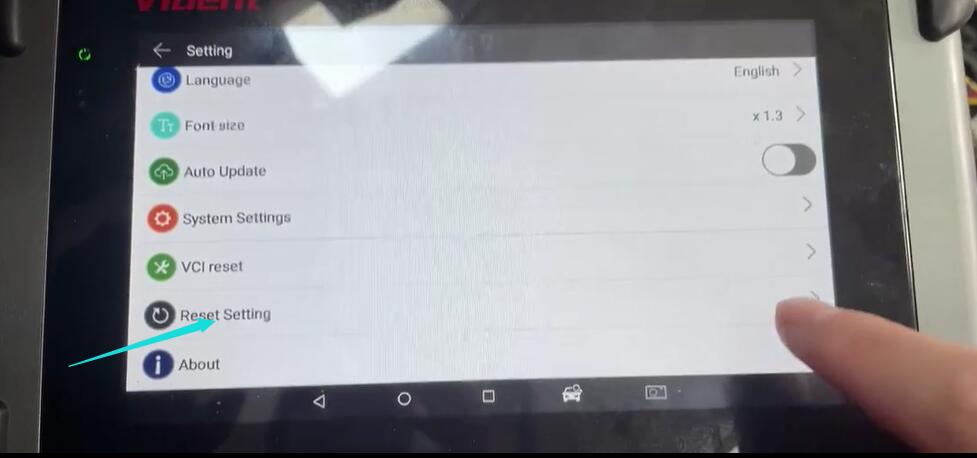
2.Entrez les paramètres et recherchez “Réinitialiser les paramètres”
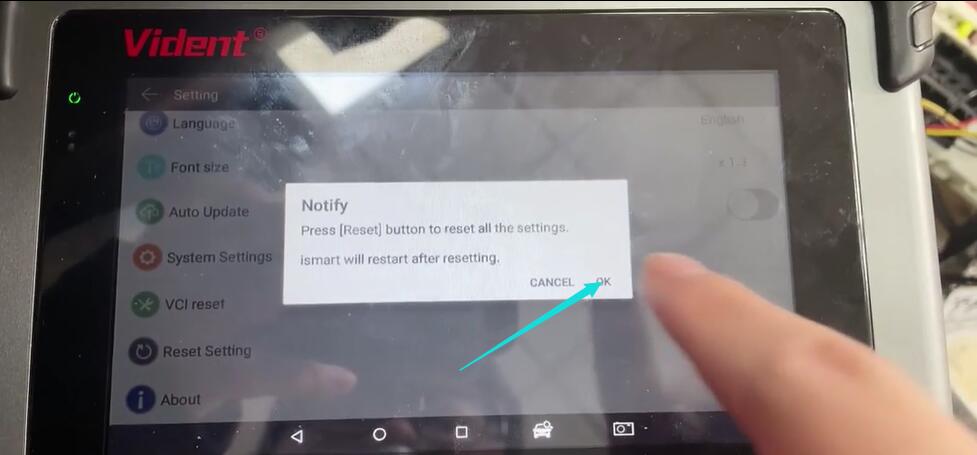
3.Il apparaîtra un message “Appuyez sur le bouton 【Réinitialiser】 pour réinitialiser tous les paramètres, puis cliquez sur” Ok “pour continuer
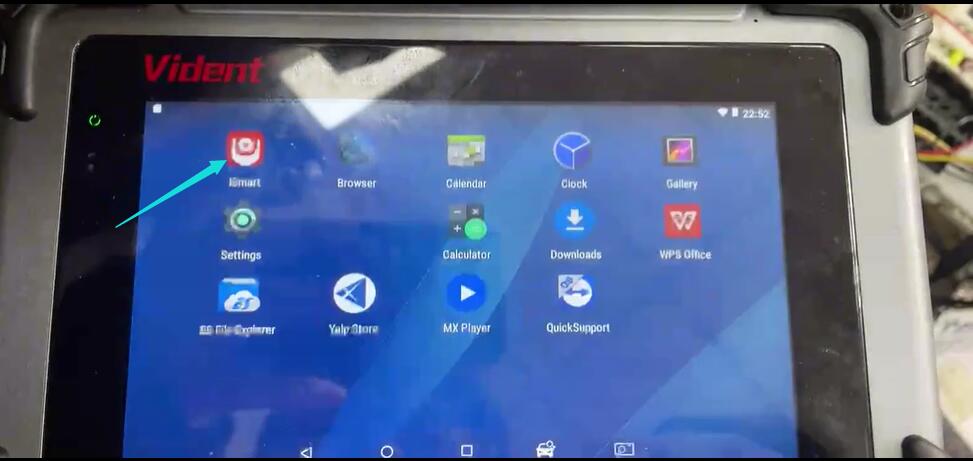
4.Revenez à l’écran principal et cliquez sur “iSmart”
5.Cliquez sur “Mettre à jour” pour terminer le processus
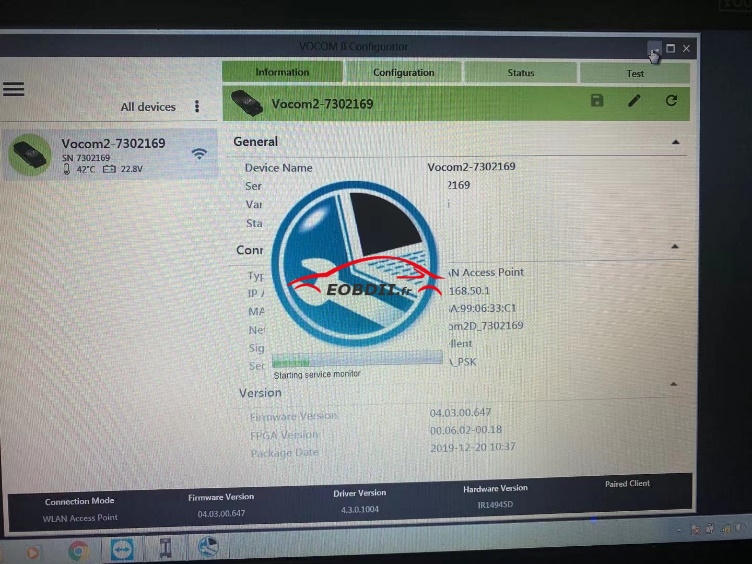
Guide de configuration et de mise à jour du micrologiciel du dongle VOCOM IIVOCOM2 WIFI
Le dongle VOCOMII, produit par ACTIA en Allemagne, couvre toutes les fonctions du VOCOM2 VOCOMII 88890400, qui n’a pas besoin d’accessoires de câbles car il peut être parfaitement connecté à l’ordinateur portable via WIFI.C’est un appareil de communication de véhicule portable pour sa taille et lester.
Ici, nous partageons les étapes sur la façon de configurer le wifi et aussi la mise à jour du firmware
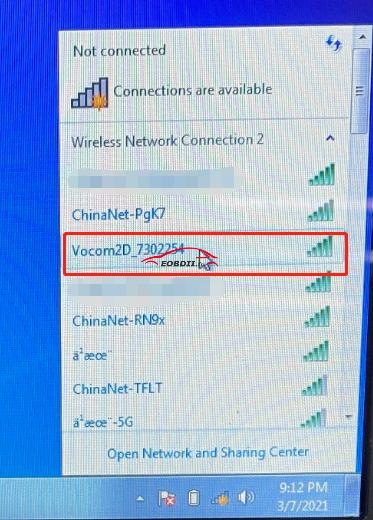
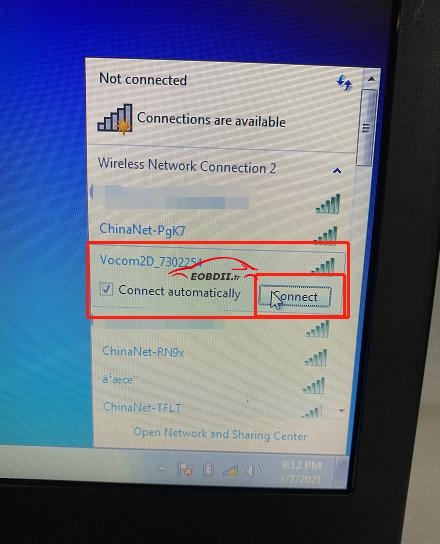
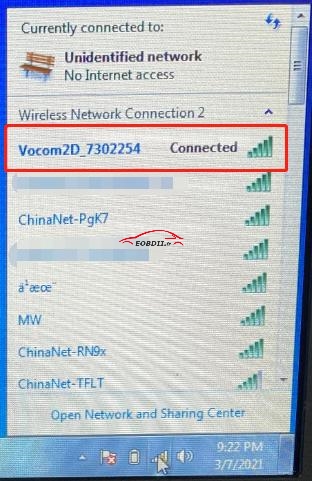
1.Allumez le dongle vocom2 et les lumières clignoteront.Trouvez le signal WIFI Vocom2D_* de l’ordinateur portable.Cliquez sur connecter.
2.Entrez “v2d+ SN num”, le numéro SN est composé de 7 chiffres que vous pouvez trouver à l’arrière du dongle VOCOM2. Cliquez ensuite sur OK. Et c’est fait.
Guide de mise à jour du micrologiciel : Veuillez vous assurer que le dongle vocom2 est alimenté par un calculateur ou un camion 24 V. Une basse tension affectera la mise à jour du micrologiciel.
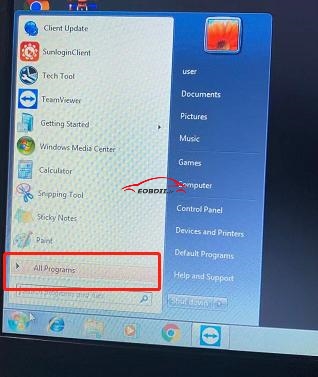
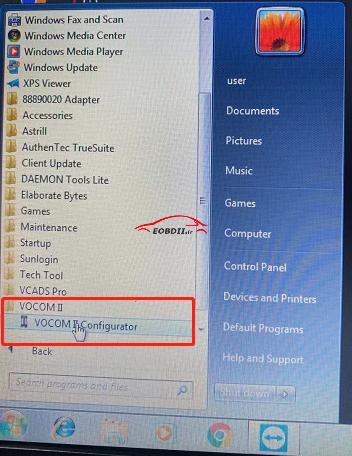
Après avoir bien réglé le WIFI, allez dans Tous les programmes puis VOCOMII
Cliquez sur le configurateur VOCOMII.
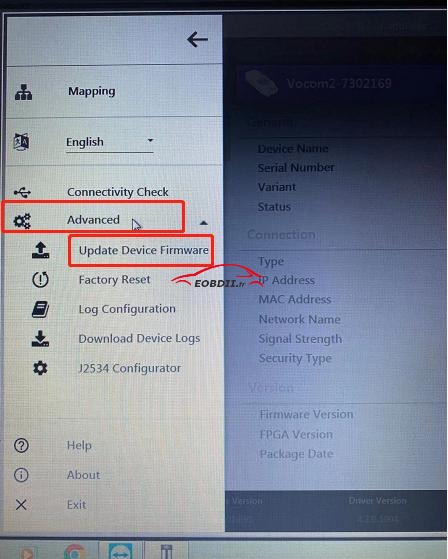
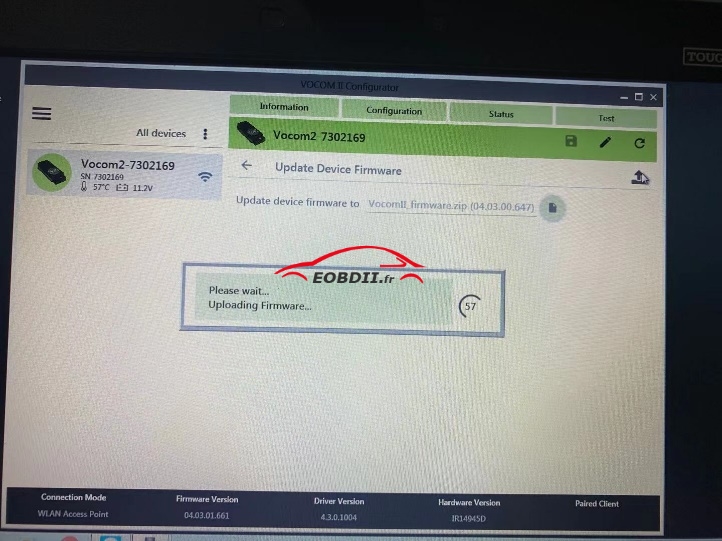
Vous verrez les fenêtres comme ci-dessous. Et cliquez sur l’endroit comme les images ci-dessous.
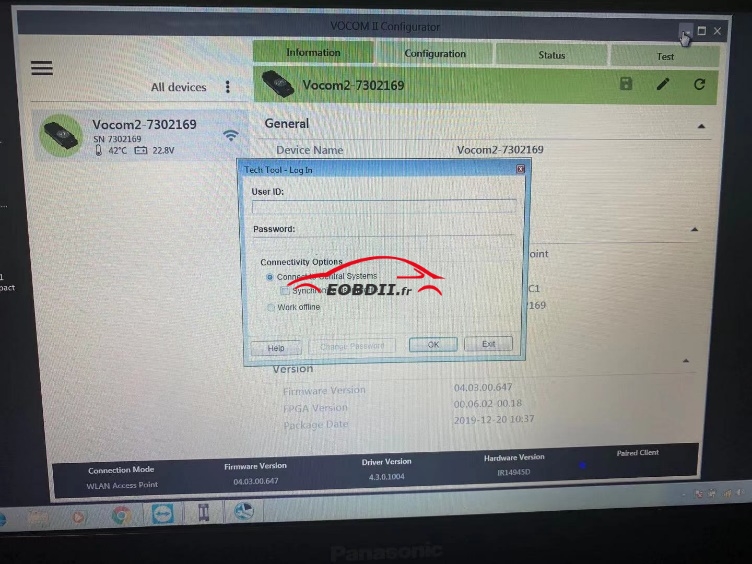
Ensuite, choisissez “Avancé” Mettre à jour le micrologiciel de l’appareil
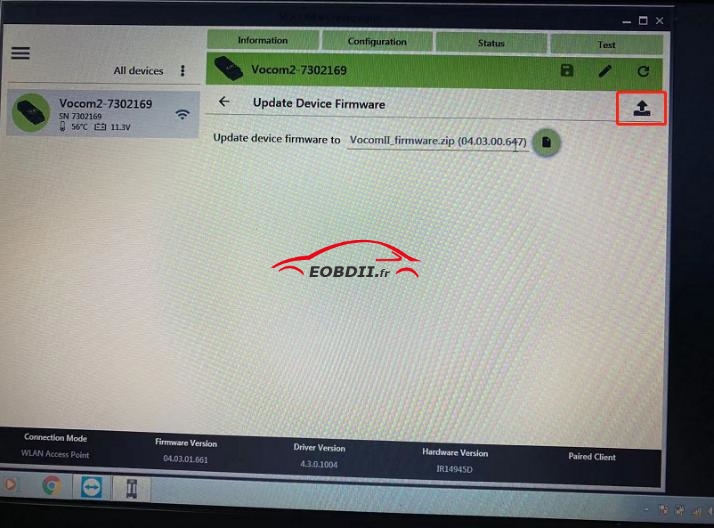
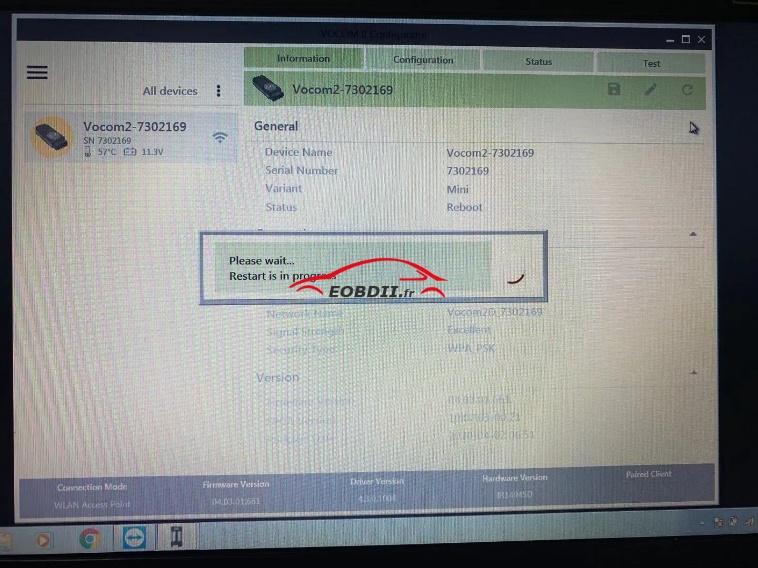
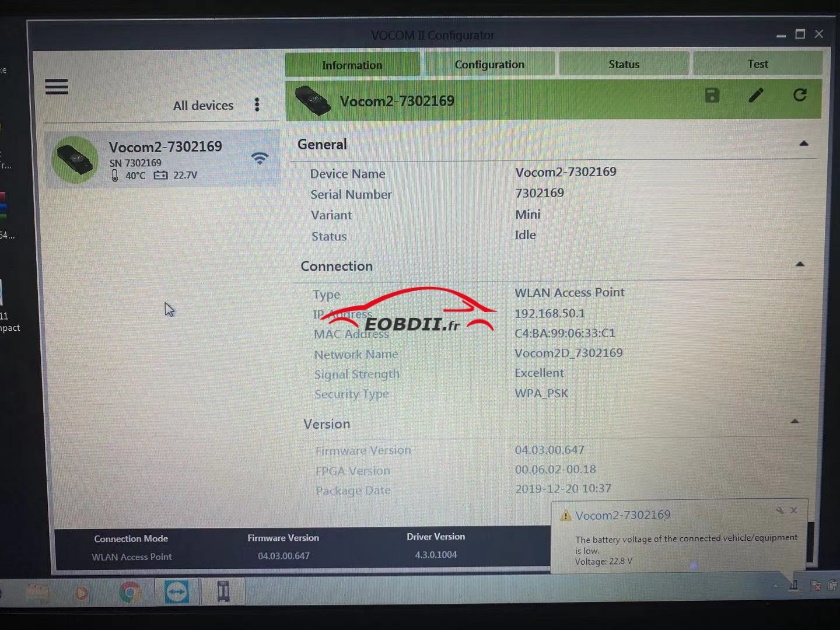
Vous verrez les fenêtres comme ci-dessous. Et cliquez sur l’endroit comme les images ci-dessous. Et attendez jusqu’à ce qu’il soit terminé.
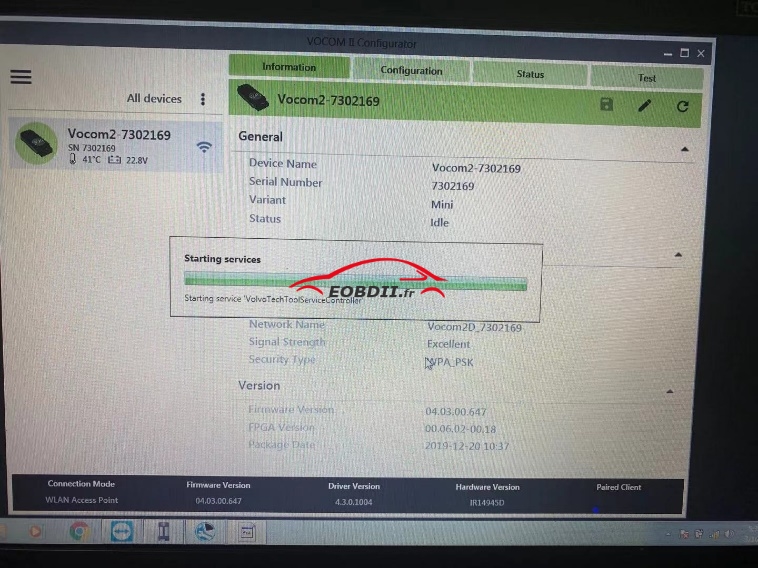
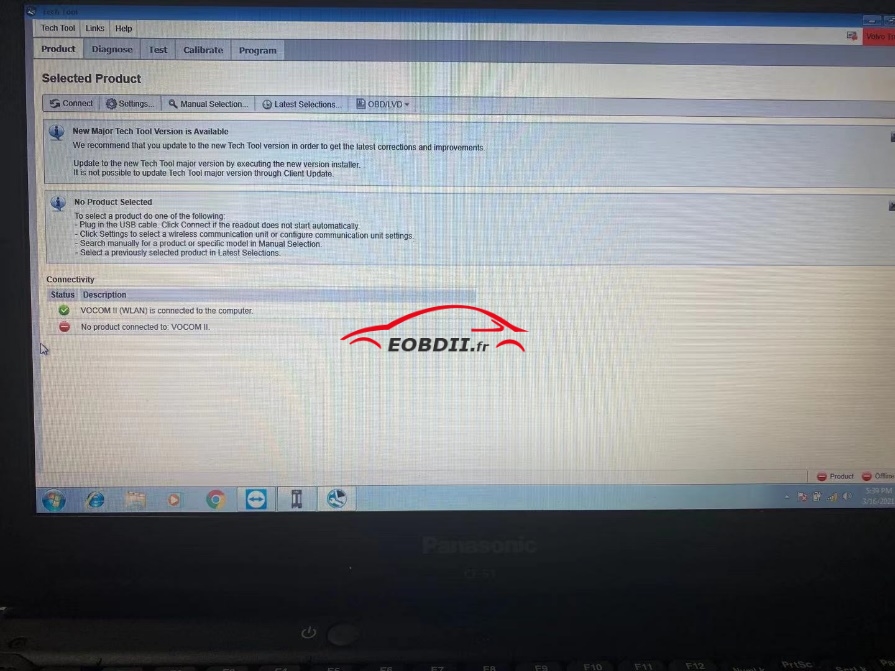
Il exécutera automatiquement TECH TOOL une fois la mise à jour du micrologiciel terminée.
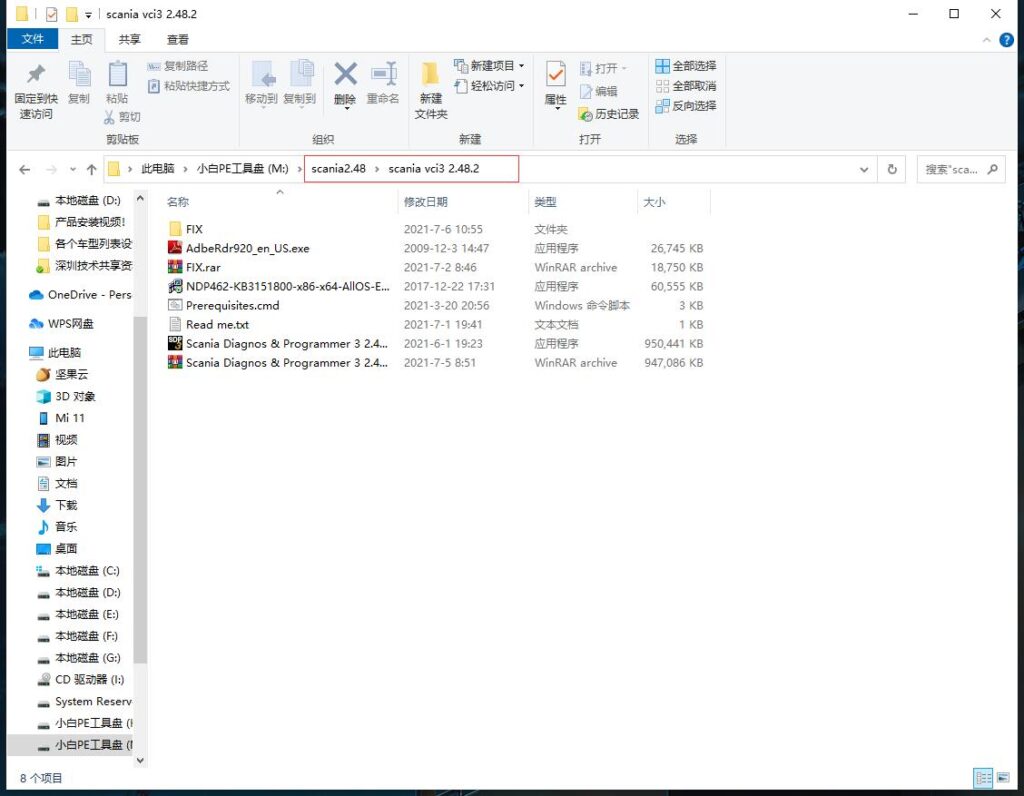
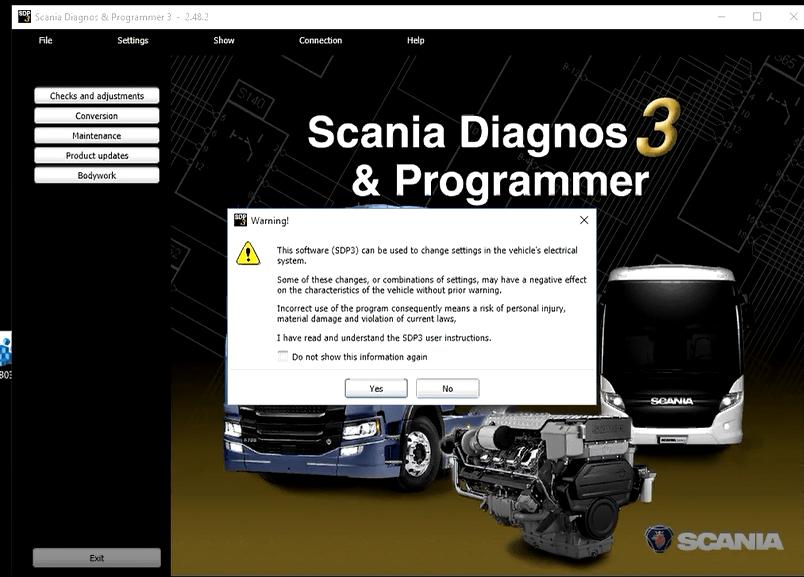
Scania VCI3 est livré avec la dernière version de SDP3 (V2.48), Scania VCI3 est un tout nouvel outil conçu par Scania pour fournir une maintenance complète pour tous les camions, bus et autres véhicules lourds ou moteurs lourds Scania. Cet outil est un remplacement parfait pour l’interface Scania VCI 2.
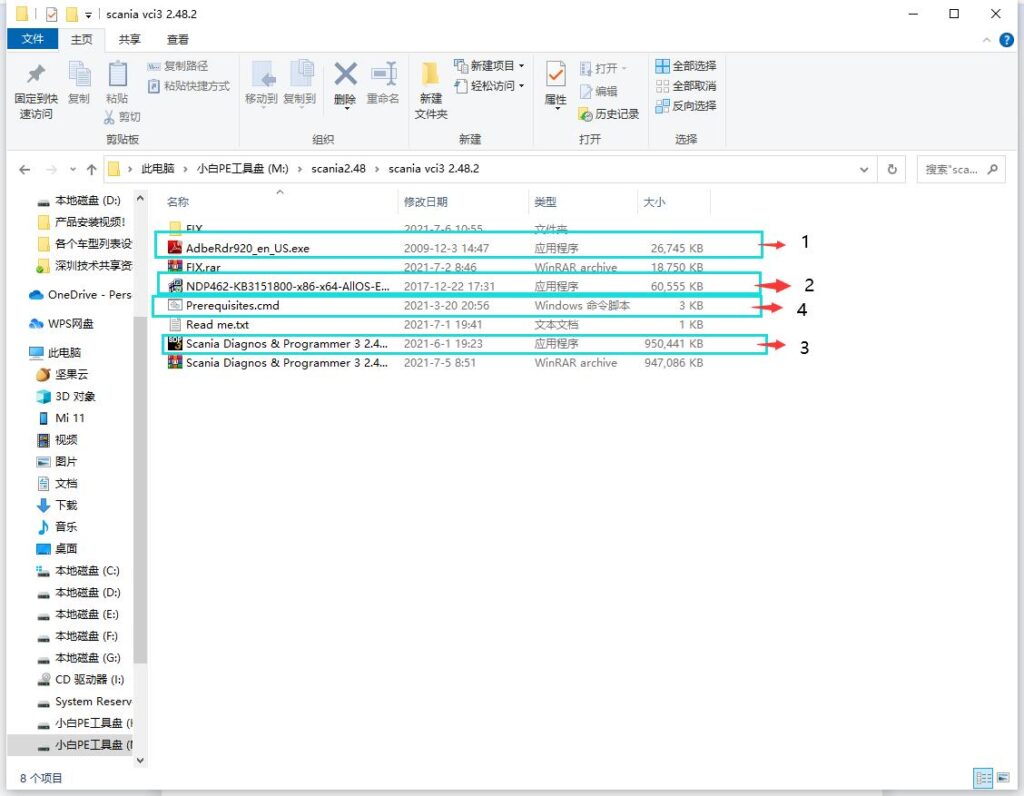
Mais comment installer le logiciel ? C’est le problème le plus important pour les clients Ici, nous partageons les étapes pour aider le client à installer le logiciel en douceur
1.open the scania vci 32.48.2 foler
2.Install in the order of the pictures below, the order cannot be wrong! (The installation software is all run as an administrator)
Note: After the installation of the fourth software (Prerequisites.cmd) is complete, the computer needs to be restarted once! ! ! If the computer does not restart, continue to install the software, the software will not be available! ! !
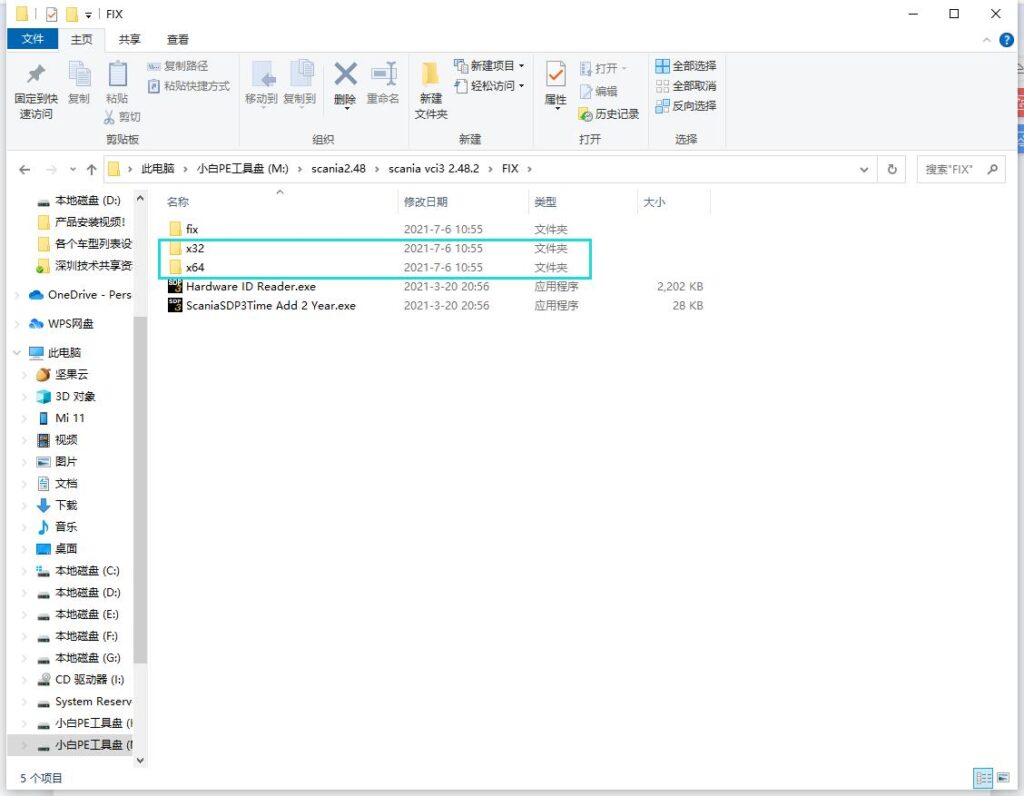
3.After opening the scania vci3 2.48.2 folder, enter the Fix folder directory, and select the following files according to the system of the computer. If the computer is a 32-bit system, choose X32, and if the computer system is a 64-bit system, choose X64. (Choose the wrong computer system installation will cause the installation to fail!!!)
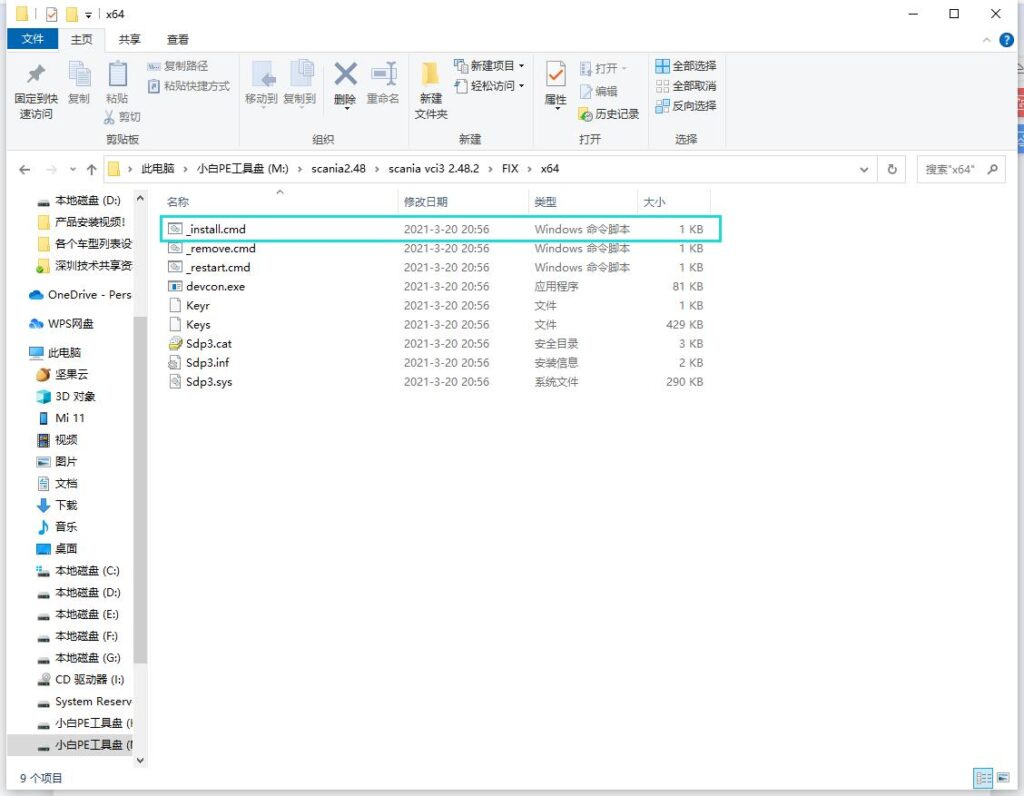
4.After opening the folder, select the first file to run (run as administrator!!!)
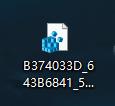
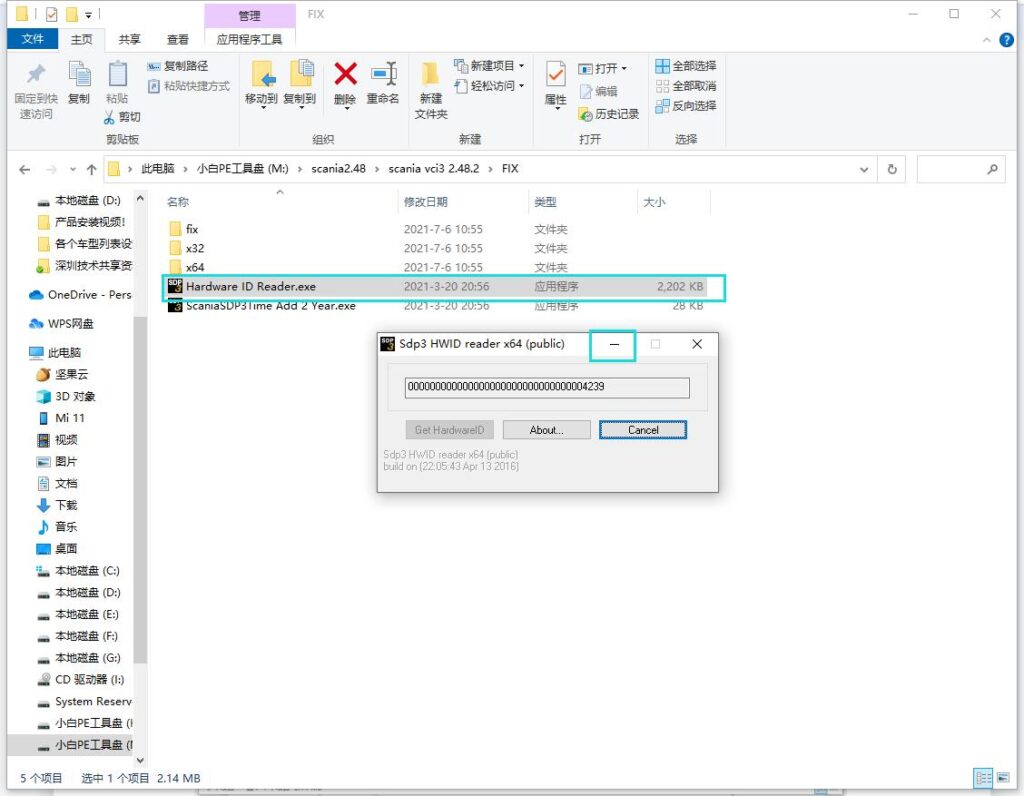
5.Return to the Fix folder, run the Hardware ID Reader file (run as an administrator!!!), after opening it will prompt a string of digital codes, if your numbers are the same as the picture demo, the installation will fail. The software needs to be uninstalled and reinstalled! ! ! The correct numeric code should look something like this :78113F059337D68A39C9F422271CF8AB42FA Give the correct digital code to the engineer for activation, the engineer will send you an activation file like this
,Just put the activation file on the desktop and run it. (It should be noted that when running the Hardware ID Reader software to generate an ID, the Hardware ID Reader software cannot be closed, because closing the Hardware ID Reader software will invalidate the ID file registered by the engineer. So minimize the Hardware ID Reader software and let it run in the background just fine)
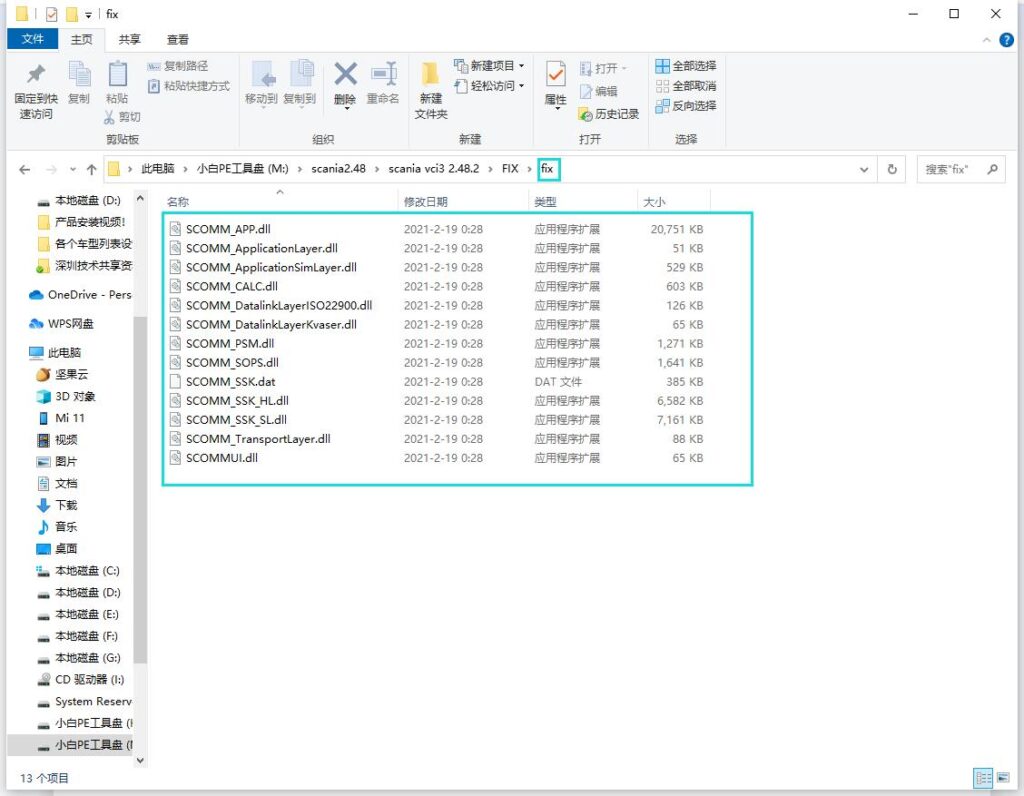
6.Enter the fix folder of Fix and select all the files in the fix
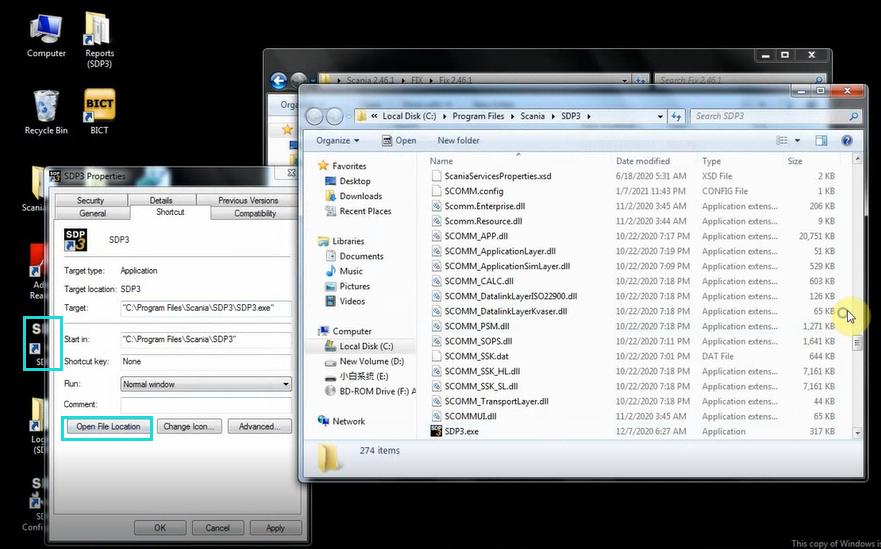
Copy all the files in the selected fix to the location of the desktop SDP3 files. (Prompt whether to replace the current file, select yes to all) Right-click to open the SDP3 software on the desktop, select Properties, and then select the location of the open file
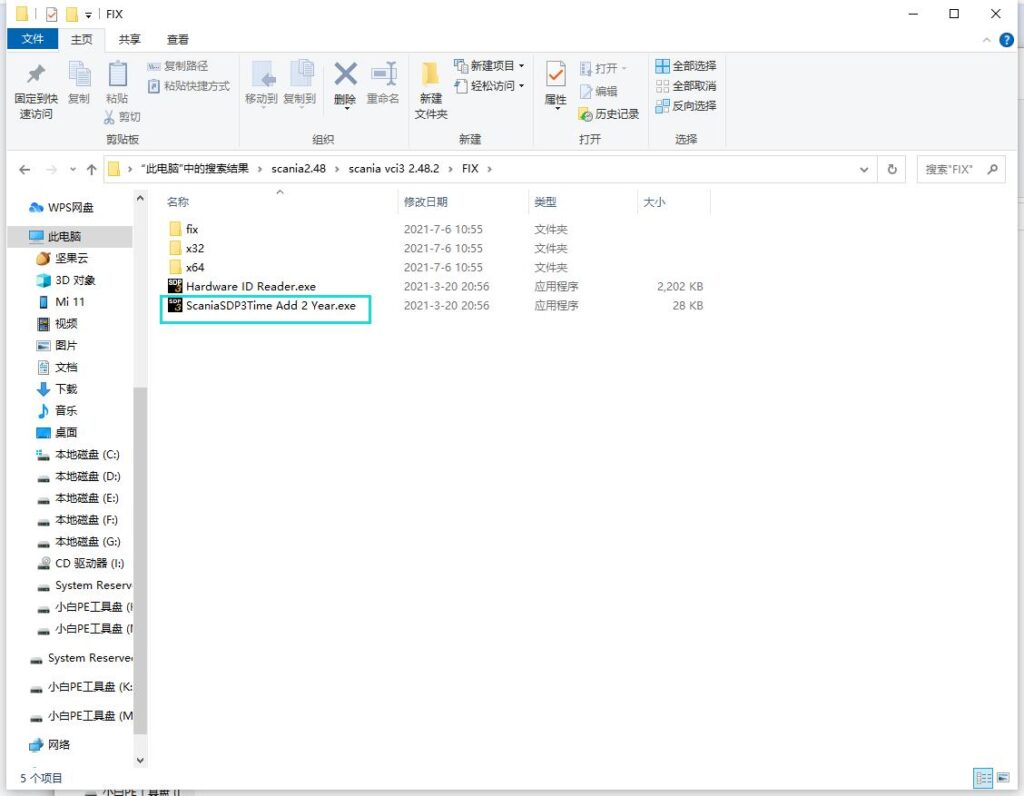
7.Then go back to the Fix file and run the Scania SDP3 Time file (run as administrator!!!) After the software prompts success, do not close the Scania SDP3 Time software. (Be sure to restart the computer immediately!!! Otherwise the installation will fail)
8.After restarting the computer, open the SDP3 software, there is a menu bar on the left, indicating that the software has been installed successfully.
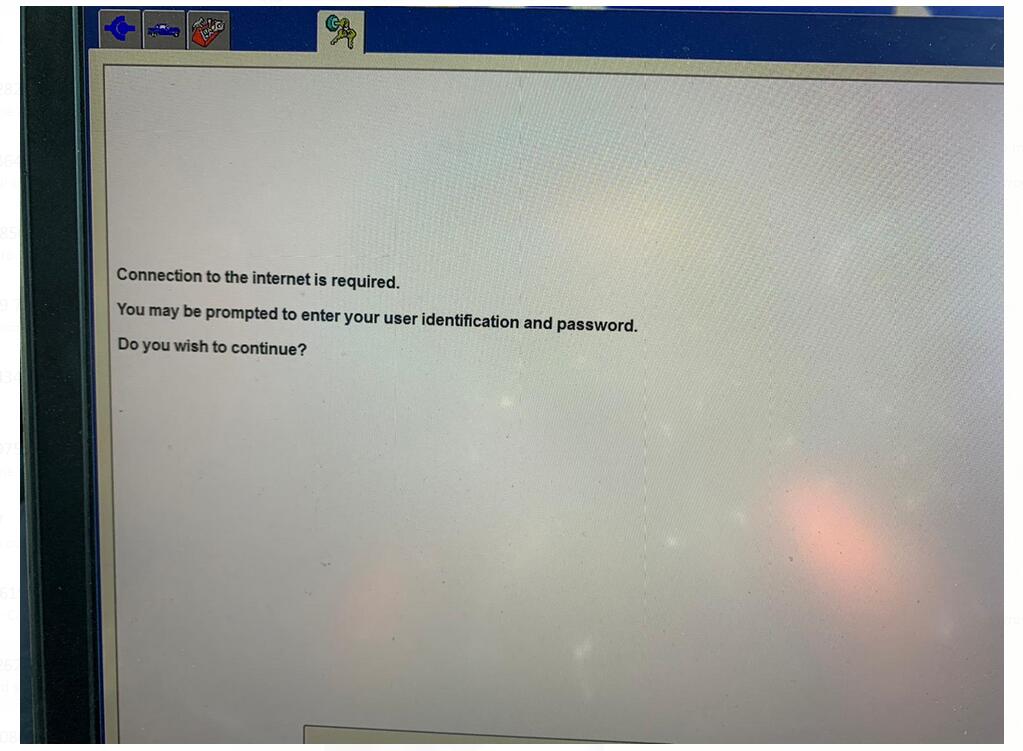
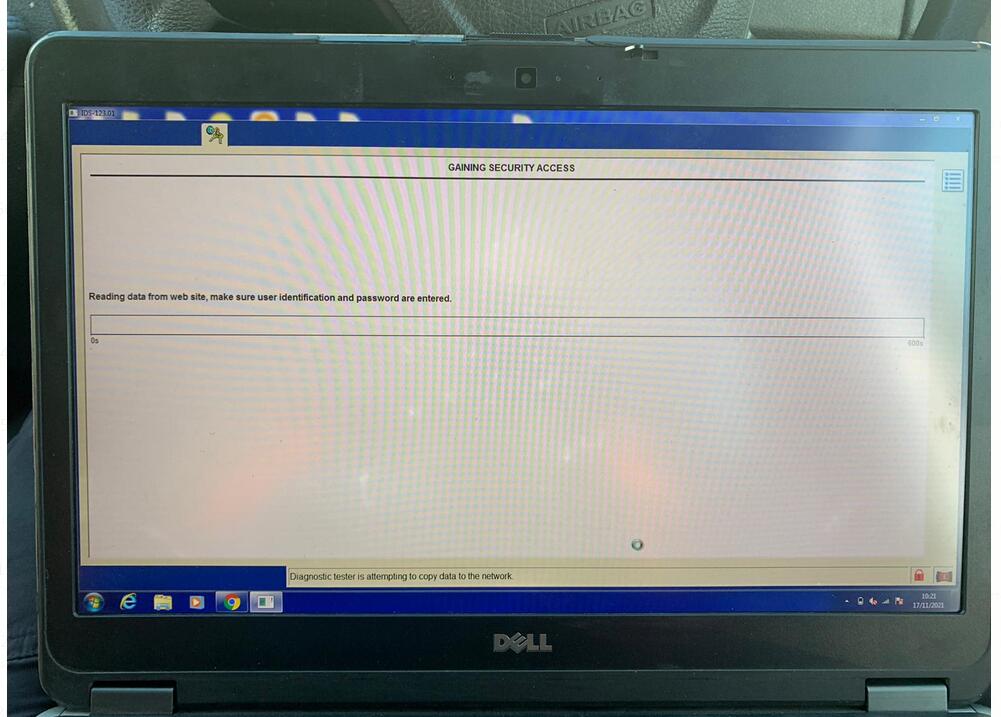
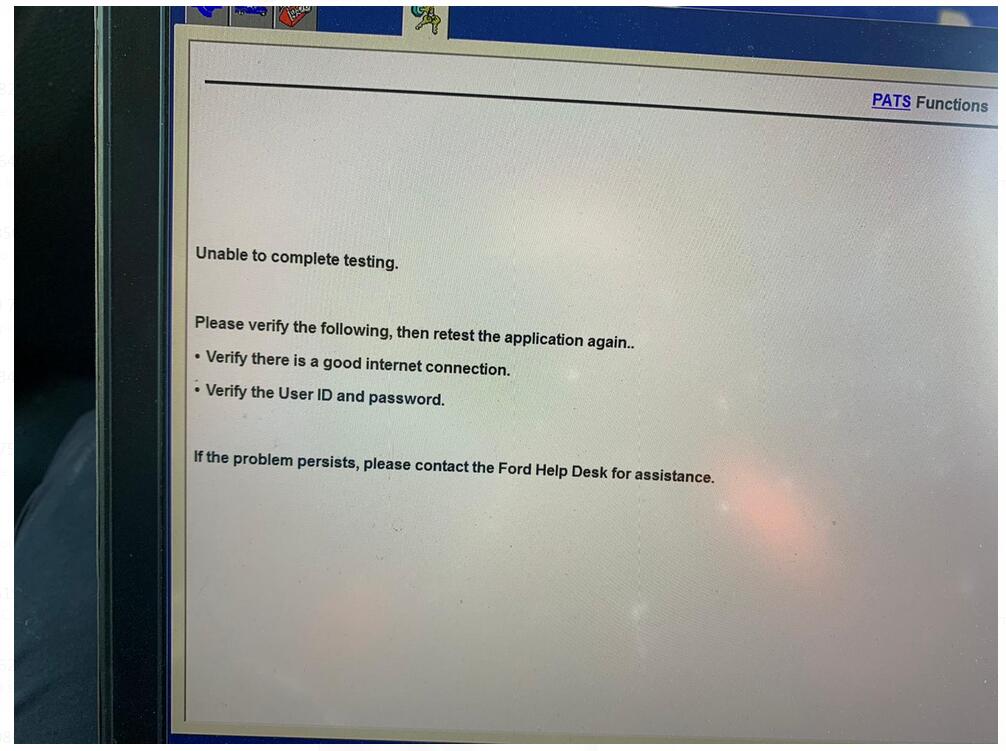
L’un de nos clients a acheté un appareil SVCI J2534 et souhaite l’utiliser pour effectuer la programmation en ligne Ord Transit 2015 PATS. Mais pendant le test, il montre un échec de connexion. Voici les photos partagées par le client
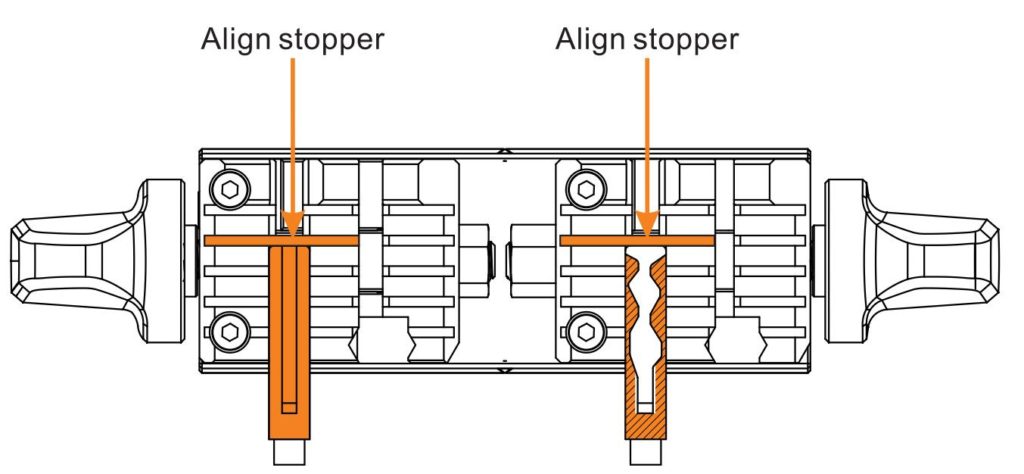
L’alignement des touches comprend l’alignement des épaules et l’alignement des pointes: 1) L’alignement des épaules est montré dans les images ci-dessous
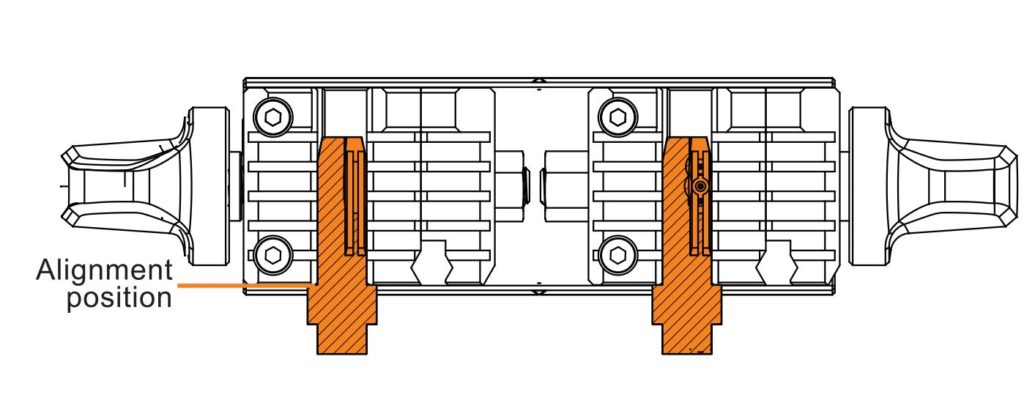
2) L’alignement de la pointe est indiqué dans les images ci-dessous.La butée d’alignement est utilisée pour la clé fixe en fonction du type de clé
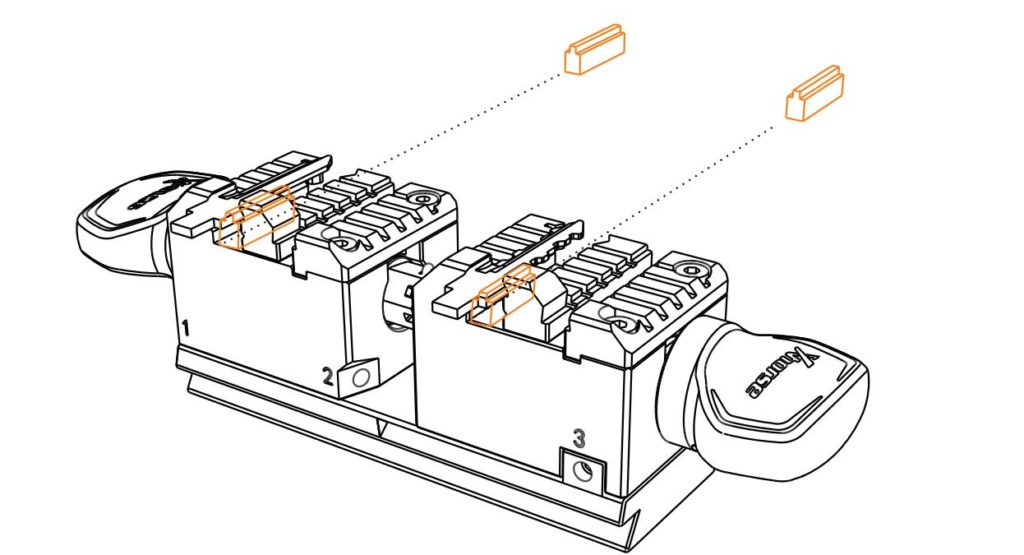
2.Guide d’installation des clés
2-1.Installation des touches latérales
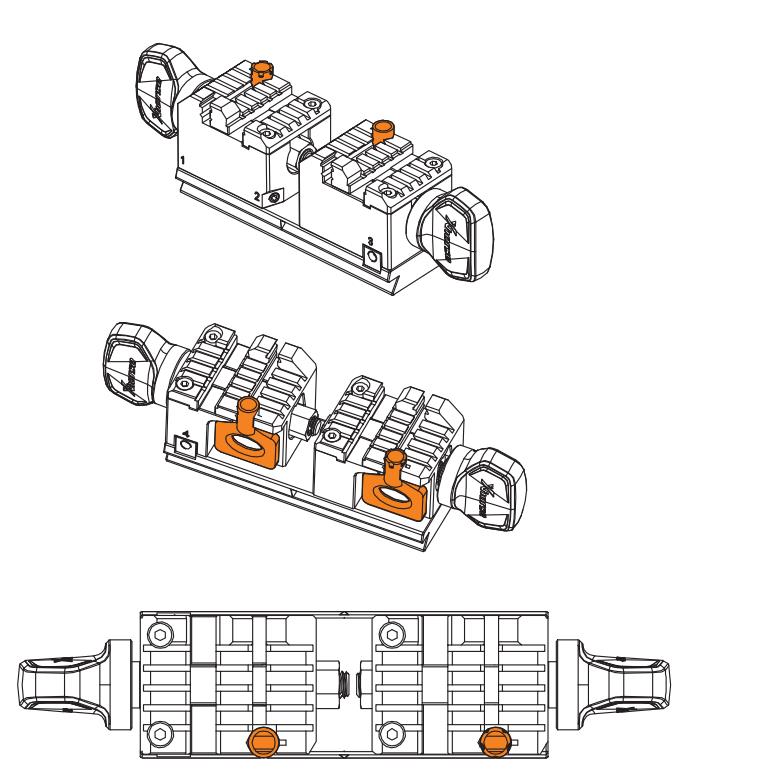
Installation des touches latérales montrée comme image, besoin d’assurer une cale.Selon les caractéristiques de la clé, veuillez sélectionner l’alignement de clé approprié
Note gentille: Ce manuel montre juste des parties des images de fixation de clé comme exemple.Cette pince multifonctionnelle, en cas de problème pour la fixation de certaines clés spéciales, veuillez contacter le support technique
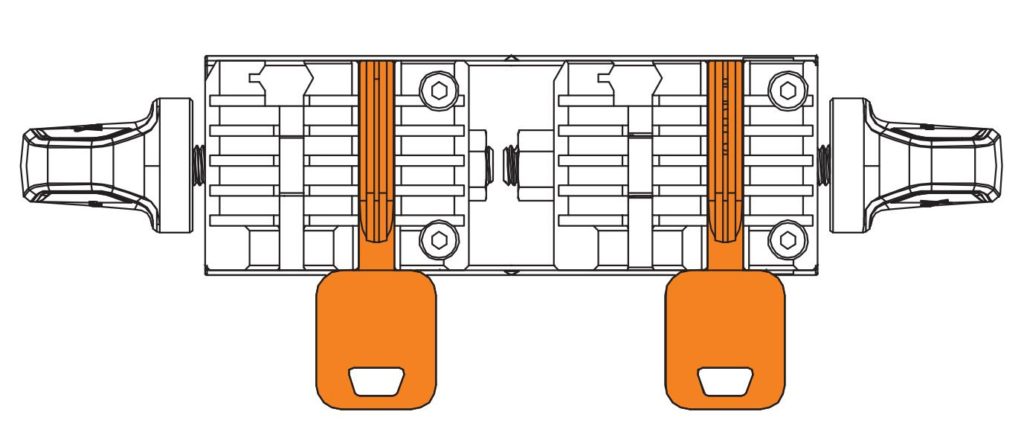
2-2.Fixation des clés de types d’arc
Pour la fixation de clé de type arc, assurez-vous que la base de la clé vierge est complètement attachée avec une pince, puis serrez.
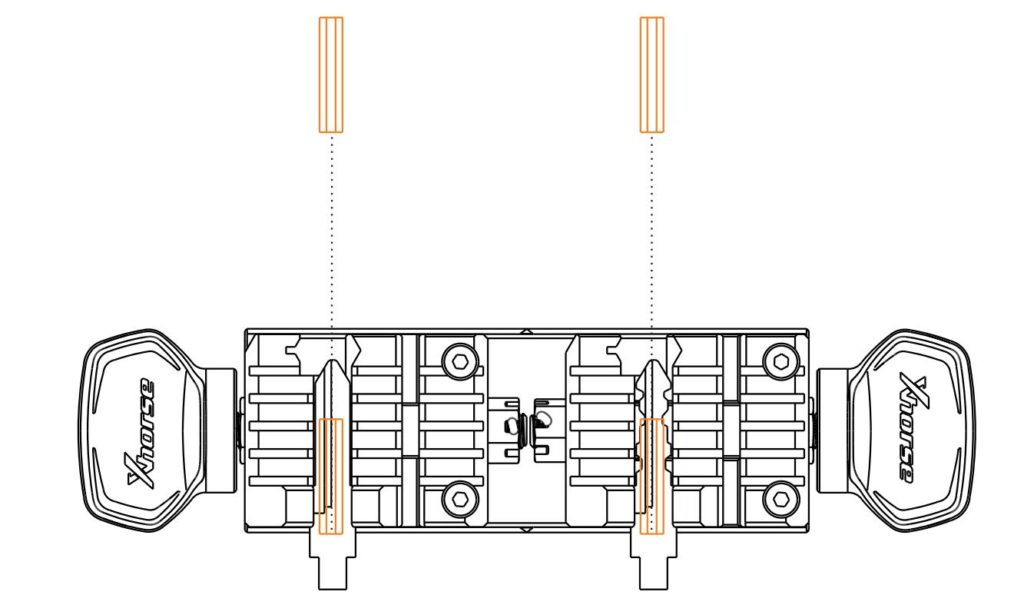
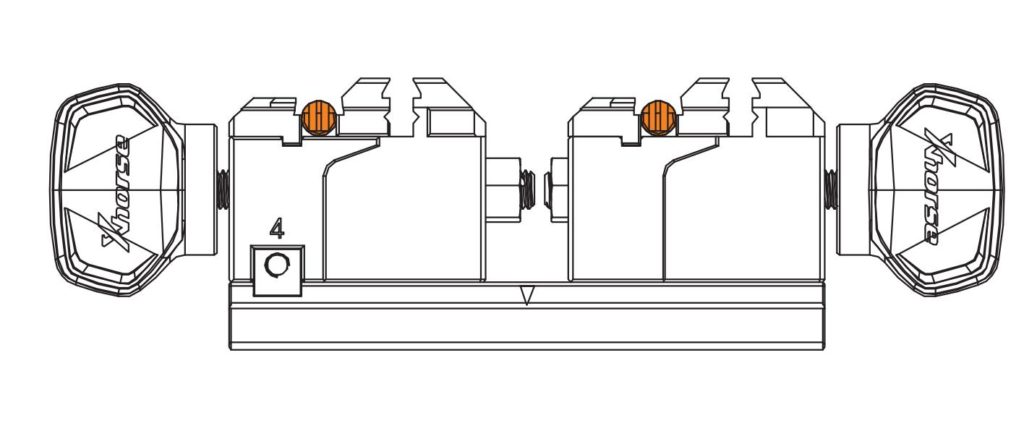
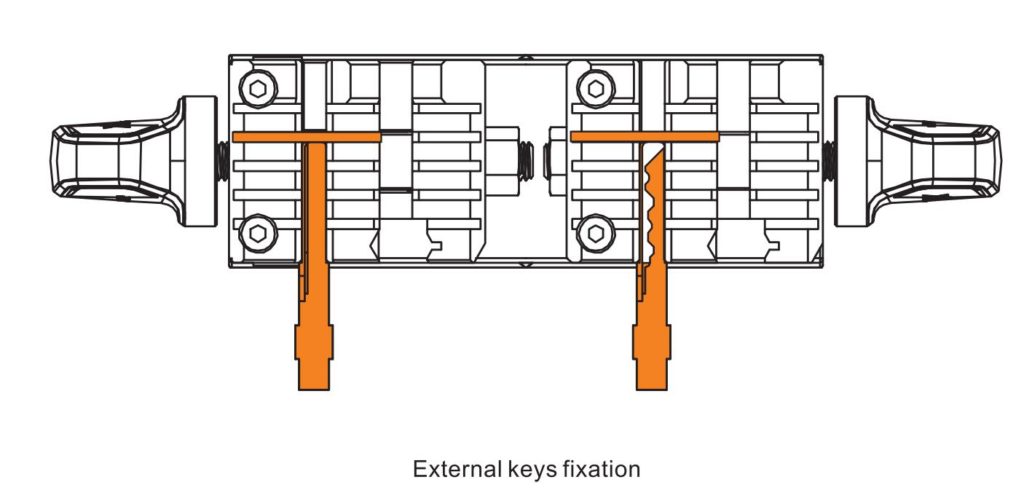
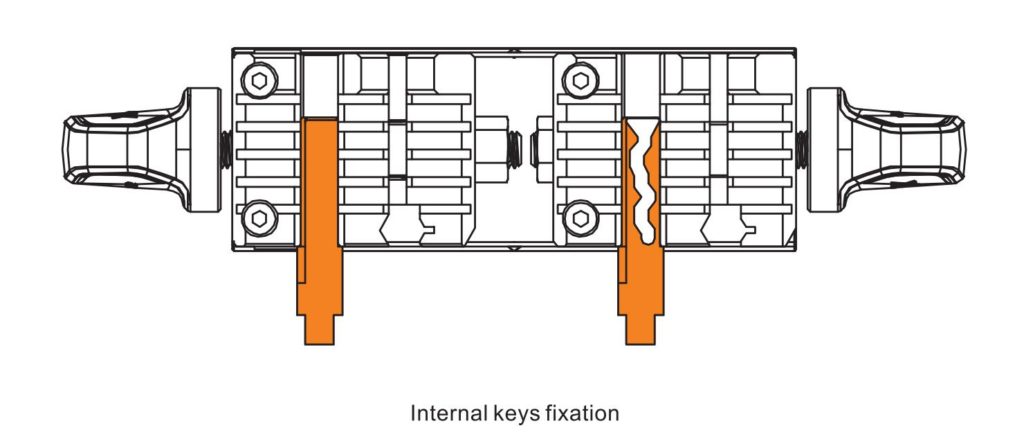
2-3,Fixation des clés externes et des clés internes
2-4.Fixation des clés tubulaires
Pour la fixation des clés tubulaires, vous devez effectuer un nivellement en hauteur et un positionnement circulaire, la sonde et le couteau peuvent être utilisés pour l’outil de nivellement de la hauteur.La rainure de type V de la pince et les caractéristiques clés peuvent être utilisées pour le positionnement circulaire, comme illustré ci-dessous.
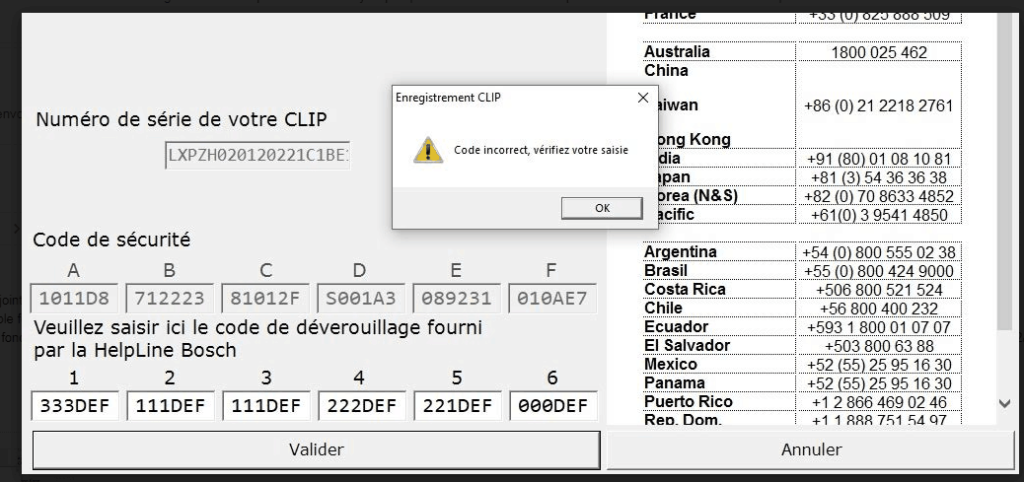
Je vous ai commandé un outil de diagnostic CAN Clip Renault v195 il y a quelques mois.
J’ai eu beaucoup de difficultés à le faire fonctionner pour cause de PC portable pas adapté, puis de version windows pas adapté non plus; mais maintenant la clé d’inscription n’est plus valide, et le logiciel me demande la nouvelle.
Pouvez-vous m’envoyer celle-ci, s’il vous plait, afin que je puisse continuer à utiliser cet outil.
Merci par avance.
Cordialement
Le code d’enregistrement ayant expiré en 2020.12.30
Le client doit donc passer à l’heure de l’ordinateur en “2020.12.30 ou avant”
Et puis réinstallez le logiciel
Ceci est la solution, peut aider le client à résoudre le problème
In order for the return of the diagnostic files towards the central server to be more fluid, remember to connect Clip and close the session daily.
New ADT probe available for sale.
Be careful to keep the old VI Alliance to make the legacy.
As part of the Windows 10, 64-bit migration project planned for 2020 for all clip entries, the period of validity of applications will gradually be reduced from one year to one month.
Warning :
Maintenance of the PANASONIC CF19 MK3 ceased in March 2018 and they can no longer be registered.
Maintenance of the Tecra A11 and CF19 MK2 ceased in January 2017 and they can no longer be registered.
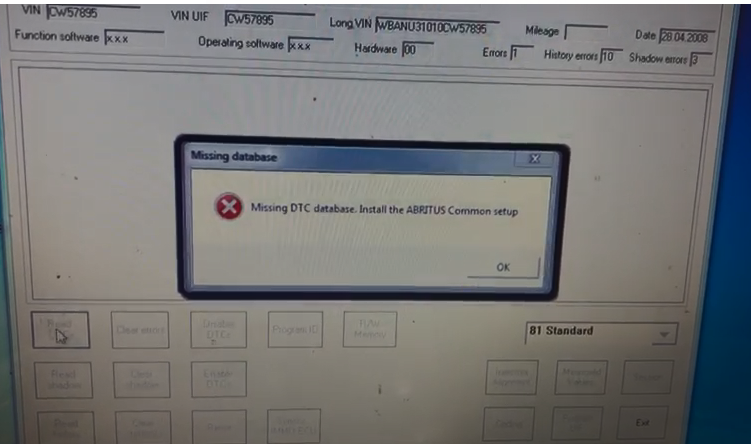
When you open the Abrites commander BMW v10.4/v10.5 software with SVCI2020/SVCI2019 device, the following error will be reported when reading the DTC functions.
step 2: Enter “C: Program Files (x86)\Abrites Commander Software List\Common2\ ” directory and copy BMW folder to “C: Program Files (x86)\Abrites Commander Software List\Common\” directory.
Good news! FVDI 2019 is coming soon! What’s the difference between it and other old versions. Check the newest comparison diagram incl. hardware, software and vehicle coverage.
FVDI 2014 vs. FVDI 2015 vs. FVDI 2018 vs. FVDI 2019 (Hardware)
FVDI 2014 vs. FVDI 2015 vs. FVDI 2018 vs. FVDI 2019 (Software)
Version
SVCI 2014
SVCI 2015
SVCI 2018
SVCI 2019
VVDI
x
x
v1.2.2
v1.2.2 v4.2.1
TAG
v6.2
v6.2
v6.2
v6.2
VW/Audi/Skoda/Seat
v18.0
v18.0 v24.0
v18.0 v24.0
v18.0v24.0v37.0
BMW/Mini
v10.4
v10.4
v10.4
v10.4v10.5
Mercedes_Benz/Smart/ MAYBACH
v5.11
v5.11 v7.0
v5.11 v7.0
v5.11v7.0v10.8
Renault/Dacia
v5.2
v5.2 v6.3
v5.2 v6.3
v5.2 v6.3
Peugeot/Citroen
v5.10
v5.10 v6.7
v5.10 v6.7
v5.10 v6.7
Fiat/Lancia/Alfa Romeo
v5.1
v5.1 v5.7
v5.1 v5.7
v5.1 v5.7
Opel/Vauxhall
v5.8
v5.8 v6.6
v5.8 v6.6
v5.8 v6.6
Ford/Mazda
v4.9
v4.9
v4.9
v4.9
Chrysler/Doge/Jeep
v3.3
v3.3
v3.3
v3.3
Toyota/Lexus/Scion
v9.0
v9.0
v9.0
v9.0
Nissan/Infiniti
v4.3
v4.3
v4.3
v4.3
Hyundai/KIA
v2.1
v2.1
v2.1
v2.1
Volvo
v4.3
v4.3
v4.3
v4.3
Mitsubishi Motors
v2.1
v2.1
v2.1
v2.1
Porsche
v4.1
v4.1
v4.1
v4.1
DAF
v1.0
v1.0
v1.0
v1.0
Bikes/Snowmobiles/ Water scooters
v1.2
v1.2
v1.2
v1.2
FVDI 2014 vs. FVDI 2015 vs. FVDI 2018 vs. FVDI 2019 (Vehicle coverage)
Version
SVCI 2014
SVCI 2015
SVCI 2018
SVCI 2019
VVDI
TAG
before 2014MY
before 2015MY
before 2015MY
before 2015MY
VW/Audi/Skoda/Seat
before 2014MY
before 2015MY
before 2015MY
before 2019MY
BMW/Mini
before 2014MY
before 2015MY
before 2015MY
before 2019MY
Mercedes_Benz/Smart/ MAYBACH
before 2014MY
before 2015MY
before 2015MY
before 2019MY
Renault/Dacia
before 2014MY
before 2015MY
before 2015MY
before 2015MY
Peugeot/Citroen
before 2014MY
before 2015MY
before 2015MY
before 2015MY
Fiat/Lancia/Alfa Romeo
before 2014MY
before 2015MY
before 2015MY
before 2015MY
Opel/Vauxhall
before 2014MY
before 2015MY
before 2015MY
before 2015MY
Ford/Mazda
before 2014MY
before 2015MY
before 2015MY
before 2015MY
Chrysler/Doge/Jeep
before 2014MY
before 2015MY
before 2015MY
before 2015MY
Toyota/Lexus/Scion
before 2014MY
before 2015MY
before 2015MY
before 2015MY
Nissan/Infiniti
before 2014MY
before 2015MY
before 2015MY
before 2015MY
Hyundai/KIA
before 2014MY
before 2015MY
before 2015MY
before 2015MY
Volvo
before 2014MY
before 2015MY
before 2015MY
before 2015MY
Mitsubishi Motors
before 2014MY
before 2015MY
before 2015MY
before 2015MY
Porsche
before 2012MY
before 2012MY
before 2012MY
before 2012MY
DAF
before 2014MY
before 2015MY
before 2015MY
before 2015MY
Bikes/Snowmobiles/ Water scooters
before 2014MY
before 2015MY
before 2015MY
before 2015MY
In conclusion:
Compared with FVDI 2014, FVDI 2015 and FVDI 2018, FVDI 2019 has the advantages in following aspects:
Hardware: Supports more versions and cars models. It has strong stability and no need repairing.
Software:Supports more versions for VW/Audi/Skoda/Seat, BMW/Mini, Mercedes_Benz/Smart/MAYBACH.
Vehicle coverage: Support the years of Vehicle manufacture before 2019MY for VW/Audi/Skoda/Seat, BMW/Mini, Mercedes_Benz/Smart/MAYBACH.
FVDI 2020 is the Latest FVDI ABRITES Commander Version. It is the update version of FVDI 2018. FVDI 2020 has not button battery and need to be activated, it will not lock the machine, and the serial number will not be lost.
FVDI 2020 has more 19 softwares than FVDI 2018:
ABRITES Commander for VAG V37.0, ABRITES Commander for BMW V10.5, ABRITES Commander for Mercedes V10.4 ABRITES Commander for Bikes V2.0 ABRITES Commander for Chrysler V3.4 ABRITES Commander for Daihatsu V1.4 ABRITES Commander for FIAT V7.6 ABRITES Commander for Ford V7.7 ABRITES Commander for Hyundai V4.4 ABRITES Commander for JLR V2.6 ABRITES Commander for Mitsubishi V3.7 ABRITES Commander for Nissan V5.7 ABRITES Commander for OPEL V7.5 ABRITES Commander for Porsche V7.1 ABRITES Commander for PSA V6.3 ABRITES Commander for Renault V7.4 ABRITES Commander for Suzuki V1.2 ABRITES Commander for Toyota V11.4 ABRITES Commander for Volvo V6.2
How to install FVDU 2020 software?
CD is only one executable file, double-click the “AbritesCommanderSetup. Exe”
Start the installation,Do not plug USB into your computer during installation
After the installation is complete, USB is connected to the computer.
How to start FVDI 2020 software quickly?
FVDI 2020 ABRITES Commander quick launch software has 42 shortcut ICONS, click the icon to launch the corresponding software. Compared to the quick start of SVCI 2018, clicking the icon does not display the activation dialog box.
The last icon is the firmware upgrade program, click to start the firmware upgrade program.
Note: Must be connected to the Internet to download the latest firmware program, download and click upgrade to update the firmware program.
Click the icon, the tray in the lower right corner of the computer will appear the dongle program icon