Monthly Archives: September 2019

How to Set Launch X431 PAD III ?

Launch X-431 X431 PAD III is a brand-new high-end car fault diagnostic device developed by Launch based on Android system. X431 PAD III is the only device in the X431 family which supports 140 car brands and more than 2000 car models. LAUNCH X431 PAD3 is the only car scanner in the world which is built to IP65 water proof specifications, with dust proof design and which has passed droop test.

Customer usually said that it is difficult to set or use the device

Here we share how to set language,bluetooth and connection.

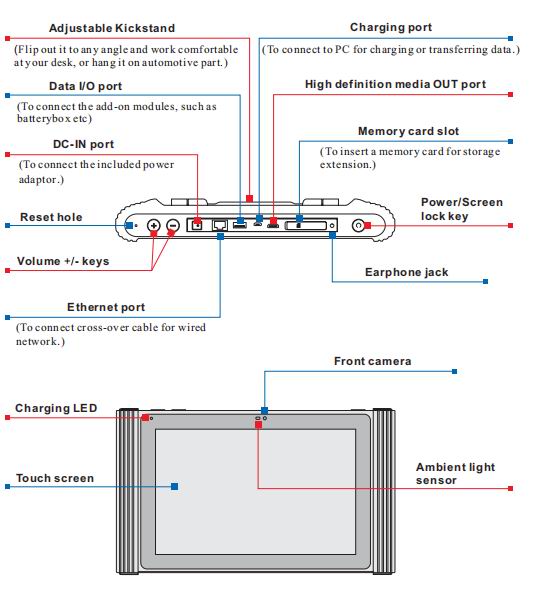
1.Launch X431 PAD3 V2.0 Handset
The handset acts as the central processing system, which is used to receive and analyze the
live vehicle data from the VCI connector and then output the test result.

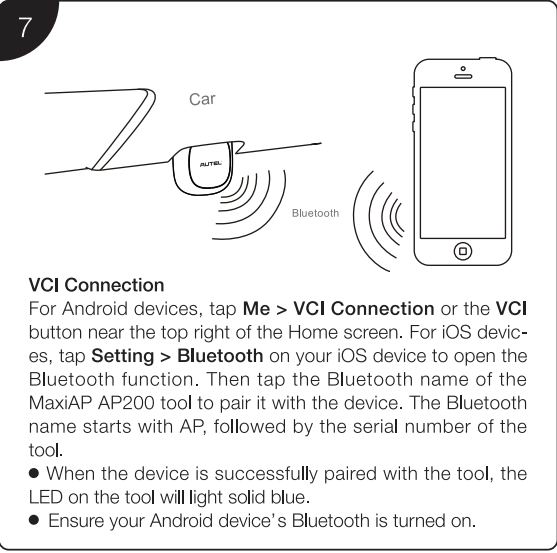
2.VCI(Vehicle Communication Interface)
The VCI connector works as a vehicle communication interface device, which is used to
connect to the vehicle’s DLC (Data Link Connector) socket directly or via OBD II extension
cable to read the vehicle data and then send it to the handset via wireless (BT)
communication only works with the vehicle with 12V battery voltage.

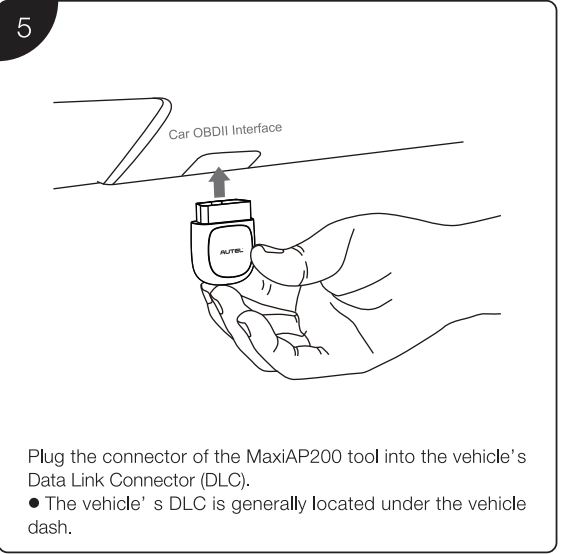
Install the VCI Connector

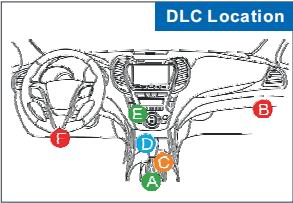
1.Locate vehicle’s DLC socket:DLC Location The DLC (Data Link
Connector) is typically a 16-pin connector where
diagnostic code readers interface with the
vehicle’s on-board computer.
It is usually located on driver’s side, about 12 inches away from the
center of dashboard. See Figure .
In case no DLC is found, please refer to Automobile Repair Manual.

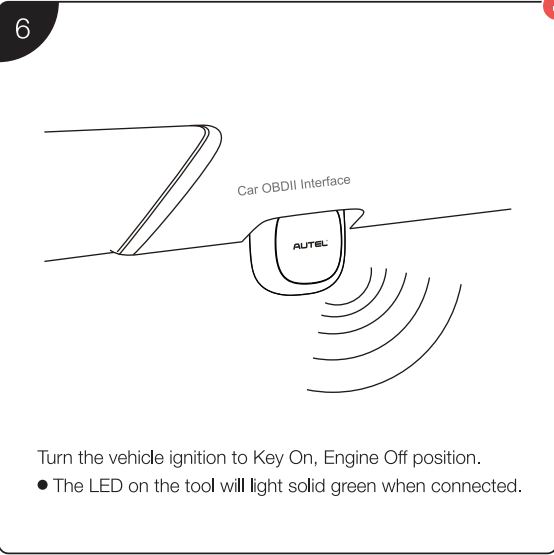
  1. Plug the VCI connector into the vehicle’s DLC (It is suggested to use the OBD II extension cable to connect the DLC and the VCI). Normally the power indicator of the VCI will light
    up.

How to Change Language for X431 PAD III ?

X-431 PAD III supports multiple languages. To change the language of the tool, please do the following:

  1. On the home screen, tap on .Settings>Language&Input>Languages
  2. Tap on “ Add a Language”, and then choose the desired language from the list.
  3. Tap and hold the desired language and drag it to the top of the screen and then release it,
    the system will change into the target language.

How to Register&Update Launch X431 PAD III ?

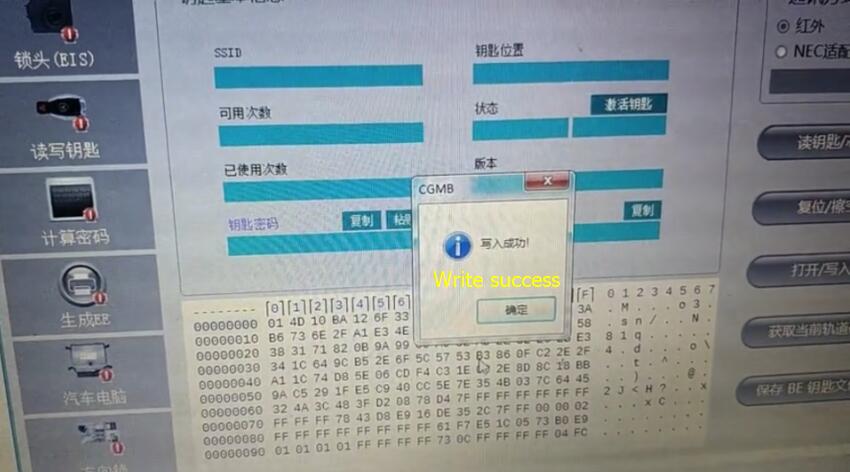
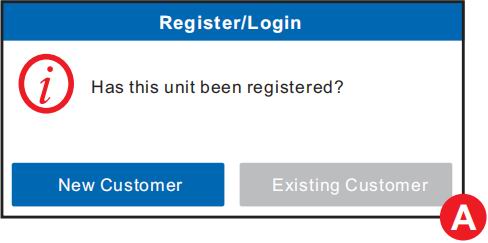
1.Launch APP: On the home screen, tap the application icon to launch it,a diaglog box similar to the following will pop up on the screen .

A. if you are a new user, top on” New Customer”.A to start your sign-up.
B. if you have registered to be a member, tap on “Existing Customer” to log in the system directly.

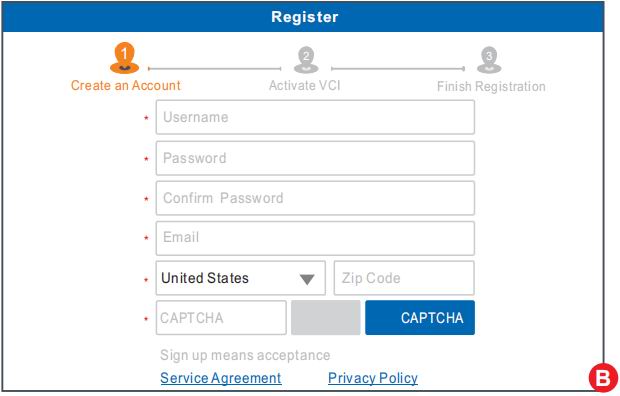
2.Create and APP Account: Tap on “New Registratin” in Figure A,input the information(items with* must be filled) and then tap on “Register”.Refer to Figure B.

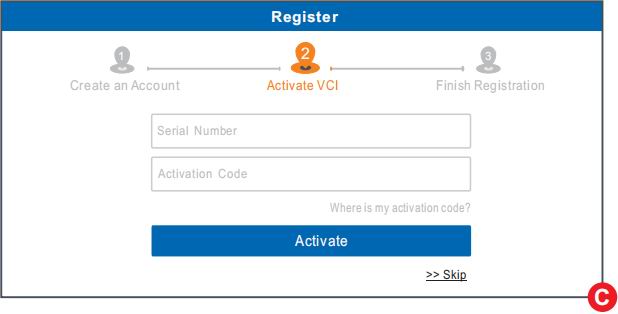
3.Activate VCI Connector: Input the Product S/N and Activation Code(can be obtained from the password envelope),and then tap on”Activate”Refer to Figure C

4.Finish Registration: To download the diagnostic software,tap on”Yes” to navigate to the download page.Tap on” No” to download and install it later.
On the download page,tap on “Update” to start downloading until it is complete.

for more informations about X431 PAD III,please check following link

http://www.eobdii.fr/launch-x431-padiii-diagnostic-tool.html

CAN CLIP V183 CANNOT INDENTIFY ON WIN 7 32BIT (64BIT) Solved!!!

Problem:

I have installed can clip v183 software on windows 7 32bit and 64bit, but the system cannot identify the device. The indicator light flashed normally on the can clip for Renault. I also installed the driver manually, but only one light flashed. What’s wrong?

Eobdii.fr Solution:

If there’s only one indicator light flashing on your can clip v183 diagnostic interface, it indicated that you didn’t connect the device to your car well. Please connect again.

It’s normal when all 4 lights are flashing.

The red indicator light means “power on”.

The green light means “the signal is on”.

2 red lights and 2 green lights mean “the USB cable power supply & communication are normal, and the car EPC power supply & communication are normal”.

Customer feedback:

I connected can clip v183 to my car again, it worked, all the indicator lights flashed. I diagnosed my Renault car. Everything works great!

CAN Clip V183 for Renault Diagnostic Interface source:

http://www.eobdii.fr/v165-can-clip-pour-renault-avec-puce-complte-an2135sc-an2136sc.html

Hope it is a useless solution for you.

How to Use Autel AP200 on IOS and Android System via OBD ?

Autel MaxiAP AP200 is new released product from Autel company

It is the simplified version of MK808.

It is easy to take and operate.

But how to use it ? Here we share the steps.

I,Download & Install APP
Scann the QR Code to download the MaxiAP200 app.
Or serch for MaxiAP200 in APP Store or Google Paly to download
and install the app to your device.

II,Register&Log in

Open the MaxiAP200 app and tap Register near the top right of the screen

Follow the on-screen instructions to complete the registeration.

Log in with your registered email address and password.

Note:if you have a previously created Autel ID,please use it to log in no need to register.

III,Bind VCI

Tap Me>VCI Management. Scan the QR code on the MaxiAP AP200 Bluetooth dongle to put in the serial number.

Check if the email information is correct.Tap Bind to bind VCI

IV,Purchase & Install Software

Tap Mall or the plus sign below the Diagnose list to purchase and install vehicle-specific software.Full OBDII functions included at no charge.You can get one free vehicle-specific software through Mall after successfully binding VCI for the first time.(For IOS devices,the purchased vehicle-specific software will display in the Diagnose list,tap it to another applicationo for diagnosing.

V,Plug the connector of the MaxiAP200 tool into the vehicle’s Data Link Connector(DLC)

The vehicle’s DLC is generally located under the vehicle dash.

VI,Turn on the vehicle ignition to Key On,Engine Off postion

The LED on the tool will light sold green when connected.

VII,VCI Connection

For Android devices,tap Me>VCI Connection or the VCI button near the top right of the Home screen.For IOS devices,tap Setting>Bluetooth on your IOS device to open the Bluetooth function. Then tap the Bluetooth name of the MaxiAP AP200 tool to pair it with the device.The bluetooth name starts with AP. followed by the serial number of the tool.

When the device is successfully paired with the tool,the LED on the tool will light solid blue.

Ensure your android device’s bluetooth is turned on.

VIII,Your MaxiAP200 is now ready for use.

UPDATE

  1. The installed vehicle-specific software can be seen on the Home Screen.
    When a new version is available ,an update button will display.
    Tap the button to update the software.
  2. Tap Me>VCI Managementd>Detect firmware to update the firware if a new version is available.

Print
1.For IOS devices, the saved report can be printed via the Print function on the device.
2.For Android devices,download and isntall a third-party print app to print the saved report.

Note: the device needs to be connected with a printer to print

CGDI PROG MB TEST REPORT: GOOD FOR MERCEDES-BENZ GLK300 2011, C260 2013, AMG G63

CGDI Prog MB is the fastest Mercedes Benz key programming tool to calculate the password at present, support fastest Benz car key add and MB all key lost including 211,209,204,207,212,166,246,197,172,164 +, 216. Here have collected test reports on GLK300 (W207), C260 (W204) and AMG G63.

Purpose:

To check if CGDI Prog MB Mercedes-Benz key programmer can add new key or not

Test:

CGDI Prog MB add new key to 2011 Mercedes-Benz GLK300 (W207)

CGDI Prog MB program new key to 2013 Benz C260 (W204)

CGDI Prog MB write Mercedes- AMG G63 smart key

Steps:

Step 1: Calculate password of original Benz car key by CGDI Prog MB

Step 2: Save EIS Data when calculate password is completed

Step 3: Generate Key File with the EIS data saved

Step 4: Plug the new key into CGDI MB device to read and write

Result: All success!

CGDI MB Benz key programmer can add new key to Mercedes-Benz GLK300 2011/ C260 2013/ AMG G63.