Category Archives: Appareil De Diagnostic Professionnel

Promotion Sale 2014V Opcom OP-Com Can OBD2 for OPEL Firmware V1.95 Software Display

Promotion Sale 2014V Opcom OP-Com Can OBD2 for OPEL Firmware V1.95 Software Display

2014v-opcom-can-obd2-scanner

Opcom OP-Com 2014 V Can OBD2 for Opel Firmware V1.95

New OPCOM V1.95 Firmware 2014V Software Features

1. OPCOM is a special PC Based diagnostic interface especially for OPEL.
2. Software Version: 2014 Firmware Version: 1.95
3. Never Update It Online, It Will Damage The OP-COM !

New OPCOM V1.95 Firmware 2014V Software Function:

1. It covers almost all Opel cars, even new cars with CAN-BUS based diagnostic, such as Vectra-C, Astra-H, Zafira-B.
2. The program lets you to read out and clear fault codes, shows you live data, lets you to perform output test.
3. The program supports many control units, like Engine, Automatic Transmission, ABS, Airbag, Engine Cooling module, Instrument Cluster, Electronic Climate Control, Body Control Unit, just to name a few examples.
4. Since Opel uses many pin in the OBD connector, the diagnostic interface works as a multiplexer, and selects the appropriate pin for communication.
PIN3, PIN7, PIN8, PIN12 = Serial Link (ISO9141, KW81, KW82, KWP2000)
5. Fault codes will be shown with all available information:

Full Fault Code Text Description:

1) Full status information (Present, Not present, Intermittent)
2) You can print out, save, or copy the fault codes to any other application. From the fault codes window, you can go directly to the measuring blocks window.
3) The program shows you measuring block information on many control module, you can choose anything from the list on your own.
4) The program is capable of showing 8 measuring block parameter simultaneously. The sample rate is depends mostly on the communication protocol. For example, older system, like Omega-B X 25 DT Engine (ISO-9141-2) can be very slow, during communication, while newer Multec, or Bosch units are faster (using KWP-2000), and the newest CAN based control units are very fast!

You can also run output tests on many controllers.

PIN6-PIN14
PIN3-PIN11
PIN1
HSCAN – Dual-wire, High Speed CAN-BUS, 500 kbps
MSCAN – Dual-wire, Medium Speed CAN-BUS, 95 kbps
SWCAN – Single-wire, Low Speed CAN-BUS, 33.3 kbps

OP-COM V1.95 Software Display

op-com-195-1

op-com-195-2

op-com-195-3

op-com-195-4

op-com-195-5

op-com-195-6

How to solve V2017.9 MB Star Install Wizard interrupted

Provide solution to MB Star diagnostic SD Connect C4 V2017.9 Xentry OpenShell XDOS installation error “The InstallShield Wizard was interrupted before Xentry Diagnostics Openshell could be completely installed.”

Attach installation error picture:

xentry diagnostics OpenShell error


Possible reasons:

1- from virus

2- or Microsoft Message Queue Service is not enable

Please make sure you do like these tips:

  1. You need absolute clean windows. choose win 7 32bit
  2. Click to show you the log file and read that. It will be specified what has gone wrong with your install.
  3.  Be sure to run your install with administrator rights and have enough room on your HDD.

Finally, the problem is solved.

it was the Microsoft Message Queue Service not enabled now is installing fine.

2017-09-mb-star-4

2017-09-mb-star-5

Thanks to http://www.eobdii.fr/ engineer who helped me solve the problem, thumb up for their service.

New Ford PCM Programming Error Code 103

autel-maxiflash-pro-ecu-programming-device-a1-620x264

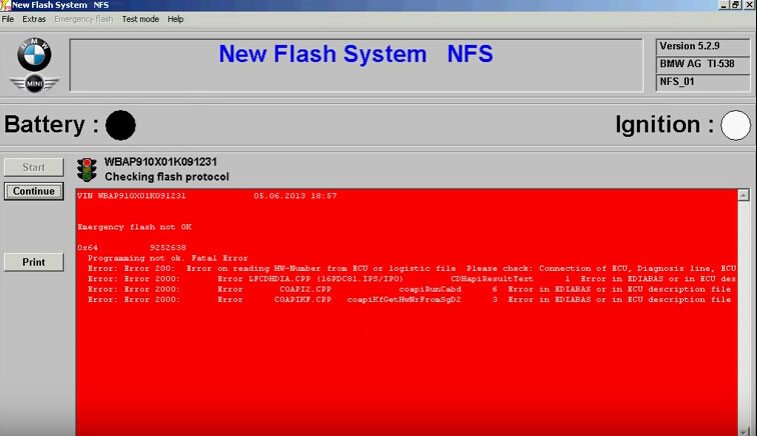
i am trying to program used PCM in FORD Explorer 08 and trying to program ECU but Ford UDS gives this error message

error code: 103-0x31 851082

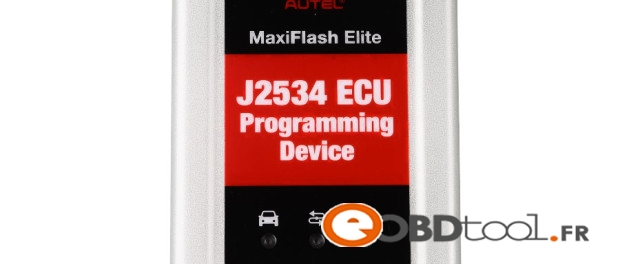
i am using Autel j2534 i think no issue with this

iam suspecting on the PCM part no though it taken from similar car the part no on have slight difference

After i contacted the support they answer me very fast:
clone Ford VCM 2 and Autel J2534 ECU MaxiFlash Pro Programming Tool with Maxisys 908P..i think both are ok
because ity keep same PCM after instructed by FPM to replace PCM all process erasing and programming successful with both Autel and FORD VCM i think some issue with PCM i want to install

Error Code 103
High Level interpretation:
The diagnostic tester is trying to send a message which out of range or not
supported by the ECU.
Technical interpretation:
The action or the tool that is being performed in the diagnostic tester has sent a
message sent to the ECU which is not with in the acceptable range or limit.
User Action Recommended:
• Try closing the diagnostic tester application, cycle the key and perform the
test or action again.
• If the above step fails check if the ECU in question is accepting any other
message by attempting to communicate with the module via another tool or
application (e.g., try launching datalogger if self test fails).
• Check if there is an IDS software or database update available. If so try the
same action after performing the update. The update may fix the issue.
• If the above steps fail please record the number in the screen, the tool that is
being run, details about Vehicle and Model Year and the software release and
contact the appropriate Ford DSP department.
Possible Causes:
This error is a genuine diagnostic application failure which occurs when there is a
limitation in the diagnostic tool application. This may also occur when incorrect
hardware or ECU is fitted to the vehicle that is not supposed to have the functionality that
is being performed with the tool in the diagnostic tester.

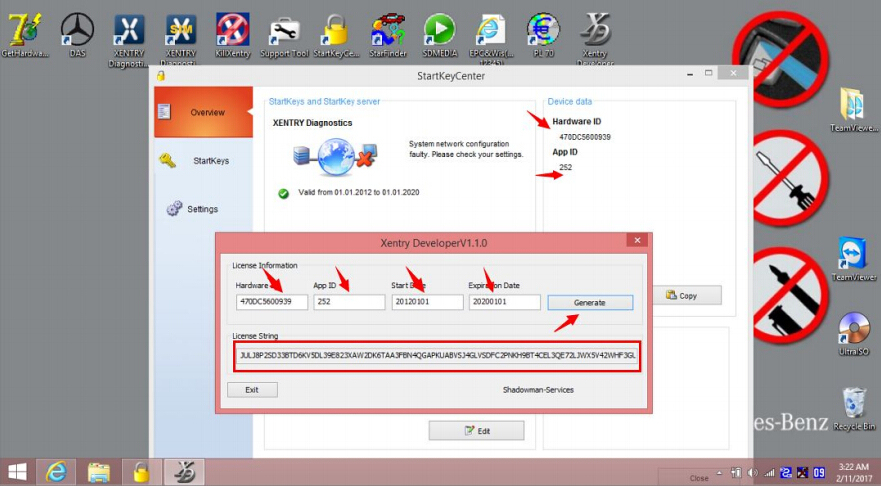
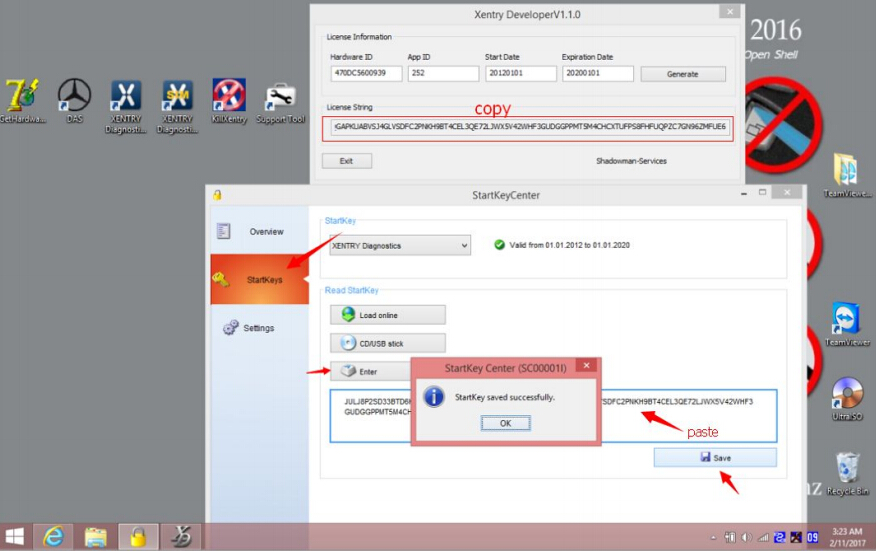
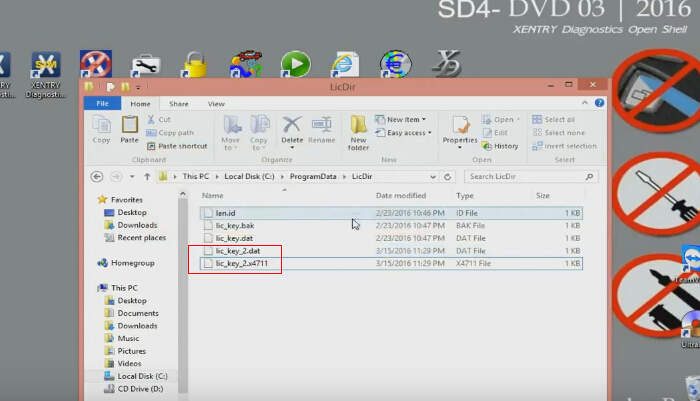
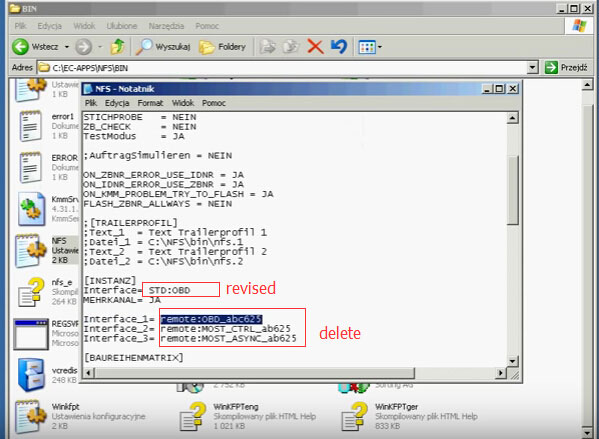
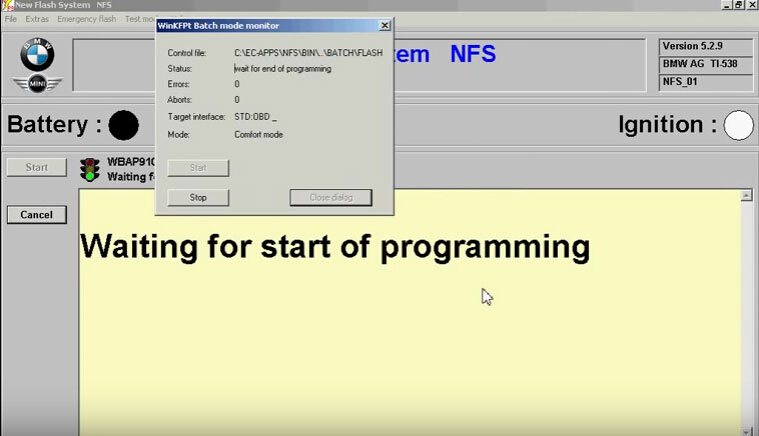
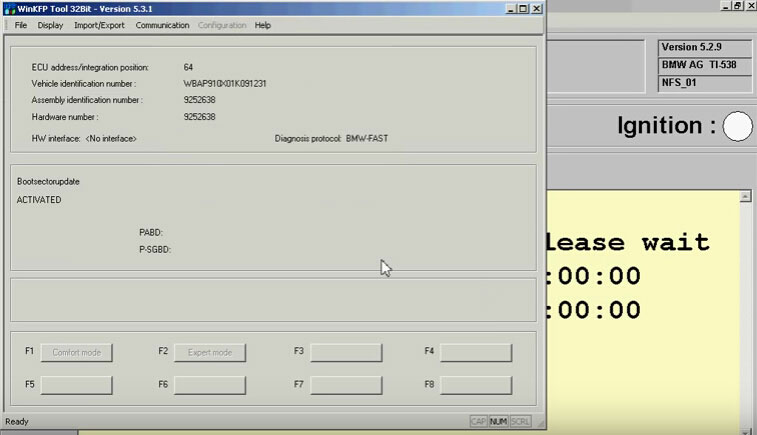
The important note: How to program a new module with VCM2 clone

When installing a new module, the configuration data must be transferred from the old module before it is removed. The new module will then be programmed using this information. Use the following steps to download the data from the existing module and program the new module:

Step 1: Select the toolbox tab at the top of the screen

Step 2: Select “Module Programming”

Step 3: Select the tick mark or the Enter key

Step 4: Select “Programmable Module Installation”

Step 5: From the fly out menu, select the type of module to be installed

Step 6: Select the tick mark or the Enter key

Step 7: Make sure that an Internet connection has been established and then select “Confirm”

Step 8: Follow the instructions on the screen. These instructions vary depending on the type of module being installed.

NOTE: Be sure to follow these instructions in the exact order that they are given. Do not remove or install any modules until instructed to do so. Failure to follow the instructions correctly may result in the configuration data received during vehicle identification to program incorrectly or not at all.

Step 8A: If Ford Module Programming was unable to retrieve the configuration data due to either

a non-functioning module or a module which was removed before the data was retrieved, the

application will request that the user obtain information from the Module Build Data (As Built)

database. Access to this database is included in the Ford Module Programming subscription. The

data can be obtained by doing the following:

Go to the Motorcraft website (www.motorcraft.com)
Go to the Technical Resources area
Log in using the User ID and password set up when the subscription to Ford Module
Programming was purchased

Select “My Subscriptions”
Select “Ford Module Programming”
Select “Module Build Data (as Built)”
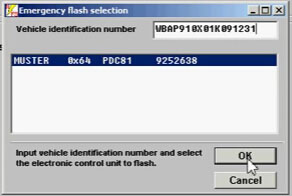
Enter the Vehicle Identification Number (VIN) and select “Submit”
Write down the information that was requested by the Ford Module Programming
application

Return to the Ford Module Programming application and enter the requested information
Step 9: If necessary, apply the reprogramming label to the PCM

If an emissions recall has been performed or a required emissions-related TSB has been completed,

an Authorized Modification label must be placed on the PCM. These labels can be purchased at the

parts counter of a Ford or Lincoln/Mercury dealership.

NOTE: It is the responsibility of the technician to inform the customer that Ford Motor Company will not reimburse the vehicle owner for field service actions that are not completed at a Ford or Lincoln/Mercury dealership.

Step 10: When the “Programming complete” screen appears, select the tick mark or the Enter key. If PATS initialization is required, Ford Module Programming may automatically link to the PATS parameter reset and/or key relearn procedures. Two ignition keys may be required to complete the

PATS initialization procedure.

Step 10A: If PATS initialization is required and Ford Module Programming did not link to that functionality automatically, go to the Toolbox tab and select “PATS”. Detailed instructions are provided in Section 6.

New Arrivals 2014V Opcom OP-Com Can OBD2 for OPEL Firmware V1.95

Opcom OP-Com 2014 V Can OBD2 for Opel Firmware V1.95
opcom-op-com-2014-v-can-obd2-for-opel-1
New OPCOM V1.95 Firmware 2014V Software Feature:

1. OPCOM is a special PC Based diagnostic interface especially for OPEL.
2. Software Version: 2014 Firmware Version: 1.95
3. Never Update It Online, It Will Damage The OP-COM !

New OPCOM V1.95 Firmware 2014V Software Function:

1. It covers almost all Opel cars, even new cars with CAN-BUS based diagnostic, such as Vectra-C, Astra-H, Zafira-B.
2. The program lets you to read out and clear fault codes, shows you live data, lets you to perform output test.
3. The program supports many control units, like Engine, Automatic Transmission, ABS, Airbag, Engine Cooling module, Instrument Cluster, Electronic Climate Control, Body Control Unit, just to name a few examples.
4. Since Opel uses many pin in the OBD connector, the diagnostic interface works as a multiplexer, and selects the appropriate pin for communication.
PIN3, PIN7, PIN8, PIN12 = Serial Link (ISO9141, KW81, KW82, KWP2000)
5. Fault codes will be shown with all available information:

Full Fault Code Text Description:

1) Full status information (Present, Not present, Intermittent)
2) You can print out, save, or copy the fault codes to any other application. From the fault codes window, you can go directly to the measuring blocks window.
3) The program shows you measuring block information on many control module, you can choose anything from the list on your own.
4) The program is capable of showing 8 measuring block parameter simultaneously. The sample rate is depends mostly on the communication protocol. For example, older system, like Omega-B X 25 DT Engine (ISO-9141-2) can be very slow, during communication, while newer Multec, or Bosch units are faster (using KWP-2000), and the newest CAN based control units are very fast!

You can also run output tests on many controllers.

PIN6-PIN14
PIN3-PIN11
PIN1
HSCAN – Dual-wire, High Speed CAN-BUS, 500 kbps
MSCAN – Dual-wire, Medium Speed CAN-BUS, 95 kbps
SWCAN – Single-wire, Low Speed CAN-BUS, 33.3 kbps

Package list:

1pc x OP COM Interface
1pc x USB Cable
1pc x  Software and Drivers CD

If you have interest ,please enter this link:

http://www.eobdii.fr/wholesale/opcom-op-com-2014-v-can-obd2-for-opel.html

Free download GM Tech 2 PCMCIA bin file

gm-tech2-in-carton-package-b3-1-600x264

As we know, there are a lot of free software in eobdii.fr website

so there are some of car tool software maybe fit for you/

There is software that can reprogram the 32MB PCMCIA card within the GM Tech2 diagnostic scanner via serial cable with bin files. Here gathering some download resources of the Tech II PCMCIA bin file with multi-language and versions.

How to load software on Tech2 scan tool 32GB card?

Insert tech2 card into pcmcia port on laptop and use mce to write the required bin to card, once done remove card and place in tech 2 and power on.
Tech2 card writer is one of them but the method is much slower then reprogramming in pcmcia slot. Tech2 card writer can be downloaded free below as well.

Disclaimer: You are on your own risk.
NO PASSWORD.

Download 1:
https://mega.co.nz/#fm/3k8hRZTZ

File including:
New version Tech2 PCMCIA 165.000.rar English (used with TECH2 or with TECH2WIN)
Opel German 164.000.zip
Opel German 154.000.zip
Opel 150.020 english.rar
Opel_161.002.rar
Saab 148.000 English.rar
SAAB 148.000 32MB German
TECH 2 OPEL VAUXHALL V159.001.rar
Tech2-cardwriter.rar

tech2-bin-file-2

Download 2:
https://mega.co.nz/#F!JlhF2STa!8ElYLExLisPlBaRbIX5sjQ
Tech2 & Tech2Win PCMCIA 32GB Card Bin Files Opel Multi-Language

You have inside:
Opel 165 EN; DE ; FR ; IT
Opel English 165, 171, 172 and 175
Tech2Win v2.302
27.05.2015 – Added Opel version 176

tech2-bin-file-3

Download 3:
http://www.filedropper.com/tech2cards
Tech 2 cards bin files in English:

Zip file contains:-

Cadillac 117.500.bin
Cadillac BLS 120.000.bin
Opel GT Chevrolet HHR V30.004.bin
China-1 29.002.bin
Holden 1997 – 2012 V157.000.bin
Saab 148.000.bin
Holden Export V149.000.bin
Saturn Astra V31.001.bin
Isuzu 107.021.bin
Suzuki 28.007.bin
Isuzu truck 11_530 1996-2011.bin
Isuzu truck 11_530.bin
ISUZU Truck CAN 122_050.bin
Suzuki 29.003 eng.bin
V33-002_NAO_EN.bin
nao 32.08.bin
vauxhall.bin
opel 137.000.bin
opel_160-000_en.bin
OpelVauxhall V166.00.bin

NOTE:
Tech 2 32MB memory PCMCIA is available here:
Tech 2 32MB B card

GM scan tool review: Tech2 or MDI?

Tech 2 scan tool and GM MDI interface are two populous diagnostic

gm-mdi-multiple-diagnostic-interface-with-wifi-1-620x264

tools for GM vehicles including SAAB, OPEL, GM, ISUZU and Holden cars. So, which one is better? Hand-held Tech 2 or MDI diagnostic software for laptop? Here are real reviews form users. Read and get the truth, not depends on what the seller advises.

Review 1:

Tech2 hand held support more then Opel cars.
It support also Isuzu, Suzuki, GM and SAAB
Just changing the PCMCIA card or flash it the one you have if you have only one with the software for cars that you need.
But this tool cannot be used with GDS2 in newer cars models after 2008 ( here we are talking in newer cars as Insignia and Astra J not the models as Corsa D 2014 which is still supported by the Tech 2 hand held )
GM MDI can be used as Tech2 hand held in cars from 1997 till 2014 ( but models before 2008 ) using Tec2Win emulator and can be used with GDS2 in newer models cars as Insignia and Astra J
GM MDI doesn’t support Suzuki and SAAB
Booth tools support SPS Programming
Me I’m using a HQ OP-COM clone with the latest version of software wich cover even Corsa D 2014 made in February 2014 ( it covers almost all functions of Tech2 for cars between 2004 – 2013 and better connection for cars before 1997 even it is the same tool revision B hardware ) and an AVDI ( using Tech2win and GDS2 )

If you need a better cover my advise to you is to buy a GM MDI but the GM Tech2 hand held it is still good
Anyway in the end it is your choice-this is only my opinion
Good luck

Review 2:

GlobalTis v32 the last offline version that you can use it offline and it is for free you can get it and you can get a free activation.
The GlobalTis you use it for release the Tis2Web and GDS and SPS offline programming
Bin file for Ts2Web you can get it for free too
Now all opel bin file for Tis2Web starting from 1997
Only Tech1 hand held support cars before 1997
Not even Tech2 hand held do not cover that cars ( I asked a friend about this for you )
Good luck

Review 3:

When you connect the MDI into the MDI Manager then the Tech2Win will not see the GM MDI too
I didn’t use T2w in VMware ever. But I was tried it just at my desk.
The point is that I am using a genuine MDI.
I tried a clone when I installed for him a GDS2 and T2W in native installation. No problems at all.
So I am thinking if you are using a clone if there is a ny problems of this.
In case of Mr. Xantrum he is using win 7 64bit system. As I rememember this could be the problem but for you in VMware….. I really don’t know
Please show us some pics maybe you are doing something wrong or you miss something in setup
In VMware it must work
Good luck

DAS license key is corrupted: Solved! Reactivate DAS

v201709-mb-sd-c4-hdd-software-1-620x264

I got 07.2017 Xentry Windows 7 and the DAS is giving me the following massage:

winLicense

your license key is corrupted

please contact support@…

Solved!

DAS need activation.

Xentry/DAS activation help:

Step 1: Run StartKeyCenter to get ID for activation

Open “StartKeyCenter” on Desktop, to get the SD connect c4 Hardware ID and App ID

xentry-das-activation (1)

Complete Licence information (Hardware ID, App ID, StartDay, ExpirationDay), then click “Generate” to get License String

xentry-das-activation (2)

Copy License String, then go to “StartKeys”, click “Enter” to read StartKey, then “Save” data

xentry-das-activation (3)

Step 2: Reactivate Xentry/DAS

Go to Local Disk C:/ ProgramData/ LicDir, the copy and paste “lic_key_2.dat”, re-name as “lic-key_2.x4711”

xentry-das-activation (4)

Setup Properties of “lic-key_2.x4711”, select Read-only

Then open XENTRY Diagnostics Openshell and close it

(NOTE: this avoids the activation code to be lost and reactivate XENTRY)

Free Download Scania VCI2 SDP3 V2.23.1 Multi-Language

Scania SDP3 VCI2 heavy duty diagnostic tool software update to latest V2.23.1.

Scania VCI2 SDP3 V2.23.1  Diagnosis & Programmer [2017]
Diagnostic & Programmer software for Scania trucks .
Region: All regions

Version: v2.23.1
Type: Diagnostic & Programmer Software
O/S: Windows 7 32 bit,  Windows 8/8.1 32 bit, Windows 10 32 bit.
Software language: French, German, English,Spanish, Finnish, Italian,Japanese, Korean, Dutch, Polish, Arabic, Portuguese, Russian, Swedish,Turkish, Chinese, Traditional Chinese,Romanian
Quantity of CD: 1 CD
Year: 2017

scania-sdp3-2.31.2scania-sdp3-2.31.3
SDP3 2.23.1 Diagnostic & Programmer software works with Scania VCI2 interface
Highest level access
Internal Scania
Industry & Marine
Authorized Scania Workshops

Scania SDP3  v2.23.1 Features:

* Check and adjustements
* Conversion
* Maintenance
* Campaign
* Bodywork
* Fault Codes
* Fault Reporting
* Programming of Control units
Scania SDP3 2.31.1 system requirements:

Windows 7 32 bit,  Windows 8/8.1 32 bit, Windows 10 32 bit.

Microsoft .Net Framework 4.6.2 must be installed.

• There is no longer support for Windows 7 32 bit. For more information, see Ti 00-17 01 25.

Scania SDP3 2.31.1 features:
Function view
By using the search box at the top of the window you can now search directly in the function view. You can choose to search in the Adjustment, Check or Calibration tab.

Troubleshooting
The procedure for defect reporting in SDP3 has been improved to make it simpler to follow.
Instead of a guide in several steps, there is now a simple dialogue box. In the dialogue box you can select if you want to save the defect report locally or if you want to send it via e-mail. To be able to send the defect report via e-mail you must have Microsoft Outlook. You can choose to create a defect report for a specific individual product or to make a general defect report.
The dialogue box for defect reports you find in the Help menu.

Note: As from SDP3 2.31, the dialogue box is no longer available for use if you are connected to a job type.  Scania CV AB 2017
Communication troubleshooting
• The  instructions& solution for communication errors has been updated. You access the document via the Help menu.
System specifications

CUI –Infotainment system
• Support resume an interrupted download of software has been introduced.

COO – Coordinator
• The new guide verify and check switch modules in the steering wheel according to the version and the vehicle’s SOPS file.
EMS – Engine Management System
• Vehicles with the S8 engine control unit have previously lacked support for Default setting of power take-off adaptation. This has now been rectified.
• The Spark check guide has been removed for vehicles of the P, G, R and S series with Euro 6 gas engine. As the support in SDP3 has been improved, the guide tool is no longer required. Instead, use the Electrical system view for troubleshooting.

RES – Rechargeable energy storage system
• For the sake of clarity and uniformity, the hybrid battery has been changed to propulsion battery in all instances in SDP3.

TMS – Transmission management system
• New parameters have be added to TMS2:
o Clutch monitoring
o Downhill speed control with active prediction
o Reduced use of the clutch (new values)  Scania CV AB 2017
• After a product update of the transmission management system, the Accelerometer adaptation must always be run. It now starts automatically after an update of the control unit.

GMS – Gearbox management system
• A  function guide which shows how the power is transferred in the gearbox for different gears in real time has been added. You can also see how the gear shift forks move and which sleeves are affected.
The guide applies to the following gearboxes:
o GRS905
o GRS905R
o GRSO905
o GRSO905R
o GRSO925
o GRSO925R
o GRSO935
o GRSO936R
The guide also applies to the following transmission management systems:
o OPC4,
o OPC5
o TMS1
o TMS2

CMS – Chassis management system
• A guide for bleeding control circuit 2 has been implemented.
• Circuits, I/Os and the functional description of differential locks has been improved.

TSS/TSA – Tag axle steering system
• Function guides for activating and deactivating service mode have been implemented.  Scania CV AB 2017
• A function guide for checking EST and ESTA has been implemented.
• A new parameter for the centring function has been implemented.

Scania SDP3 2.31.1 car list:

To work with Scania VCI2: can support vehicles after the year 1995:

Scania P, G, R, T, buses Scania series K, N, and other vehicles using engines Scania
To work with Scania VCI3: support vehicles after the year 2004:

trucks, buses and other heavy vehicles, which produces the corporation Scania

In short, Only hardware difference, they can use the same software
Scania vci 3 diagnostic tool highlights its high-speed WI-FI connection

K+DCAN INPA cable do Emergency Flash when flashing interrupted

bmw-inpa-k-can-with-ft232rq-chip-1-600x264

I’m showing you how to do Emergency Flash when your flashing process was interrupted.

i bricked my CD player, got an aftermarket sony and its made a huge difference.

I’m using windows 7 64bit. I’m thinking of doing a fresh install, which i didn’t want to do as i have program dis and inpa working (i say working, program did brick my car).

I use K+DCAN USB cable green board, but of course it is possible also with ICOM. INPA works fine. my program and dis are on virtual machines. I have a copy of ista-p but no icom emulator and am unsure if my cable will work with an emulator. the guy that unbricked my car had an a cable like mine but with a black adapter plug on also, he also had an actual icom and some other box of tricks. It’s hard to find good information.

Here is the how-to’s.

K+DCAN-INPA-cable-do-Emergency-Flash-(1)

Copy NFS notepad to Desktop and open it

K+DCAN-INPA-cable-do-Emergency-Flash-(2)

Change Interface= remote:OBD_abc625 to Interface= STD:OBD

Delete Interface_1, Interface_2, Interface_3 valuesK+DCAN-INPA-cable-do-Emergency-Flash-(4)K+DCAN-INPA-cable-do-Emergency-Flash-(3)

WinKFP starts emergency flash

K+DCAN-INPA-cable-do-Emergency-Flash-(15)K+DCAN-INPA-cable-do-Emergency-Flash-(5)K+DCAN-INPA-cable-do-Emergency-Flash-(6)K+DCAN-INPA-cable-do-Emergency-Flash-(7)K+DCAN-INPA-cable-do-Emergency-Flash-(8)K+DCAN-INPA-cable-do-Emergency-Flash-(9)K+DCAN-INPA-cable-do-Emergency-Flash-(10)K+DCAN-INPA-cable-do-Emergency-Flash-(11)K+DCAN-INPA-cable-do-Emergency-Flash-(12)K+DCAN-INPA-cable-do-Emergency-Flash-(13)K+DCAN-INPA-cable-do-Emergency-Flash-(14)

Note: it won’t work now, because my car is disconnected

Mercedes WIS Online/Offline Vehicle Schema

v2017-7-mb-sd-connect-compact-c4-software-hdd-1-620x264

It was very useful information of Mecedes workshop information system….In WIS online I noticed that it is possible to toggle cable colors between black/white and their respective colors.In my WIS offlineI also have at the moment no possibility to check it.

WIS-online-768x432

WIS-cable-colors-768x432

This only works for newer vehicle schemas.

“Newer” – it works from 204 and up. So from 2007-today.

(But this option does not exist at 202,210,211,220 etc, not for all models.)

To enable the button do the following: (I only can tell you in German, just google for translate if you cannot follow.)

Optionen -> WIS -> Leitungslinien schwarz-weiß anzeigen (uncheck it)

That option is there for all models. It is there even without choosing any model. But it doesn’t do anything.

WIS-all-options-768x396

To be honest, I often prefer Starfinder to WIS for wiring diagrams, pretty much all the diagrams have colours, also reference values and location of components come in nice and handy.but Starfinder is not always right.. WIS is far more accurate.

http://www.eobdii.fr/wholesale/latest-software-hdd-for-mb-sd-c4-for-win7-win10.html