Xhorse VVDI Prog Software Released on 18th Oct

Xhorse VVDI Prog Software Released on 18th Oct
OBDSTAR Series Upgrade Announcement of September
Lonsdor K518ISE Key Programmer avec Odometer Adjustment Support VW 4th 5th immobilization
V1.0 XTUNER AM1011 OBDII/EOBD Plus Code Reader Mise a jour En ligne
2.Support Multi-Language:French,Spanish,Portuguese,Swedish,English
3.Compatible Vehicles
Compatible with All 1996 & newer vehicles (OBDII and EOBD)
How to Program Volvo S60 Smart key by Lonsdor K518ISE
Vehicle and Key Information:
Chip model: Dedicated chip(brand new)
Remote type:433 frequency
Key embryo no.:No.24/38
PIN code requirement:Dismantle & read CEM to backup security data and program
Remote generation:Program smart key complete, remote will automatically generated
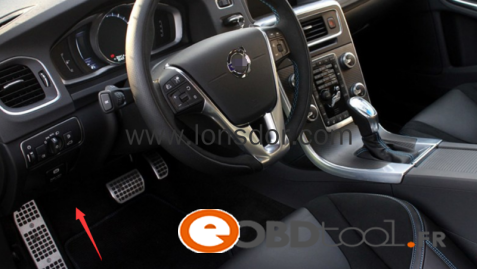
Under the lower-left of the steering wheel:
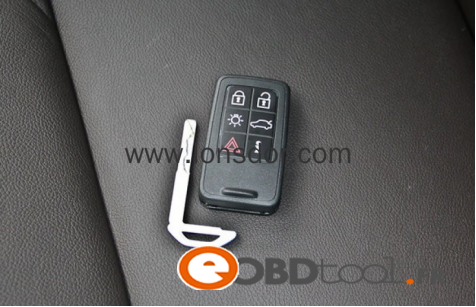
Smart sensor-to-start key (6-button)
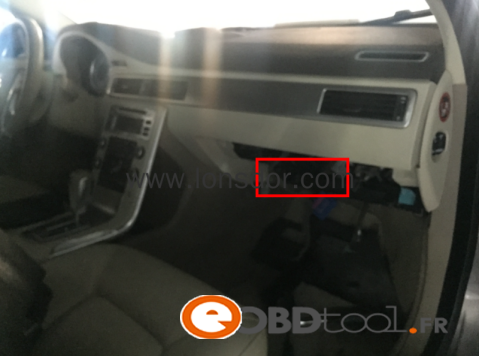
Volvo’s CEM is basically located behind the storage box which is in front of the co-pilot seat
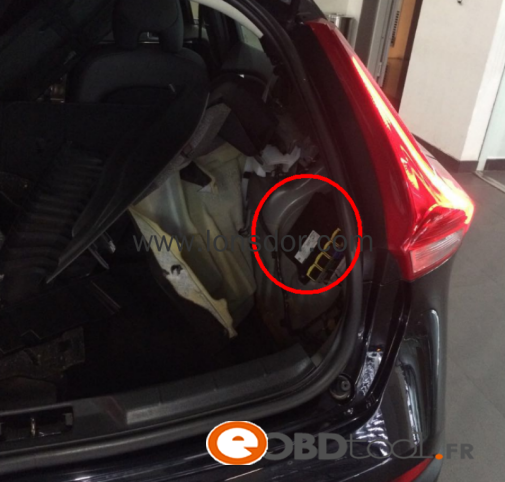
Volvo’s KVM modules are basically located in the trunk, in the right rear wheel position
Function
1. Add smart key: to add a smart key or program on all key lost;
2. Delete smart key: delete the already programmed smart key;
3. Read the CEM security data: dismantle & read CEM to backup security data (this is a must before programming);
4. Read the KVM security data: dismantle & read KVM to backup security data (this is a must before programming);
5. Key identification and unlocking: to detect whether the key is a new unused one. If the remote control is invalid after programming (on condition that the battery has been installed and the remote frequency is correct), try to import the CEM safety data to unlock the key and program again after unlocking.
Note: it can only unlock the CEM safety data of the vehicle or the corresponding vehicle
6. Module identification: identify the body CEM / KVM module status, please do this before all the operation, this function can ensure the module status, and distinguish between full-keyless / half-keyless. In addition, when the safety data backup is completed, and the module has been installed where it should be, please perform “module identification” again just in case and then proceed programming.
Note:
1. When programming Volvo 6-button keys, please be sure to dismantle&read the CEM and KVM first, as to their location and how to read, please refer to the “Operation” or “Reference”
2.First time to use the adapter, you need to bind it with K518ISE. Go to the K518ISE home page and choose “Settings -> Bind adapter”, following the direction to finish binding. One K518ISE host can bind up to 5 adapters, and the bound adapter can not be bound to other K518ISE hosts. Once bound, no need to bind again.
3. For the 6-button key, you need to dismantle & read the CEM in the co-pilot storage box,as well as the KVM in the right trunk to backup security data.
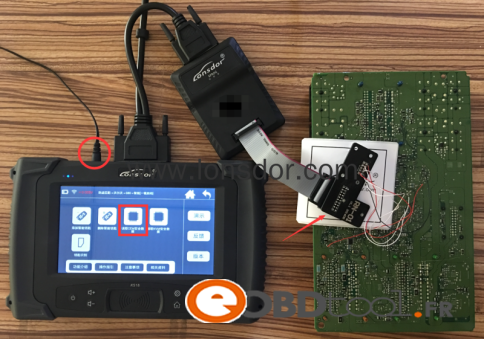
4.Connection between Lonsdor K518ISE host, adapter and RN-01 board :
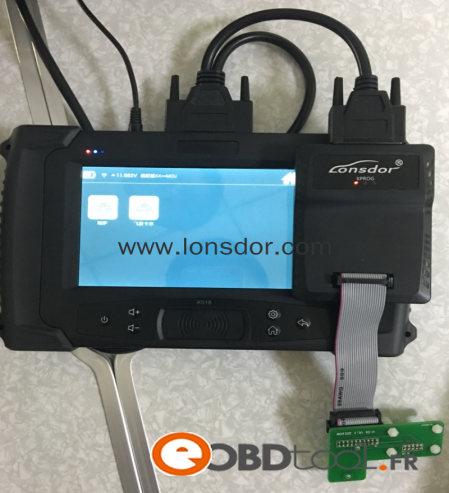
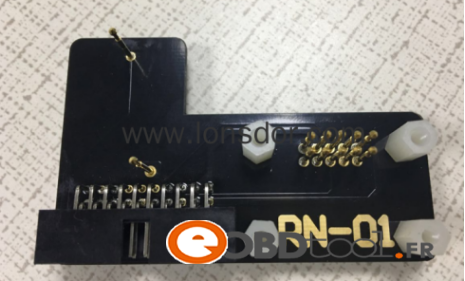
5. Read Volvo CEM please use RN-01 board:
6. Connection between K518ISE host, adapter and FS-01 board:
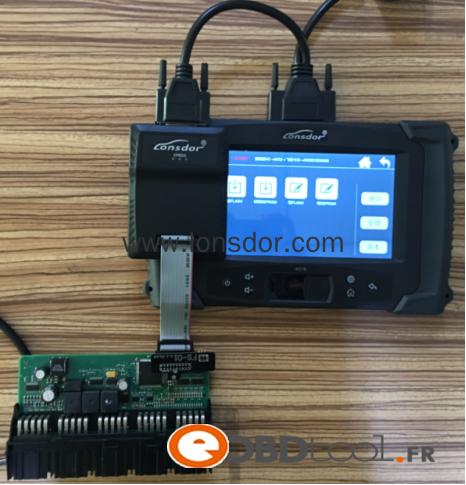
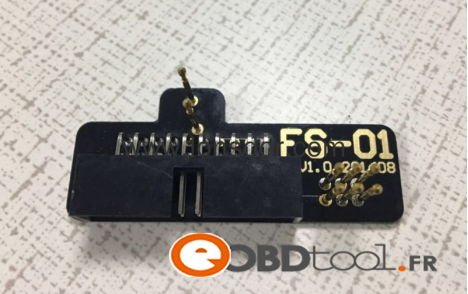
7. Read Volvo KVM please use FS-01 board:
Operation:
Module identification
Before all operation, please connect the car OBD to “Module identification”, which can detect the module (CEM / KVM) status, distinguish if the car is full key-less or half-key-less.
Test status results: (1) Installed. (Indicating that the corresponding module status is normal)
(2) No installation or communication failure. (That the car does not have the corresponding module, or the module status is abnormal)
After the backup of the safety data is completed, install back all the modules accordingly. Please do “Module identification” again, check to ensure that the module is well installed and in normal status. And then do programming operation.
Read CEM security data:
1. Volvo’s CEM are located under the co-pilot airbag on the left, the removal of the co-pilot glove;
Volvo’s CEM is basically located behind the storage box which is in front of the co-pilot seat
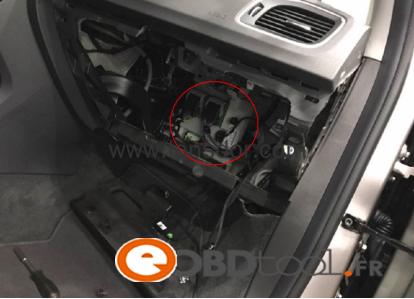
CEM boxes may have the same appearance, but the back of the circuit wire location is different, can be called type A and B .
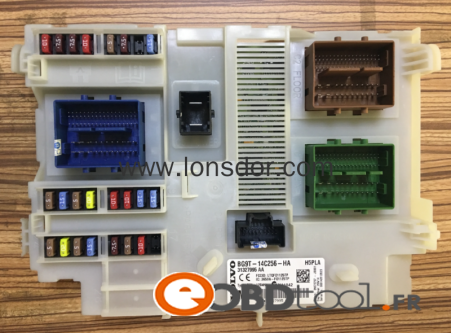
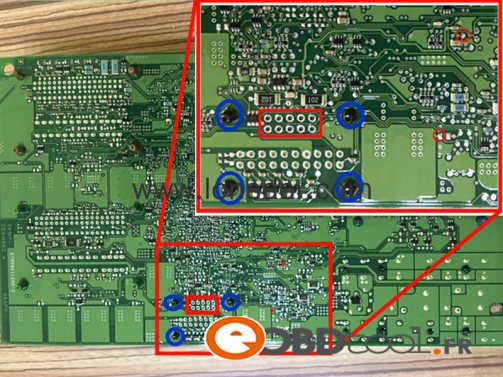
Type A: open the lid, pay attention to the black columns in the blue circle on the back of the circuit board, those are four positioning points, stably match them respectively with the white columns on RN-01 board.
Note: The circuit board is coated with insulating glue, it is required to use the washing plate water to wash it off the blue area of the insulation coating in the contact point (solder joint) , or power can not go through, if the needle of RN-01 board is broken, it will need to wire in the corresponding locations.
(First time to use the adapter, please bind it with Lonsdor K518 ISE host, please refer to”Function”)
Type B: Its circuit is different from that of type B, it requires to wire to read immodata, please refer to below wire instruction:
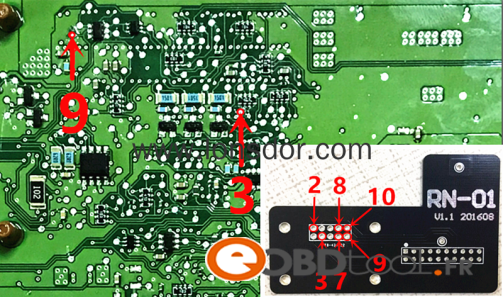
Note: Connect power to read the data, it is required to separate RN-01 board to the motherboard to prevent conduction; welding line should not exceed 15cm.
Read KVM security data:
1. Volvo’s KVM modules are located in the rear of the car rear, right rear wheel position (16 S60L recommended from the right rear door to the wheel direction);
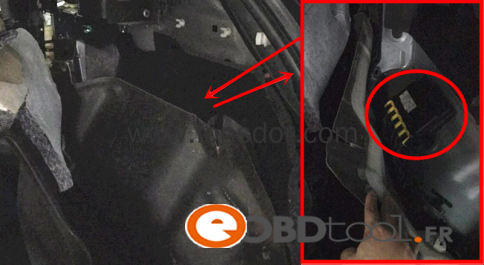
2. Open the module cover, you must first use the washing plate to clean the blue area of the insulation coating,
or power can not go through, please bind it with Lonsdor K518ISE car key progammer host, please refer to”Function”)
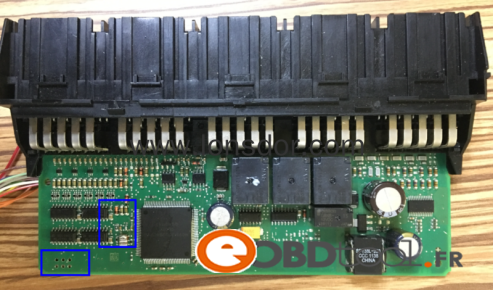
3. The points in the red area are the 8 pin insertion points on the FS-01 board:

Notice
Part of the Volvo KVM data read failure is because the chip model is different, then please:
① use the programmer to read out the data (.bin file);
② Please contact the after-sales (phone / QQ: 4009669130) and send EEPROM data to them, then the engineers will transfer the data into a special file;
③ Then please connect K518ISE to the computer, put the special file into the”file —> feature_35”folder;
④ Please continue programming to select the KVM data from the process.
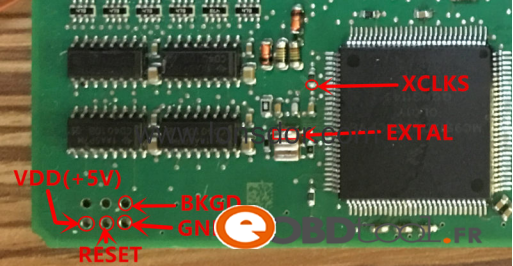
Read KVM data with programmer:
Attention
1. When programming Volvo 6-button key, be sure to dismantle & read the CEM and KVM, as to their location and how to read them, please refer to the “Operation” or “Reference”.
2. It is required to bind the adapter when using it for the first time, you need to bind it with K518ISE. Go to the device home page and choose “Settings -> Bind adapter”, following the direction to finish binding. One K518ISE host can bind up to 5 adapters, and the bound adapter can not be bound to other K518ISE hosts. Once bound, no need to bind again.
3. For 5-button key, you only need to dismantle&read the CEM in co-pilot storage box to backup security data, for 6-button key, you need to dismantle&read the CEM in co-pilot storage box, as well as the KVM in the right trunk to backup security data.
4. For 6-button key, you need to first insert the key into the key slot and then operate according to the directions.
5. Check if the card is locked when it can’t be inhaled in the key slot, locked key can’t be inhaled, a new card generally will not be locked.
6. When install battery to Volvo models, please pay attention that the two batteries are overlapped, separated by a white paper in between, do not just replace the above one.
Disassemble is also very simple, remove the metal key, in the place where the key lies, please find a little knife with not too sharp blade, gently open it from the gap.
Guide to use Lonsdor K518 key programmer to program/add Lamborghini LP560 remote key by OBD. (same procedures are applied to LP550, LP570 Gallardo)
K518 English version-Lonsdor K518ISE is released. Will be available in the end of Oct.
Reference:
OBD Location: Under the steering wheel
Vehicle model: LP550,LP560 LP570 Gallardo

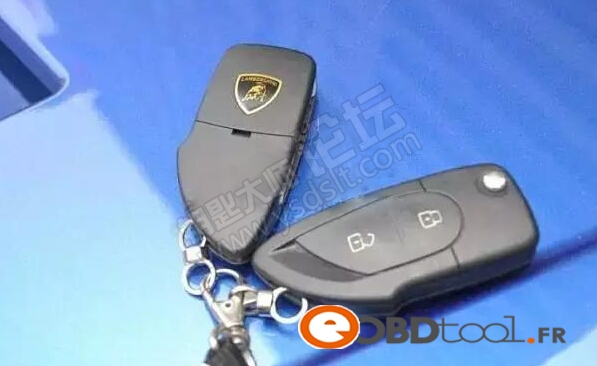
Remote Key type:
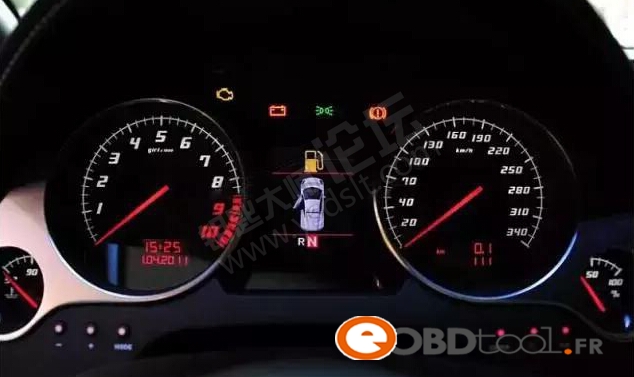
Dashboard type:
Pin code: No need
Remote program: by Lonsdor K518ISE key programmer
Guide:
Step 1: Program remote
Connect K518 host with vehicle
Turn on K518ISE
Select Immobilizer->Lamborghini->LP560
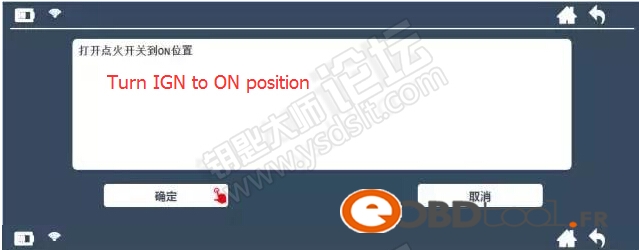
Turn ignition switch to ON position
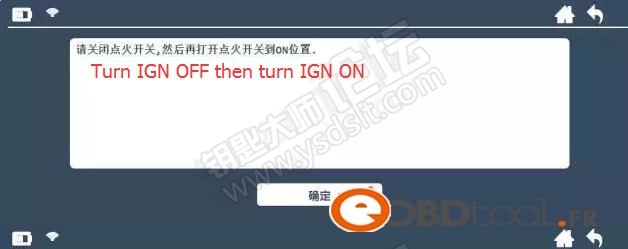
Turn ignition OFF and then turn it ON
Select a remote position to write key (4 position optional/available )
Press on the Unlock button of the remote key for 1s within 5s
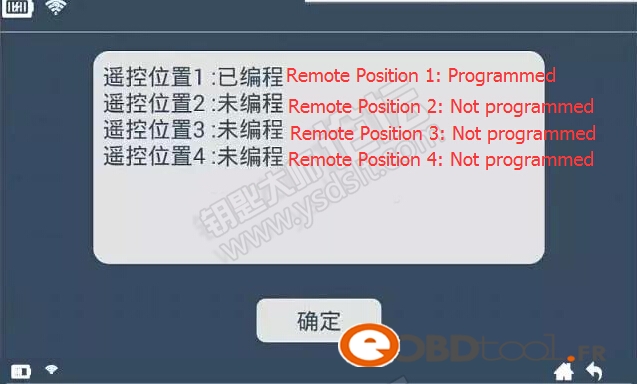
No you can see remote position 1 has been programmed
Processing…
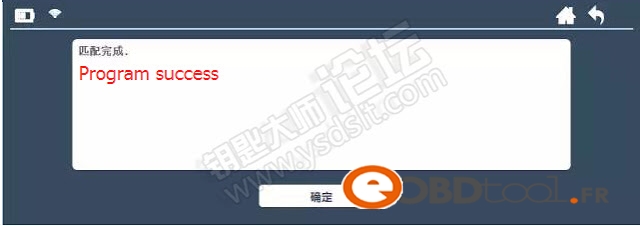
Program remote success.
Step 2: Delete Remote
If 4 remote position are occupied, you can delete remote to program other remote again
Turn ignition switch to ON position
Turn ignition OFF and then turn it ON
Configuring… please wait
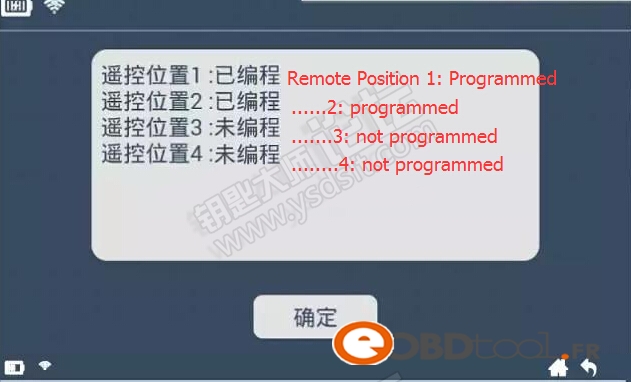
Position 1 and 2 has been programmed
configuring
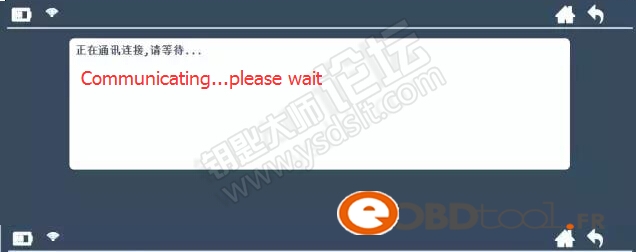
Communicating…
Delete success.


First of all, i’ll tell you this MINI VCI with Techstream works 100% on my 2012 FJ Cruiser! Very pleased with the result, wanted to get rid of the annoying no seat belt warning buzzer.
!!PLEASE BE AWARE!!: This does not work on Windows 7 64 bit.
It will run on Windows 8 32 bit.
It will run on Windows 7 32 bit and was made for Windows XP (Either 32 or 64 bit work excellent)
A previous comment on here says you should be tech savy to use this cable. Very true.
If you have Something other than the previous Operating systems, ie if you have Windows 7 64 bit or Windows 8 64 bit, this WILL NOT WORK Properly. The MVCI driver will NOT install, I can promise you that.
But do not fear, here’s the important thing you need to know. You can get it to work perfectly,you just need a Virtual Machine with a bootable .iso of Windows XP (32 or 64 bit doesn’t matter). Boot that and install this techstream software on the VM, then connect to your car. voila! works.
Oh, 5/5 for this MINI-VCI J2534 cable as an alternative to the OEM $500 Mongoose cable!
important note:
mini vci j2534 software download
toyota tis techstream download
mini vci with techstream
mini vci prius
mini vci for toyota
xhorse mini vci cable
mini-vci j2534 cable
techstream cable and software
CGDI Prog MB user manual: how to program a new key with CGDI Prog key programmer when all Mercedes-Benz W166 keys are lost
CGDI Prog MB how to use:
select Lock (EIS)
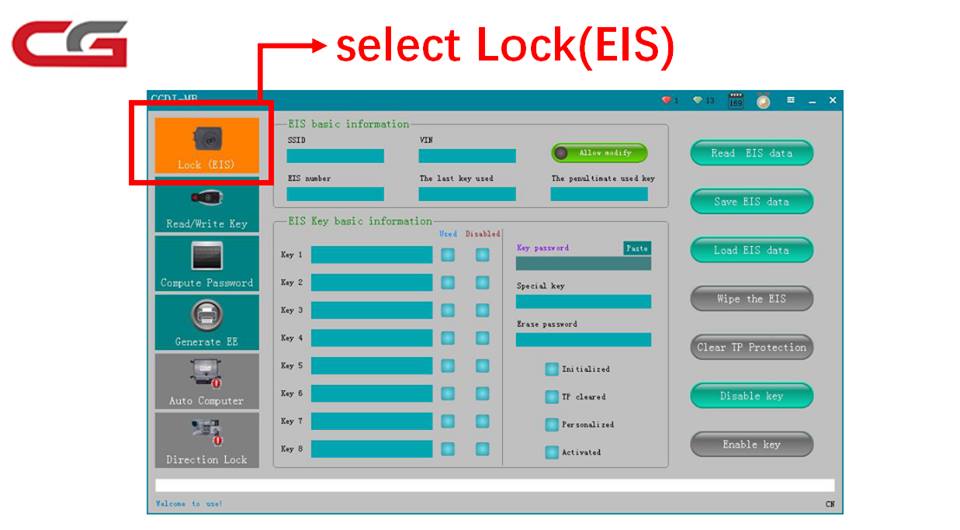
click on Read EIS data
select Compute password
select Copy key without key
click on Collect data
prepare to collect data. pls. don’t move:
waiting to read the lock data
insert the simulation key into the lock
start collecting it will take a long time; do not disconnect the CGDI-MB device
collection completes. pls. save data, then click on Update data
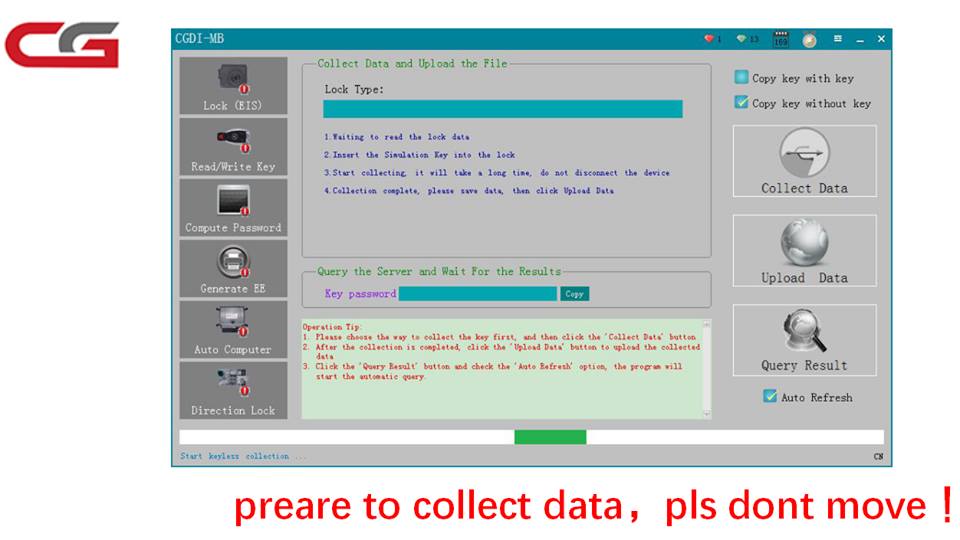
follow CGDI-MB software instruction
collecting data
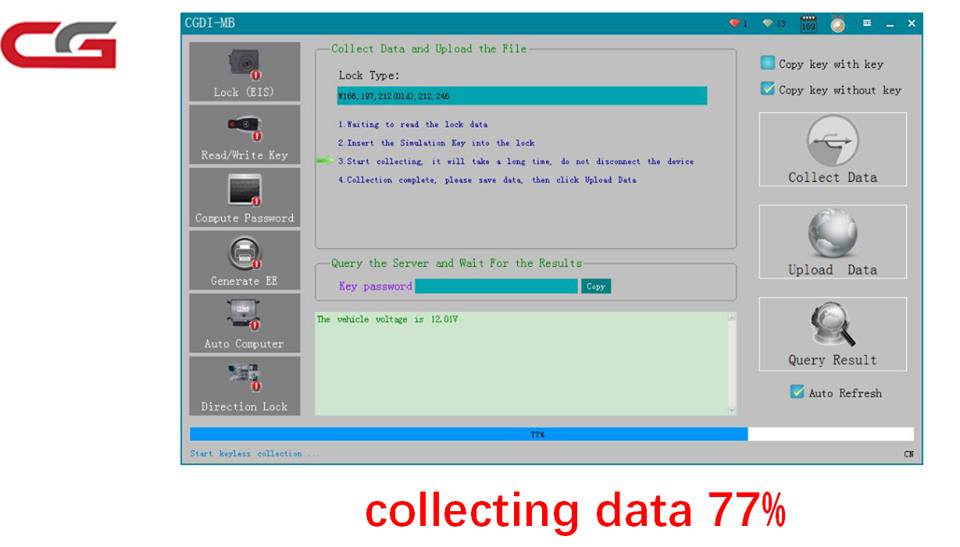
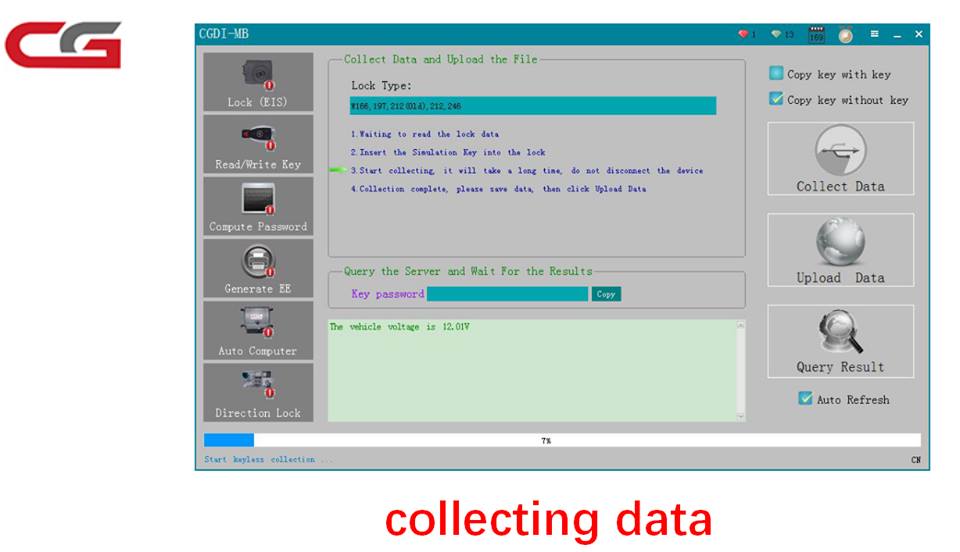
data acquisition success. save data
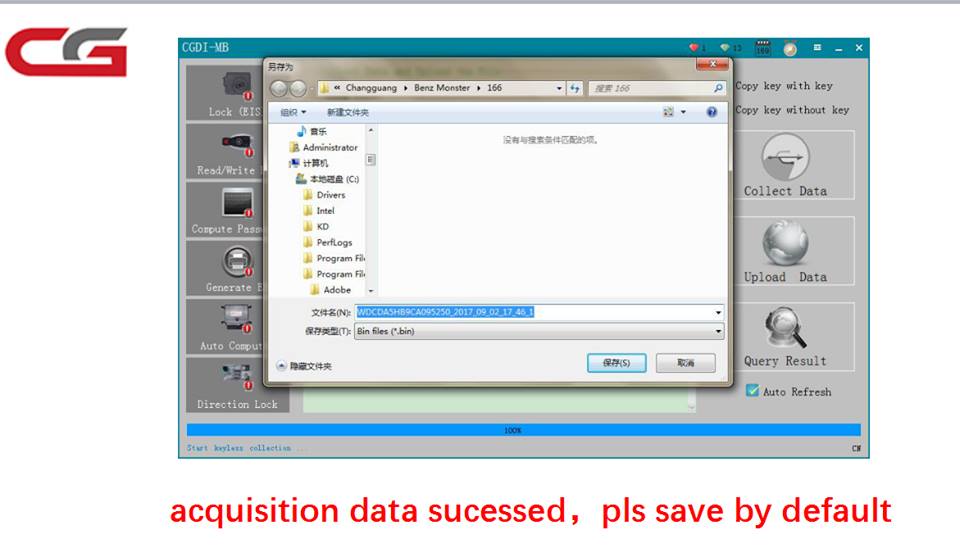
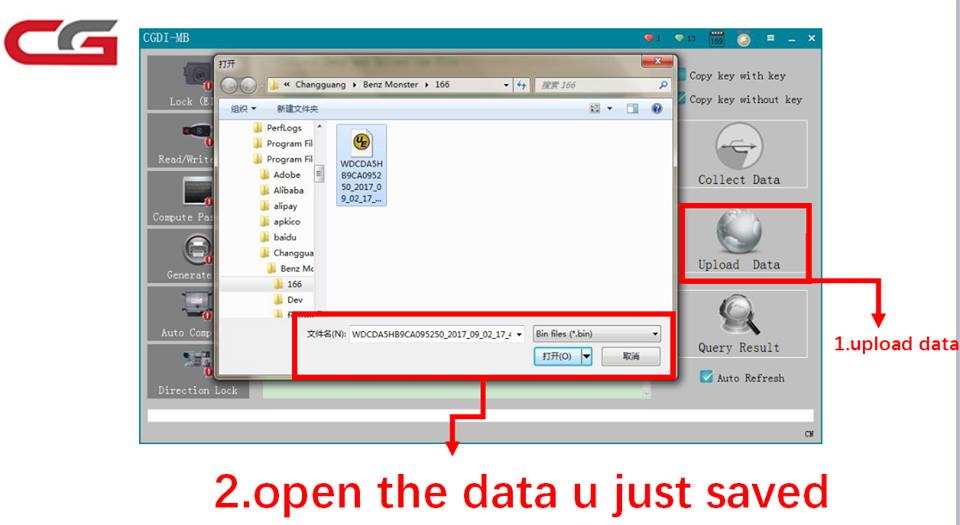
Update data
open data you just saved
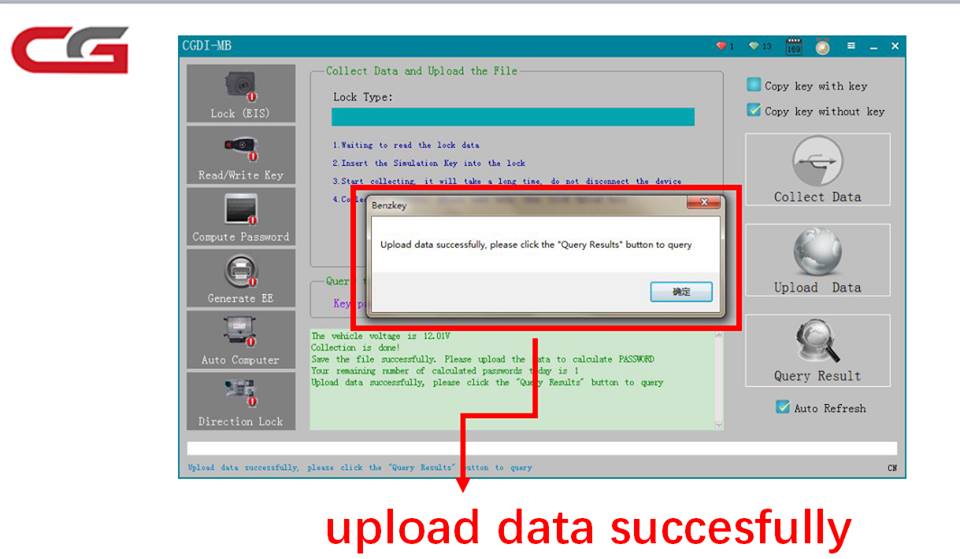
update data successfully
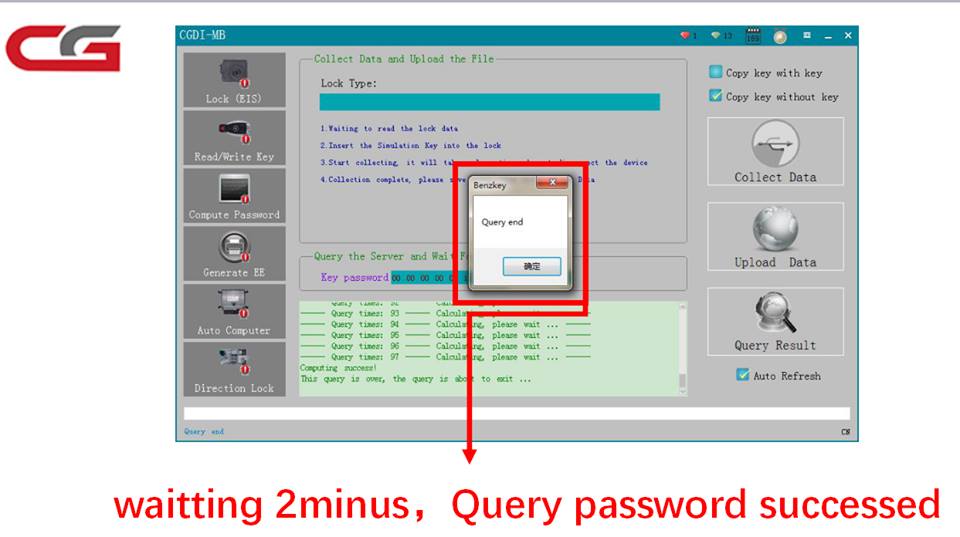
Query password
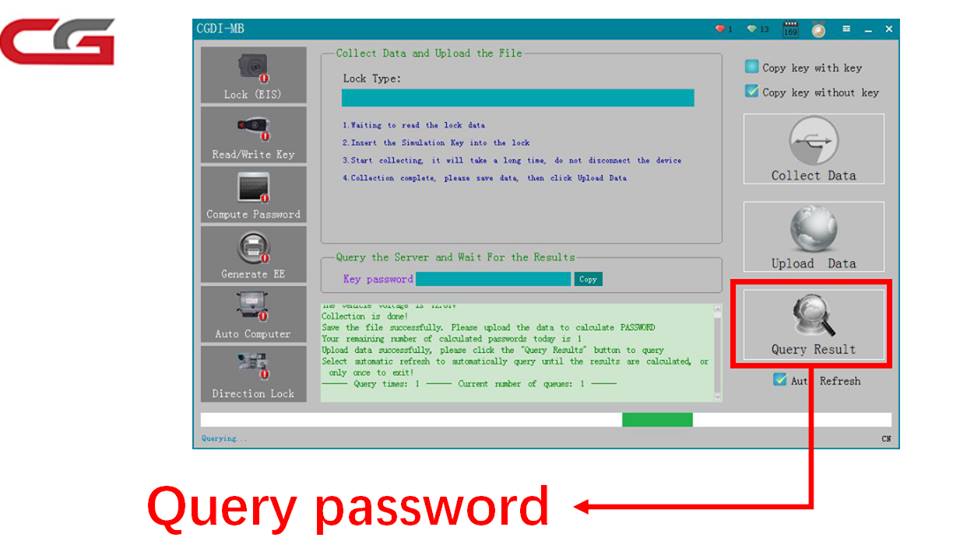
Query end
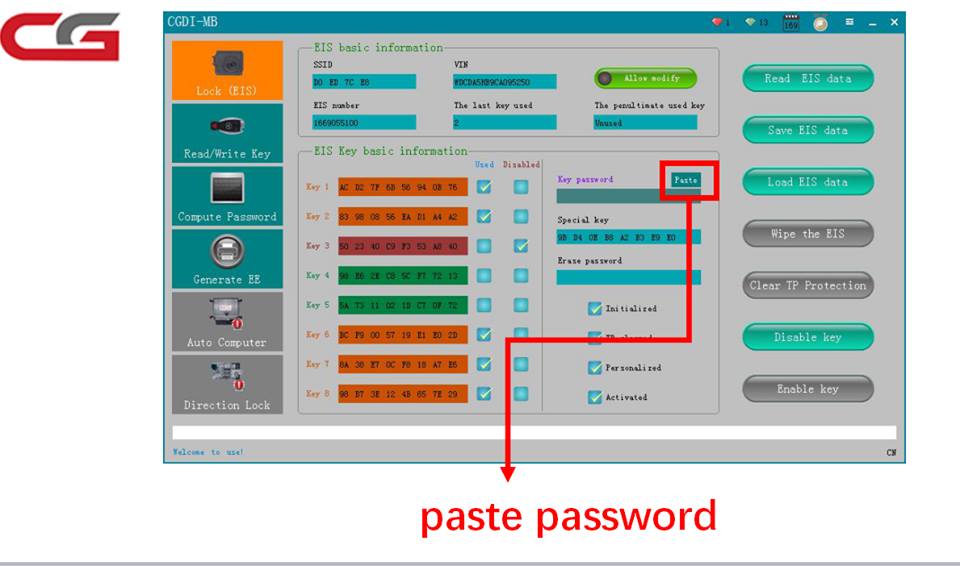
paste password
Done!
Provide solution to MB Star diagnostic SD Connect C4 V2017.9 Xentry OpenShell XDOS installation error “The InstallShield Wizard was interrupted before Xentry Diagnostics Openshell could be completely installed.”
Attach installation error picture:

Possible reasons:
1- from virus
2- or Microsoft Message Queue Service is not enable
Please make sure you do like these tips:
Finally, the problem is solved.
it was the Microsoft Message Queue Service not enabled now is installing fine.


Thanks to http://www.eobdii.fr/ engineer who helped me solve the problem, thumb up for their service.