How to guide of 2017 Autel DS808 registration ?
– Necessary to perform Autel DS808 registration?
– Definitely yes! To get access to the Support platform and obtain update and other services from Autel, you are required to register the Autel scanner DS808 for the first time you use it.
– What you need for the maxidas ds808 registration?
1- autel scanner ds808
2- account id
3- serial number & password
– How to register autel maxidas ds808?
- Go to the website: http://pro.autel.com.
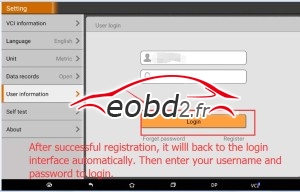
- On the Sign In page, input your account ID and other information to
log in, if you already have an account.
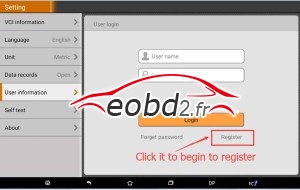
- If you are a new member to Autel and do not have an account yet,
click the Create Autel ID button on the left side.
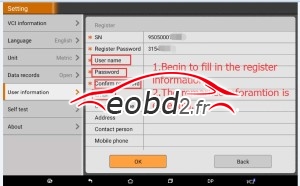
- Enter the required information in the input fields, read through
Autel’s Terms and Conditions and tick on Agree, and then click
Create Autel ID at the bottom to continue.
- The online system will automatically send a confirmation email to
the registered email address. Validate your account by clicking the
link provided through the mail. A product registration screen opens.
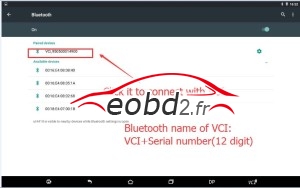
- Find out the scanner’s serial number and password from the About
section of the Settings application on the Display Tablet.
- Select the product model of your DS808 scanner, enter the product serial
number and password on the Product Registration screen, and click on
Submit to complete the registration.
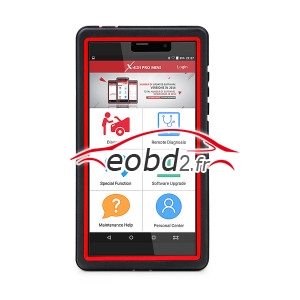
How to use Autel MaxiDAS DS808 diagnostic scanner?
The Autel DS808 diagnostics application allows you to establish a data link to the electronic control system of the test vehicle for vehicle diagnosis. You can operate functional tests, retrieve vehicle diagnostic information such as trouble codes, freeze frame data and live data for various vehicle control systems, such as engine, transmission, ABS, and more. The Vehicle Diagnostics screen has 2 main options:
- Diagnosis – a comprehensive section which includes all available functions: reading, clearing, saving and printing diagnostic information, as well as performing active tests and special functions.
- Hot Function – a separate section designed to perform vehicle scheduled service and maintenance, such as to reset the service lights and perform calibration for various systems.
After a section is selected and the tablet establishes communication with the vehicle, the corresponding function menu or selection menu displays.
Diagnosis
There are two options available when accessing the Diagnosis section:
- Auto Scan – starts auto scanning for all the available systems on the vehicle.
- Control Units – displays a selection menu of all available control units of the test vehicle.
After a section is selected and the tablet establishes communication with the vehicle, the corresponding function menu or selection menu displays.
Auto Scan
The Auto Scan function performs a comprehensive scanning over all the ECUs in the vehicle’s systems in order to locate and retrieve DTCs. The sample operation screen of Auto Scan displays as below:
Control Units
This option allows you to manually locate a required control system for testing through a series of choices. Please follow the menu driven procedures and make proper selection each time. The program will guide you to the diagnostic function menu after a few choices you’ve made.
The Function Menu options vary slightly for different vehicles. The function menu may include:
ECU Information – provides the retrieved ECU information in detail. Tap to open an information screen.
Trouble Codes – includes Read codes and Erase codes functions. Displays detailed information of DTC records retrieved from the test vehicle’s ECU and erases DTC records and other data from the test vehicle’s ECU.
Freeze Frame – displays the freeze frame data of the DCTs.
Live Data – retrieves and displays live data and parameters from the test vehicle’s ECU.
Active Test – provides specific subsystem and component tests. This selection may appear as Actuators, Actuator Test, or Function Tests, etc., and the tests options vary depending on the manufacturer and model.
NOTE
With the diagnostic toolbar on top of the screen throughout the whole diagnostic procedures, you are allowed to make various controls of the diagnostic information at any time, such as printing and saving the displayed data, getting help information, or performing data logging, etc.
How to use Autel MaxiDAS DS808 to perform a diagnostic function:
- Establish communication with the test vehicle.
- Identify the test vehicle by selecting from the menu options.
- Select the Diagnosis section.
- Locate the required system for testing by Auto Scan or through menu driven selections in Control Units.
- Select the desired diagnostic function from the Function Menu.
ECU Information
This function retrieves and displays the specific information for the tested control unit, including unit type, version numbers and other specifications.
The sample ECU Information screen displays as below:
Read Codes
This function retrieves and displays the DTCs from the vehicle’s control system. The Read Codes screen varies for each vehicle being tested. On some vehicles, freeze frame data can also be retrieved for viewing. The sample Read Codes screen displays as below:
Erase Codes
After reading the retrieved codes from the vehicle and certain repairs have been carried out, you can erase the codes from the vehicle using this function.
Before performing this function, make sure the vehicle’s ignition key is in the ON (RUN) position with the engine off.
How to erase codes via Autel DS808 Scanner:
- Tap Erase Codes from the Function Menu.
- A warning message displays to inform you of data loss when this function is applied.
- a) Tap Yes to continue. A confirming screen displays when the operation is successfully done.
- b) Tap No to exit.
- Tap ESC on the confirming screen to exit Erase Codes.
- Perform the Read Codes function again to check if the code erasing is successful.
Live Data
When this function is selected, the screen displays the data list for the selected module. The items available for any control module vary from one vehicle to another. The parameters display in the order that they are transmitted by the ECM, so expect variation between vehicles.
Gesture scrolling allows you to quickly move through the data list. Simply swipe the screen up or down to locate the data you want. The figure below shows a typical Live Data screen:
Display Mode
There are 4 types of display modes available for data viewing, allowing you to view various types of parameters in the most suitable way.
Tapping the drop-down button on the right side of the parameter name opens a submenu. There are 4 buttons to configure the data display mode, and one Help button on the right that you can tap for additional information.
Each parameter item displays the selected mode independently.
1) Analog Gauge Mode – displays the parameters in form of an analog meter graph.
2) Text Mode – this is the default mode which displays the parameters in texts and shows in list format.
3) Waveform Graph Mode – displays the parameters in waveform graphs. When this mode is applied, three control buttons will appear on the right side of the parameter item, allowing you to manipulate the display status.
4) Digital Gauge Mode – displays the parameters in form of a digital gauge graph.
Full Screen Display – this option is only available in the waveform graph mode and mostly used in Graph Merge status for data comparison.
There are three control buttons available on the top right side of the screen under this mode.
How to edit the waveform color and line thickness in a data graph
- Select 1 to 3 parameter items to display in Waveform Graph mode.
- Tap the Zoom-in Button on the right to display the data graph in full screen.
- Select a parameter item on the left column.
- Select a desired sample color from the middle column.
- Select a desired sample line thickness from the right column.
- Repeat step 3-5 to edit the waveform for each parameter item.
- Tap Done to save the setting and exit, or tap Cancel to exit without saving.
Setting Mode in Live Data
Active Test
The Active Test function is used to access vehicle-specific subsystem and component tests. Available tests vary depending on the manufacturer, year, and model, and only the available tests display in the menu.
During an active test, the tester outputs commands to the ECU in order to drive the actuators. This test determines the integrity of the system or parts by reading the engine ECU data, or by monitoring the operation of the actuators, such as switching a solenoid, relay, or switch between two operating states.
Selecting Active Test opens a menu of test options that varies by make and model. Selecting a menu option activates the test. Follow on-screen instructions while performing tests. The content and pattern of the on-screen information vary according to the type of test being performed. Some toggle and variable control tests display Active Test Controls at the top of the screen with data stream information below, or vice versa.
The functional buttons at the lower right corner of the Active Test screen manipulate the test signals. The operational instructions are displayed on the main section of the test screen. Simply follow the on-screen instructions and make appropriate selections to complete the tests. Each time when an operation is successfully executed, message such as “Command Finished”, “Activation Successful”, or something similar displays.
Tap the ESC functional button to exit the test when finished.
Special Functions
These functions perform various component adaptations, allowing you to recalibrate or configure certain components after making repairs or replacement.
The main menu displays the supported special functions for the test vehicle.
Follow the on-screen instructions to complete the desired function. When the operation is done, an execution status message such as Completed, Finished or Successful, displays. Tap the ESC button to exit the function.
Hot Functions
The Service section is specially designed to provide you with quick access to the vehicle systems for various scheduled service and maintenance performances. The typical service operation screen is a series of menu driven executive commands. By following the on-screen instructions to select appropriate execution options, enter correct values or data, and perform necessary actions, the system will guide you through the complete performance for various service operations.
The most commonly performed service functions include:
Oil Reset Service
TPMS Programming Service
EPB Service
ABS/SRS Services
SAS Calibration Service
DPF Regeneration Service
Oil Reset Service
This function allows you to perform reset for the Engine Oil Life system, which calculates an optimal oil life change interval depending on the vehicle driving conditions and climate. The Oil Life Reminder must be reset every time the oil is changed, so the system can calculate when the next oil change is required.
Tire Pressure Monitor System (TPMS) Service
This function allows you to quickly look up the tire sensor IDs from the vehicle’s ECU, as well as to perform TPMS programming and reset procedures after tire sensors are replaced.
Electric Parking Brake (EPB) Service
This function has a multitude of usages to maintain the electronic braking system safely and effectively. The applications include deactivating and activating the brake control system, assisting with brake fluid control, opening and closing brake pads, and setting brakes after disc or pad replacement, etc.
ABS/SRS Services
This function allows you to perform various bi-directional tests to check the operating conditions of both the Anti-lock Braking System and the Supplemental Restraint System, such as Automated Bleeding, Pump Motor Test, and checking Module information, etc.
Steering Angle Sensor (SAS) Service
This service function allows you to perform calibration for the Steering Angle Sensor, which permanently stores the current steering wheel position as the straight-ahead position in the steering angle sensor EEPROM. On successful completion of the calibration, the steering angle sensor fault memory is automatically cleared.
DPF Regeneration Service
The Diesel Particulate Filter service function performs the regeneration procedure which is the DPF cleaning operation to clear the blockage through continuous burning of the particulate matter captured in the DPF filter. If the DPF light on the vehicle comes on and you successfully complete a DPF regeneration cycle, you will notice that the DPF light will automatically turn off.