Tag Archives: vxdiag

VXDIAG VCX NANO FordECU Programming: 100% Success

This is Ford IDS Online Programming Service, incl. how to register an programming account , what kind of Ford diagnostic tool should use and how to use it for Ford ECU programming online. Hope this write-up helps.

I am using VXDIAG VCX NANO Ford, AllScanner

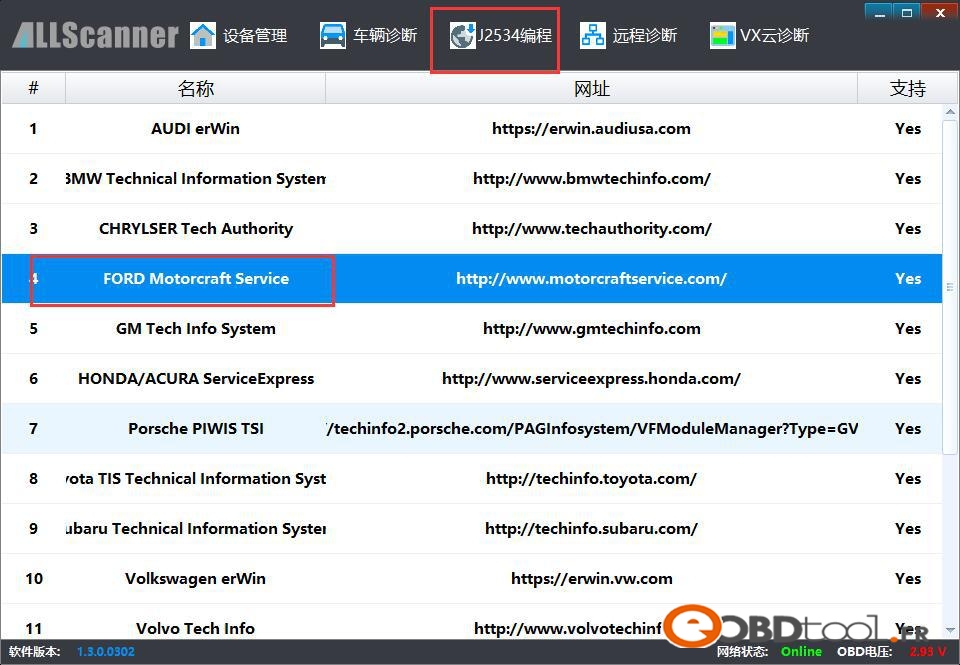
Go to J2534 Programming

Http://www.motorcraftservice.com/ FORD Motorcraft Service

The official site to register my account

ford-pcm-programming-account-register

Online programming account only

Have good success on 2005 Ford Escape 3.0 V6

PCM programming online zero issues!!!

P.S, tips i followed:

How to do FORD PCM PROGRAMMING:

scope & scan scopes PCM Ford PCM vehicle diagnostics repair shop training technician training automotive aftermarket

Programming Ford electronic control units (ECUs) is pretty straightforward and simple compared to many other OEMs. However, Ford does do one thing differently than most other OEMs. The normal Ford programming procedure has you “inhale” (read and store) the As Built data from the old ECU to the scan tool so that these As Built vehicle specific production and calibration details can then be transferred to a new, remanufactured or salvaged ECU you are installing.

A complication arises when you are attempting to replace an ECU that is dead or not communicating with the scan tool or programming device. In this instance, you are going to have to use a different method of telling the replacement ECU what the needed As Built data information should be. The Ford recommended procedure for this is stated as:

“Programmable Module Installation (PMI) must be performed when replacing module. If the information cannot be inhaled from the original module, As-built data must be used to properly configure module”

This procedure requires purchasing a per use subscription for all ECUs, except the PCM, from the Ford Motorcraft website, http://www.motorcraftservice.com. Once purchased you use the vehicle identification number (VIN) to acquire the As Built data for the particular ECU you are replacing. This As Built data is actually multiple lines of hexadecimal numbers entered into dialogue boxes in the programming software. We will describe this process for Ford ECUs in next month’s column. For this months column we will describe a quicker method than acquiring the As Built hex info to install a replacement powertrain control module (PCM) in a Ford vehicle where the old PCM is damaged and not communicating. All we need do is tell a little white lie to the scan tool or programming device!

To accomplish this trick, connect your Ford diagnostic toolor Flash programming device to the diagnostic link connector (DLC). Leave the ignition key in the OFF position. While the key is off, attempt to connect with the vehicle using your tool’s software. The programming software will show a status bar for 45 seconds while it attempts communication with the vehicle. Of course, the communication attempt will fail because the key is off! It will then ask you to turn the key off and on again as it again attempts to communicate with the vehicle. After this process completes the software will ask you if you want to make another attempt. Choose no to this query.

You are then asked to choose from a list of vehicles to communicate with. Typically, your choice on this page will be “all other” shown on the top of the list as the rest of the list are non-domestic vehicle models

ford-pcm-programming-service-vxdiag-vcx-nano-1

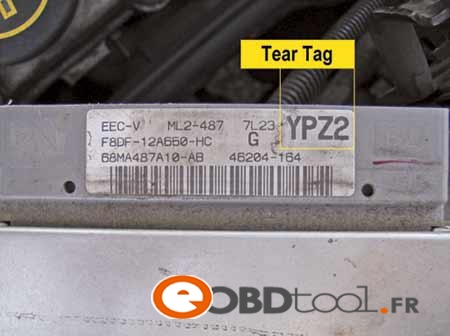
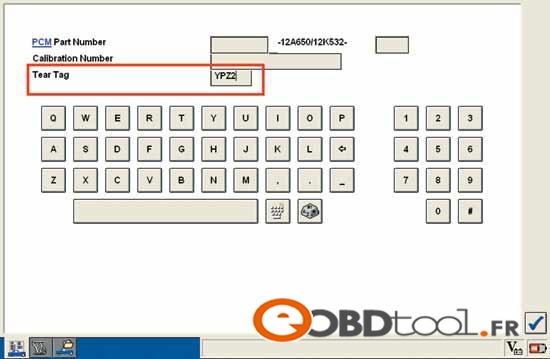
The software will explain that you must provide some numbers from the actual ID label on the old PCM in order for the software to identify the vehicle you intend to communicate with. Use the actual PCM’s label shown here if Figure 1 to gain the information you need. As you can see in screen shot shown in Figure 2, there are three sets of data fields you can use. You need only use one of these data fields to get the job done. I use the Tear Tag number because it is the easiest. In our example, we take the YPZ2 shown on the PCM label in figure 1 and type it into the Tear Tag data field as shown in Figure 2.

ford-pcm-programming-service-vxdiag-vcx-nano-2

The next screen shown will ask you to enter the VIN and mileage. This VIN information is important if your state has an OBDII inspection program requiring a VIN read from the DLC for positive vehicle identification purposes so do not skip this step.

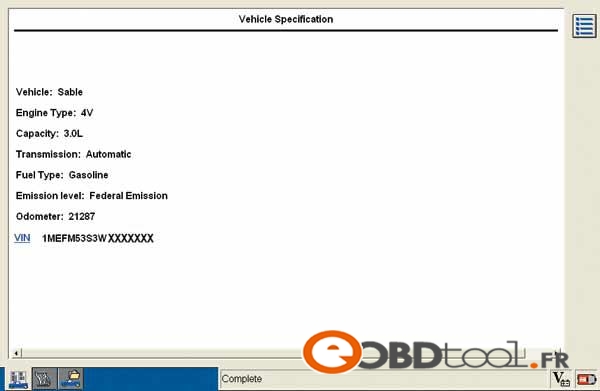
Once the vehicle is properly identified as shown in Figure 3, you can use the normal PCM replace and program procedure. You may be asked to provide a couple of other pieces of information like tire size or whether the vehicle has four-wheel drive or not.

ford-pcm-programming-service-vxdiag-vcx-nano-3

ALLSCANNER Cloud diagnostics Installation Step

ALLSCANNER Cloud diagnostics Installation Step

Note:Recommended using Microsoft WIN7 or
more of the system. Computers are required to
install the Microsoft IE11 browser or Google.
Android and IOS systems are not supported
for the time being。
1.Installation of ALLSCANNER device driver
management“VX MANAGER”;

1

2

Here nothing to choose, directly point “NEXT”
go down

3

4

5

2.Connected to the diagnostic equipment, the
computer automatically install the driver

6

3.The driver installed after open the “VX MANAGER”,
select the top menu VX CLOUD”;

7

Point open “start cloud diagnostics” will automatically
open the default browser, enter the cloud diagnostics

page, enter the dealer to the account and password;

8

9

4.Select the required models in the main interface
Icon

10

Select “Open Cloud diagnostics” and enter the cloud
server(Note: to enter the cloud server must be
connected to the device);

11

12

13

14

15

5.Open diagnostic software for vehicle diagnosis

16

17

18

VXDIAG VCX NANO pour Jaguar Land Rover FAQ

Post est sur VXDIAG VCX NANO pour Jaguar Land Rover configuration instruction, conseils, mise à jour et FAQ, toutes les infos ici, s’il vous plaît continuer pour vérifier.

Partie 1: VXDIAG Nano pour Jaguar Land Rover Foire aux questions-

Q: qui mieux parmi les VXDIAG VCX NANO pour Jaguar LandRover, JLR Mangoose DDI (Point No.SP116, SP205) et VCM2

UNE:

1) Avoir un même logiciel et effectuer même fonction.

2) Differ dans le matériel et utiliser des pilotes différents

3) VXDIAG VCX NANO fonctionnalité intéressante est le firmware ne sera jamais verrouillé (contrairement à VCM2 DDI pour JLR).

Q: Je l’ai suivi les instructions d’installation, mais DDI ne démarre pas, des idées ?? Installé sur Win 7 Pro 32bit, que le pilote du gestionnaire de vx installé, aucun rapport d’erreur et pas de captures d’écran d’erreur. Installez était OK, tout fonctionne jusqu’à l’ouverture sdd, alors rien?

A: Votre Interface VXDIAG VCX NANO est pas branché dans la prise de diagnostic véhicule avant d’exécuter le logiciel DDI.

A: Est-ce que la SDD VXDIAG pour JLR soutenir les modèles diesel?

Q: Oui, il prend en charge les diesel et les modèles à essence.

Q: Est-ce que la nouvelle VXDIAG SDD soutenir à la fois la programmation en ligne et hors ligne? Dois-je payer un paiement supplémentaire?

A: reprogrammation La nouvelle SDD fera (antidémarrage programmation en ligne nécessite compte Jaguar Autre programmation ne fait pas besoin de le faire en ligne, mais vous devez vous connecter la batterie de stockage pour vous assurer que votre tension est stable.)

Q: Quelle année couvre la nouvelle SDD ne? Fera-t-Jaguar 2015?

A: La SDD soutient 2005 à 2014 modèles de Jaguar et Land Rover.

Q: Je l’ai regardé et installé selon vide, ce qui permet en mode hors-ligne pour travailler pendant une journée, puis il ne fonctionne pas?

A: Pour tous les logiciels JLR après V137, ils ne peuvent plus supporter la programmation hors ligne, seule la programmation en ligne.

Q: Est-il en charge la langue néerlandaise?

A: Oui, le VXDIAG DDI supporte plusieurs langues, includingEnglish/Japanese/Portuguese/Romanian/Korean/Dutch/Polish/Turkish/Spanish/French/Italian/Croatian/Danish/German/Swedish/Finnish/Slovenian/Czech/Russian/Greek/Chinese.

Q: Quand il caméra arrière actif et phare sur 2012 range rover evoque, je veux modifier le fichier CCF, peut Vxdiag pour JLR effectuer?

R: Oui, vous pouvez avoir un essai.

JLR SDD V143 for VXDIAG VCX NANO install notice

vxdiag-vcx-nano-for-land-rover-and-jaguar-wifi-version-new-1-300x300

Le système d’exploitation:
Windows XP

Préparation
Remarque: s’il vous plaît débranchez la connexion Internet lors de l’installation et l’utilisation de JLR143.
Cliquez sur l’icône d’ordinateur portable sur la barre de menu du bureau pour ouvrir la connexion réseau.
Désactivez toutes les connexions réseau Connexion au réseau local et connexion réseau sans fil

Partie 1 Installez SDD
Ouvrez le Poste de travail >> 143-1 (F :), de copier “Driver” “DF5td” “DFStd_KEY” sur le bureau.
Ouvrir “SDD143.00_FULL”.
Choisir la langue d’installation pour continuer.
Cliquez sur Oui pour redémarrer votre ordinateur.
Cliquez sur Suivant.
Installation …

Cliquez sur Suivant pour installer SDD.
Sélectionnez «Je l’accepte … accord” et cliquez sur Suivant.
Cochez sur «Je l’ai lu et compris …” et cliquez sur Suivant.
Destination: cliquez sur Suivant.
Langues: Cliquez sur Suivant.
Cliquez sur Installer pour commencer l’installation.
Installation SDD …

Cliquez sur Suivant pour installer M0XA UPort 1110/1130/1150 pilote Windows.
Lieu de destination: cliquez sur Suivant.
Dossier Menu Démarrer: cliquez sur Suivant.
Cliquez sur Installer pour commencer l’installation.
Installation M0XA UPort 1110/1130/1150 pilote Windows.
Cliquez sur Terminer pour l’installation de M0XA UPort 1110/1130/1150 pilote Windows.
Allez sur l’installation SDD …
Cliquez sur Terminer lorsque l’installation réussie de SDD et redémarrez votre ordinateur.

Partie 2 Installez VDF_JA
Ouvrez le Poste de travail >> 143-1 (F:) >> VDF_JA_143.
Choisissez la langue d’installation.
Installation …
Cliquez sur Terminer après avoir installé avec succès VDF_JA.

Partie 3 Installez VDF_JV
Fermez toute l’interface, et de rouvrir mon ordinateur >> 143-2 (F:) >> VDF_JV_143.
Choisissez la langue d’installation.
Installation …
Cliquez sur Terminer après avoir installé avec succès VDF_JV.

Partie 4 Installez Tests de Pinpoint supplémentaires
Ouvrez le Poste de travail >> 143-2 (F:) >> SPA_143.
Prompt: Tests de Pinpoint supplémentaires seront installés comme une tâche de fond. Cliquez sur OK.
Installation Tests de Pinpoint supplémentaires …. (attendre pendant environ 1 heure)
Cliquez sur Terminer après l’installation Tests de Pinpoint supplémentaires.

Partie 5 Installez SDD 143.01.001
Fermez toute l’interface, et de rouvrir mon ordinateur >> 143-3 (F:) >> SDD 143.01.
Cliquez sur Oui pour redémarrer votre ordinateur.
Installation SDD 143.01 …
Cliquez sur Terminer après l’installation SDD 143.01.001, et redémarrez votre ordinateur.

Partie 6 Installez VDF_LA
Fermez toute l’interface, et de rouvrir mon ordinateur >> 143-3 (F:) >> VDF_LA_143.
Choisissez la langue d’installation.
Installation …
Cliquez sur Terminer après l’installation VDF_LA.

Partie 7 Installez VDF_LV
Ouvrez le Poste de travail >> 143-3 (F:) >> VDF_LV_143.
Choisissez la langue d’installation.
Installation …
Cliquez sur Terminer après l’installation VDF_LV.

Partie 8 Installez VX Gestionnaire
Ouvrez le pilote sur le bureau, puis à ouvrir VX Manager1.0.5.0612.
Cliquez sur Suivant pour installer VX Manager1.0.5.0612.
Cliquez sur “I accept the agreement” et Suivant.
Cliquez sur Suivant.
Installation du gestionnaire VX …
Installation VCX SDK Driver …
Cliquez sur Fermer lorsque l’installation complète.
Cliquez sur Terminer lorsque VX Manager est installé avec succès.
Redémarre ton ordinateur.

Partie 9 Installez le logiciel USB …
Assistant de nouveau matériel détecté: cliquez sur Suivant, avec une sélection de “install … (Recommander)”.
Installation …
Cliquez sur Terminer pour installer des logiciels pour le convertisseur USB de série.
Assistant de nouveau matériel détecté: cliquez sur Suivant, avec une sélection de “install … (Recommander)”.
Installation …
Cliquez sur Terminer pour installer des logiciels pour USB Serial Port.
Faites un clic droit sur Poste de travail pour Gérer.
Sélectionnez Gestionnaire de périphériques >> Ports (COM et LPT) >> USB Serial Port (COM4).
Ensuite, la gestion de l’ordinateur à proximité.

Partie 10 Installez JLR SDD
Gestionnaire de VX ouverte sur le bureau

Partie 11 Run JLR SDD
Ouvrez JLR SDD sur le bureau.
Fermer l’installation de Windows Internet Explorer 8 interface.
Internet Explorer – Moteur de recherche par défaut: cliquez sur OK.
Gérer les modules complémentaires: cliquez sur Fermer